What happened
On 16 December 2013, at about 1215 Eastern Standard Time, a de Havilland DH82A (Tiger Moth) aircraft, registered VH-TSG, took off from the operator’s airstrip at Pimpama, Queensland with a pilot and passenger on board. The purpose of the flight was to conduct a commercial joy flight in the Gold Coast area. At about 1224, 1 minute after the pilot commenced aerobatics, the left wings failed and the aircraft descended steeply; impacting the water about 300 m from the eastern shoreline of South Stradbroke Island. The aircraft was destroyed, and the two occupants were fatally injured.
What the ATSB found
The ATSB found that both of the aircraft’s fuselage lateral tie rods, which assist in transferring flight loads through the fuselage, had fractured. The location of the fracture coincided with areas of pre-existing fatigue cracking in the threaded sections of the rods, near the join with the left wing. The tie rods fractured during an aerobatic manoeuvre, resulting in the left lower wing separating from the aircraft and subsequent in-flight break-up. The ATSB also found that the tie rods were aftermarket parts manufactured under an Australian Parts Manufacturer Approval (APMA). In this respect, safety issues were identified in areas of the tie rods’ design and manufacture, as well as in the supporting regulatory approval processes. Safety issues were also identified in the maintenance and operation of the aircraft.
What's been done as a result
The ATSB consulted with the Type Design Organisation, regulators and investigation authorities from Australia, New Zealand and the United Kingdom about the failure of the APMA tie rods, which occurred well before the published retirement life for Tiger Moth tie rods. In response, the United Kingdom Civil Aviation Authority issued an airworthiness directive on 21 March 2014 that mandated the removal from service of all tie rods produced by the same Australian manufacturer. The airworthiness directive was subsequently also mandated by the Australian Civil Aviation Safety Authority and the New Zealand Civil Aviation Authority. Significant additional safety action is proposed by the Type Design Organisation to further enhance the safety of all Tiger Moth operations. In addition, the ATSB has issued a safety recommendation to the Civil Aviation Safety Authority to take action to provide assurance that over 1,000 other parts approved for APMA at about the same time as the tie rods were appropriately considered before approval.
Safety message
This accident emphasises the need for the full consideration of a part’s service history when redesigning and manufacturing parts critical to the structural integrity of the aircraft. It also shows the important role of the regulator in ensuring that parts approved under an APMA have been fully considered and shown to comply with the design requirements. Further, in the context of maintenance, it shows the importance of utilising genuine or approved substitute aircraft parts that are suitable for purpose, especially in sections of the aircraft that are critical to flight.
In addition, the ATSB cautions commercial vintage aircraft operators about the risks associated with aircraft age and the importance of understanding the originally-intended use of the design before commencing their operations.
Tiger Moth aircraft VH-TSG
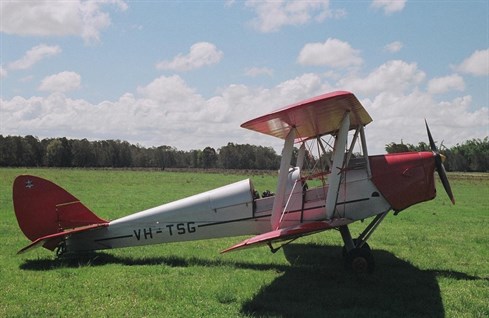
Source: David Welch, Air-Britain Photographic Images Collection
On 16 December 2013, at approximately 1215 Eastern Standard Time,[1] a de Havilland DH82A (Tiger Moth) aircraft, registered VH-TSG, took off from the operator’s airstrip at Pimpama, Queensland with a pilot and passenger on board. The purpose of the flight was to conduct a commercial joy flight in the Gold Coast area. The operator reported that, as part of such joy flights, aerobatics were conducted above the South Stradbroke Island area at about 3,500 ft above mean sea level.
Video footage obtained from a fixed, on-board camera (see Recorded information) showed that about 8 minutes after take-off, the aircraft commenced aerobatic manoeuvres. About 1 minute later, during an aerobatic manoeuvre, the left wings failed.
Two witnesses observed the final moments before the aircraft impacted the water about 300 m to the east of South Stradbroke Island. Neither witness observed the prior operations of the aircraft. One witness was working at Sovereign Waters, about 4.5 km south-south-west of the accident site, and was on a mobile telephone call when he observed the aircraft descending straight down at high speed before losing site of the aircraft behind trees. The witness’s telephone recorded the time of the call as 1224.
The other witness was a surf lifesaver who was conducting a beach patrol in the local area on a jet ski, just to the south of the aircraft. Upon observing the aircraft impact the water, the surf lifesaver informed his companion, also on a jet ski, and they arrived at the site of the accident as the tail of the aircraft submerged below the surface of the water. The lifesavers notified emergency services and remained on-site to assist the police with locating the wreckage.
The aircraft was destroyed, and the two occupants were fatally injured. Figure 1 shows the aircraft’s point of take-off, the location of the witnesses, and the location of the aircraft when it impacted the water.
Figure 1: Location overview showing the operator’s airstrip, the position of the witnesses and the location of the impact with the water
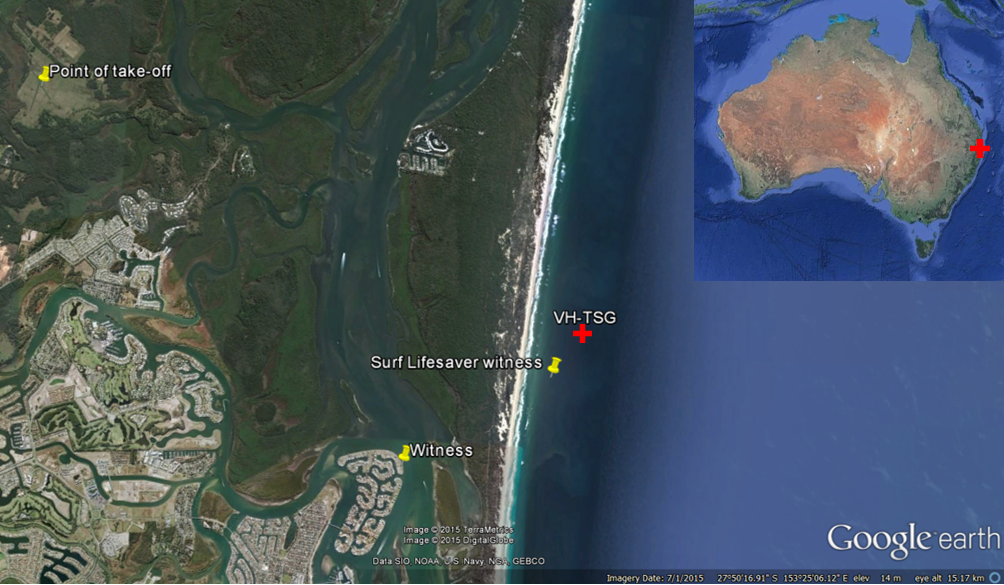
Source: Google earth, modified by the ATSB
__________
Pilot information
General information
The pilot held a Commercial Pilot (Aeroplane) Licence that was issued on 12 February 2010. The pilot’s logbook indicated that he obtained a spin endorsement on 1 December 2008 and an aerobatics endorsement on 2 March 2009. The aerobatics endorsement authorised the pilot to conduct loops, barrel rolls, humpty bumps[2], stall turns and spins, all at altitudes not below 3,000 ft above ground level (AGL).
During a series of flights to gain initial experience on Tiger Moth aircraft, the pilot demonstrated competence in spins, barrel rolls, loops and wingovers, and his logbook was appropriately endorsed on 19 July 2013. The pilot’s logbook, when integrated with a notebook of his hours logged,[3] showed a total flying experience of 1,188.4 hours as of 15 December 2013. His total experience on the Tiger Moth was 187.3 hours. In the previous 90 days, the pilot had flown 97.5 hours on type, and in the previous 30 days he had flown 18.8 hours on type.
Medical information
The pilot held a valid Class 1 Medical Certificate with no restrictions. His last medical examination was conducted on 8 July 2013. The pilot was reported to have been well rested and in good health on the morning of the accident.
A post-mortem examination of the pilot did not identify any pre-existing medical conditions that may have contributed to the accident.
Aircraft type information
General
The de Havilland DH82A Tiger Moth aircraft is a two-seat tandem biplane with fixed undercarriage comprising two main wheels and a tail skid or tail wheel. The aircraft was fitted with a four-cylinder piston engine driving a two-bladed, fixed-pitch wooden propeller. The aircraft’s structure is primarily fabric-covered metal and timber.
Thousands of Tiger Moth aircraft were built, mainly in the United Kingdom (UK), Australia, and Canada. At the time of the accident, there were 211 Tiger Moth aircraft registered in Australia.
Airworthiness design standard
The DH82A Tiger Moth is a foreign-designed aircraft that was accepted for Australian civil purposes under Civil Aviation Safety Authority (CASA) Type Acceptance Certificate (TAC) No. A132. The UK, as State of Design, did not issue formal Type Certificates in the 1930s when the DH82A was first introduced. However, the UK Civil Aviation Authority (CAA) permits its operation under Airworthiness Approval Note (AAN) No. 22556. That AAN was originally issued on 3 September 1990 for UK registration GANDE; however, the paragraph labelled ‘10.0 Approval’ of issue 9 of the AAN notes that the AAN is also applicable to all other de Havilland DH.82A aircraft. The AAN listed the ‘Basis of Certification’ as follows:
The Tiger Moth was built as a training aeroplane for the RAF in 1931 and has been in operation since that time. Approval of this aeroplane is based upon the known satisfactory operating experience of the type, and the fact that the type is supported by a currently CAA Approved company (de Havilland Support Ltd).
The contemporary civil design code for the Tiger Moth was reflective of its 1930s military design code. However, there was no recognised civil airworthiness design standard, such as the United States (US) Federal Aviation Regulations or the British Civil Airworthiness Requirements, applicable to the DH82A Tiger Moth.
Section 9 of AAN 22556 identified the instructions for ‘Continued Airworthiness/Maintenance’ of the Tiger Moth as:
The original Maintenance and Repair Manual for the Tiger Moth, reference DHTM 1, remains applicable and is to be employed in conjunction with Technical News Sheet Series CT(MOTH) as currently amended by de Havilland Support Ltd. …
Tiger Moth Aerobatic limitations
While there were aerobatic manoeuvre limitations, the frequency of aerobatic operation was not limited by the AAN. The ATSB sought advice from the Tiger Moth Type Design Organisation on the suitability of the Tiger Moth for high frequency aerobatics, such as might be expected in a commercial environment. The Type Design Organisation stated that:
A small minority of these aircraft now appear to be being flown more aggressively, on a regular basis, than would have been foreseen by the de Havilland Aircraft Company Ltd at the time of original design.
The Tiger Moth was designed as an elementary training aircraft, primarily for military air arms. Although capable of performing the basic aerobatic manoeuvres while remaining well within its flight envelope, the type was not intended to be used for intensive aerobatics on every flight. It was assumed that the impact of aerobatics on the longevity of the aircraft structure (and engine) would be diluted by greater use on tasks such as cross-country navigation and circuit flying. While any military training syllabus would include significant spinning and aerobatic content, the greater amount of airborne time would involve more moderate general handling exercises, repetitive circuit flying with multiple take-offs and landings, and cross-country navigation sorties.
Post-War civilian flying training schools continued to operate the Tiger Moth in essentially the same manner. The cumulative effect of high aerobatic loadings would again have been moderated by a probable majority of flights which did not impose any increased loads on the airframe structure.
It may also have been a design assumption that the rigorous inspection schedules of the day, and frequent fabric recovers, would be strictly applied. With type-trained maintenance personnel, readily available new spare parts, and generally Government-funded operations, this would then have been a realistic expectation.
Our recent scrutiny of public domain imagery, including video clips featured on the websites of commercial operators,[[4]] suggests that aggressive aerobatic manoeuvres, including prohibited flick (snap) rolls and tailslides, are now being flown on a regular basis.
Such misuse is contrary to the DH82A Certification Basis. It invalidates the design assumptions and any critical component lifing assessments that may be derived from them, such as fuselage tie rod safe lives. Unless aerobatic usage of the Tiger Moth respects the published limitations, there exists a possibility of structural failure. Additional guidance on these aspects, also containing constraints on the intensity of aerobatic flying, is consequently in preparation.
Wing structure
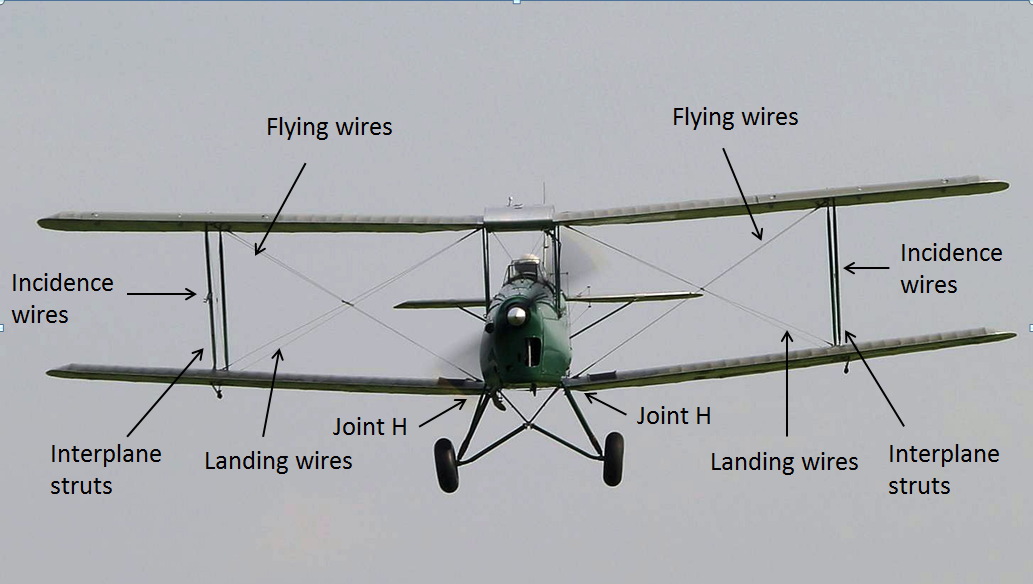
The wings were predominantly made of timber with a fabric covering. They were externally braced against each other and the fuselage using a series of flying wires, landing wires, interplane struts and incidence wires. The aircraft type did not have wing flaps fitted and only the lower wings had ailerons.
The wings were attached to the fuselage using two attachment points per wing. The left and right lower wing forward attachment points (Joint H) were also attachment points for the undercarriage shock strut. The flying wires were attached to the inboard end of the front spar, immediately adjacent to the respective Joint H (Figure 2).
Figure 2: Exemplar Tiger Moth DH82A, with the majority of the wing structure labelled
Source: de Havilland Support Ltd, modified by the ATSB
Each lower wing structure comprised:
- either two solid timber or alternatively two laminated timber spars
- two wing-to-fuselage attachment points
- three sets of internal bracing wires with corresponding steel tube supports and numerous timber ribs.
Figure 3 shows a left lower wing structure. The upper wing structures are similar, but the upper wings do not have ailerons.
Figure 3: Left lower wing structure, looking forward[5]
![Figure 3: Left lower wing structure, looking forward[5]](/sites/default/files/media/5750864/rId25 image7.png)
Source: de Havilland Support Ltd, modified by the ATSB
Wing-to-fuselage attachment
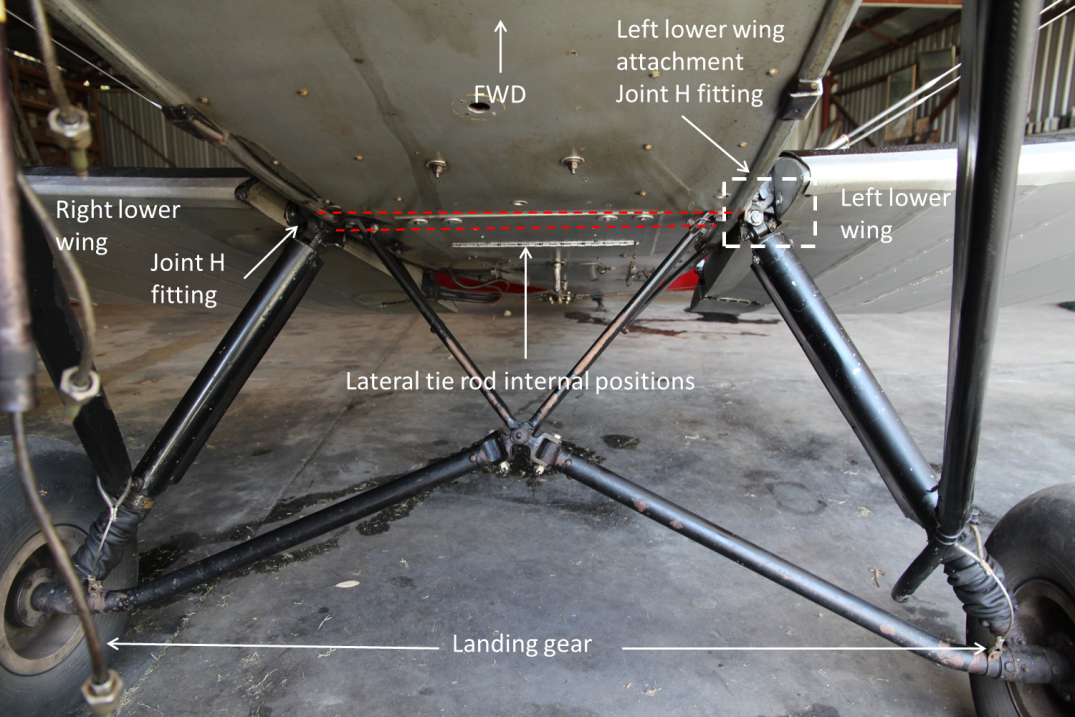
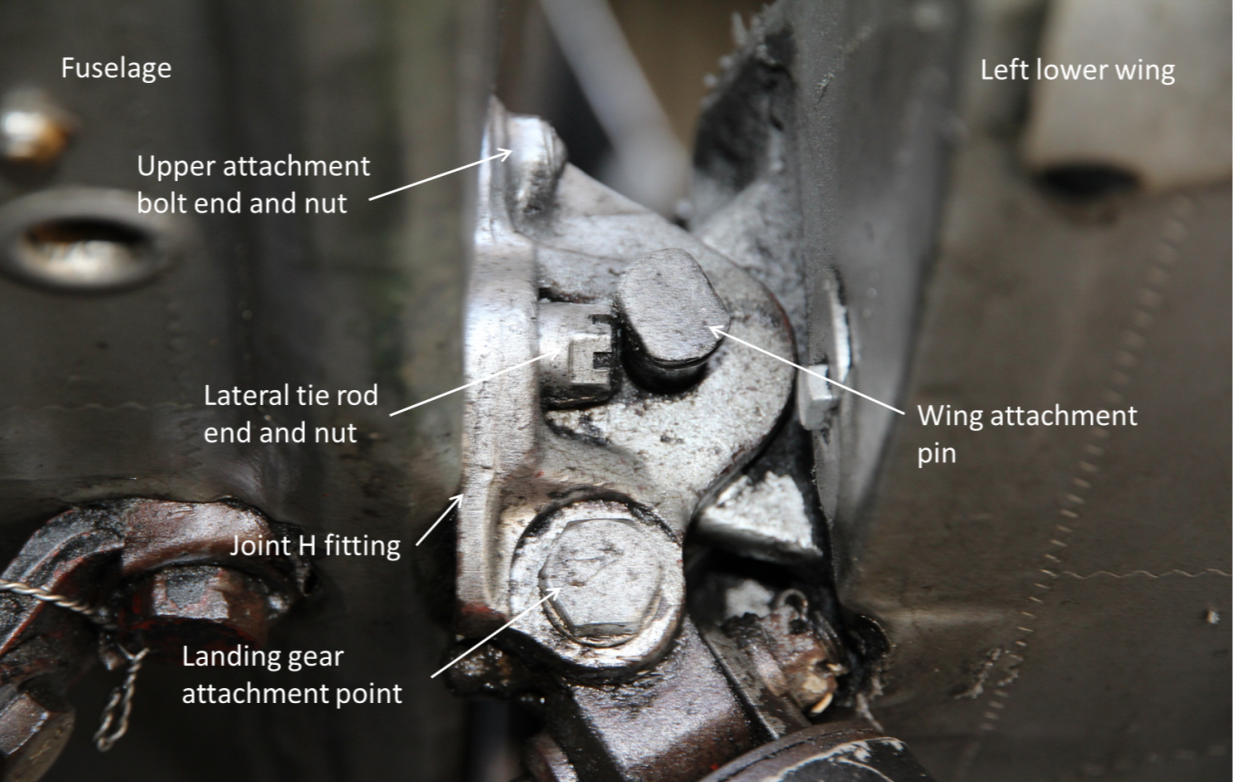
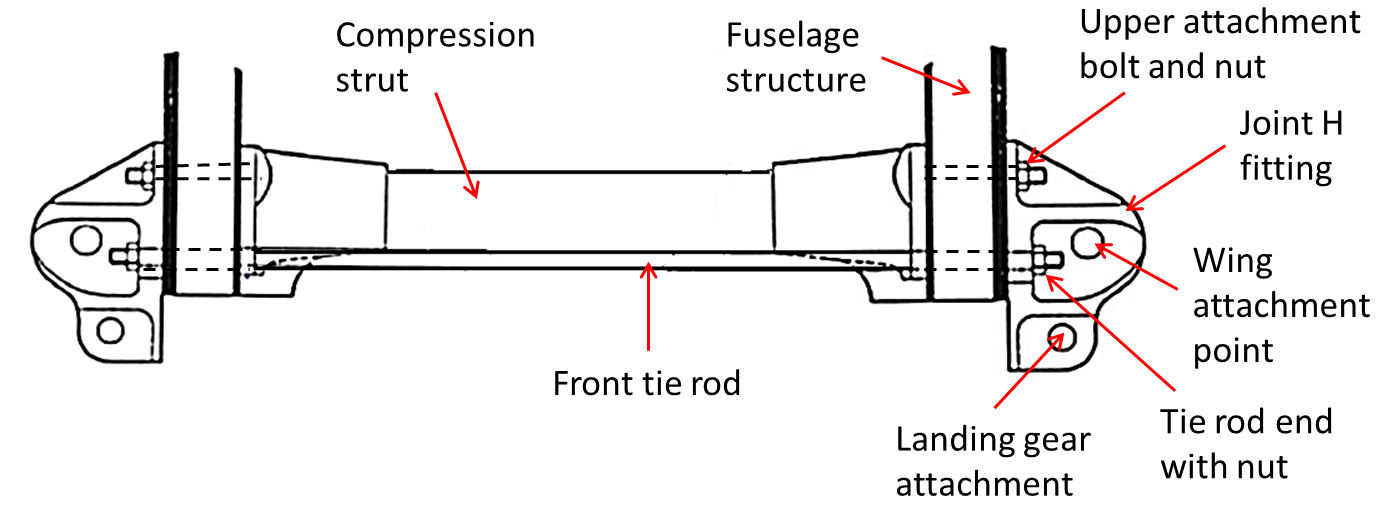
Both lower wing forward attachment point Joint H fittings were secured to the fuselage by two specially-designed upper attachment bolts and two fuselage lateral tie rods (tie rods), one forward and one aft. The tie rods passed through the lower fuselage structure and were secured and held in tension by nuts against the Joint H fittings at both ends. Figures 4 and 5 show the Tiger Moth lower wing forward attachment points at the Joint H fittings and the landing gear attachment. The tie rods cannot be seen as they are internal to the fuselage. Their position is depicted by the dashed red lines.
Figure 4: Exemplar aircraft showing the lower wing attachment points (looking aft)
Source: ATSB
Figure 5: Joint H fitting (lower wing attachment), looking aft
Source: ATSB
The upper attachment bolts were designed to transfer vertical loads in shear from the Joint H fitting into the fuselage. The tie rods transferred the loads pulling the wings away from the fuselage in tension through the fuselage (Figure 6). Loss of tie rod integrity would significantly increase the stresses in the upper attachment bolts of the Joint H fitting. Failure of these bolts would result in the separation of the wings. A compression strut that ran parallel to the tie rods provided support to the fuselage for landing, ground and inverted loads.
Figure 6: Front view of a front lateral tie rod and Joint H fittings (left fitting labelled)
Source: de Havilland Support Ltd, modified by the ATSB
VH-TSG
General
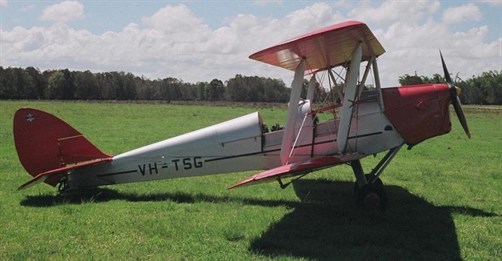
VH-TSG (Figure 7) was built in 1939 and allocated serial number DHC78.[6] The aircraft was operated in the visual flight rules (VFR)[7] day charter category and was used for commercial joy flights. It had a current maintenance release, certificate of registration and certificate of airworthiness. The maintenance release indicated that prior to the accident flight, the aircraft’s total time in service was 4,982.3 hours.[8] No outstanding defects were endorsed on the maintenance release.
Figure 7: VH-TSG
Source: David Welch, Air-Britain Photographic Images Collection
Weight and balance
The aircraft’s maximum take-off weight for normal operations was 827 kg and 802 kg for aerobatics. The operator stated that the fuel on board at the commencement of the flight provided for an endurance of about 2 hours.
The pilot’s weight was obtained from their last CASA medical examination, with additional weight added for specific clothing/equipment worn on the flight. The passenger’s weight was estimated based on video footage of the flight (see the section titled Recorded information).
An estimation of the aircraft’s weight and balance at take-off and at about the time of the accident showed that the aircraft was:
- within centre of gravity limits at the time of departure and immediately prior to the accident
- about 75 kg under the maximum take-off weight for aerobatics at the time of take-off
- about 80 kg under the maximum take-off weight for aerobatics at the time of the accident.
Aircraft and maintenance history
General
The aircraft’s logbook statement indicated that it was being maintained in accordance with the operator’s System of Maintenance. The aircraft’s maintenance release indicated no overdue maintenance requirements (such as changing the engine oil or checking the engine valve clearances) or known maintenance issues. The last periodic/100-hourly inspection was completed on 18 October 2013, 46.1 flight hours before the accident. The inspection was valid for 100 hours or 12 months, whichever came first. The following additional requirements/inspections were also completed at that time:
- as the fuselage lateral tie rods had not accumulated 2,000 hours or 18 years’ time in service, visual examination of the tie rods[9] in accordance with Airworthiness Directive DH 82/10 Amdt 1 Cockpit Lateral Tie Rods and Aircraft Structure (see the section titled Technical News Sheet (TNS) (Moth) 29)
- examination of all wooden structures, including the wings, in accordance with TNS 32 Issue 3 Inspection of Wooden Structure.
No defects were identified as a result of those additional inspections.
Aircraft history
The aircraft was substantially damaged in two previous accidents. The first occurred during a joy flight over Surfers Paradise, Queensland on 27 February 1994. In its investigation, the Bureau of Air Safety Investigation (BASI)[10] found that the engine power reduced to idle and the pilot carried out a forced landing on the beach (BASI final investigation report 199400517 is available on the ATSB website at www.atsb.gov.au). The aircraft came to rest in shallow water after the pilot manoeuvred to avoid people on the beach. The aircraft occupants were uninjured.
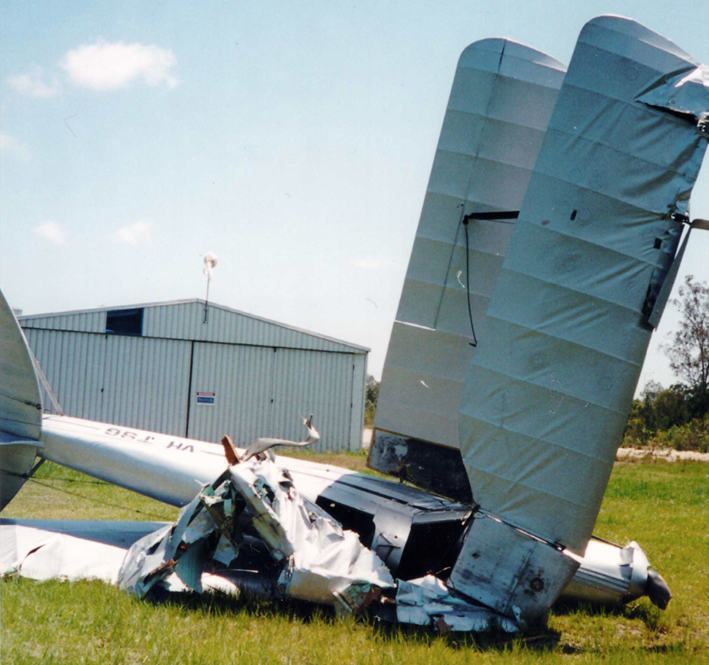
The second accident occurred on 21 November 2001. It was reported that the aircraft experienced a reduction in engine power after take-off from Albatross Field, Upper Coomera, Queensland. During the subsequent forced landing the aircraft collided with trees and was substantially damaged (Figure 8). The aircraft occupants were reported to have sustained minor injuries.[11]
Figure 8: VH-TSG after recovery from bushland near Albatross Field following the accident in 2001
Source: Supplied
The aircraft spent an extended period in storage until 2005, when the fuselage was reportedly sent to a repair facility for complete overhaul.
The repair facility completely disassembled, repaired and reassembled the fuselage and undercarriage. This included the replacement of the aircraft’s fuselage lateral tie rods with Australian Parts Manufacturer Approval (APMA) JRA-776-1 tie rods (see the following section titled Tie rod history). The wings were not overhauled at that facility.
The operator later indicated that the aircraft parts supplied to the repair facility for overhaul/installation in the repaired VH-TSG were a conglomeration of spares from the operator’s facility.
Some of those aircraft parts were from VH-TSG. However, the main fuselage section and undercarriage were from a number of other aircraft. On completion of the overhaul/rebuild of the fuselage and undercarriage, the aircraft remained registered as VH-TSG.
The overhauled/re-built fuselage was then sent to another repair facility. At this second facility a set of recently-overhauled wings was removed from another company aircraft and fitted to the overhauled fuselage. New flying, landing and incidence wires were also installed (refer to the section below titled Wings history).
The aircraft was returned to service in late 2006.
In January 2008, the aircraft was involved in a taxi incident with the operator’s other Tiger Moth, registration VHASB. The pilot of VH-TSG taxied into VH-ASB from the rear, causing significant damage to ASB’s rudder, port lower wingtip, port aileron and port upper wingtip.
VH-TSG sustained minor but observable external damage to the right wing leading edge skins. VH-TSG’s maintenance documentation did not record any maintenance, repair or inspection of the aircraft following the taxi incident.
In April 2012, VH-TSG’s engine was started with the throttle at full power. The aircraft pitched forward and the propeller struck the ground and was broken. The maintenance documentation recorded detailed inspection of the aircraft and engine following this incident. In addition, the propeller was replaced.
Overhauled tail surfaces from another aircraft were fitted to VH-TSG on 30 August 2013.
Tie rod history
The aircraft had Australian-manufactured tie rods fitted under an Australian Parts Manufacturer Approval (APMA). The tie rods were manufactured as part of Batch 7 on 24 November 2004. Batch 7 comprised of 12 rods (or six sets of two per aircraft).
The manufacturer’s work order indicated that a subcontractor cut the tie rods to length and cut a thread on each end. The tie rods were then returned to the manufacturer for deburring, polishing and final inspection before being certified for release.
A manufacturer’s authorised release certificate indicated that five of the six sets of Batch 7 tie rods were supplied to the maintenance organisation that subsequently fitted VH-TSG’s replacement tie rods in 2006.
Although the aircraft’s maintenance documentation recorded the installation of JRA-776-1 part number tie rods, on examination neither tie rod had any part or serial number identification markings.
At the time of the accident, the tie rods had accumulated about 7 years and 1,300 flight hours in service. For more information on the APMA tie rods refer to the section titled Approval and manufacture of local replacement tie rods.
Wings history
The wings fitted to VH-TSG at the time of the accident were previously fitted to another of the operator’s aircraft (VH-ASB). VH-ASB’s maintenance logbooks that were made available to the ATSB dated back to 1986. These indicated that all but the aircraft’s left lower wing remained fitted to VH-ASB over the period 19862005.
VH-ASB’s left lower wing was replaced in 2001. No reason was recorded in the aircraft’s maintenance documents for that replacement, and there was no record to identify the source of the replacement wing.
The wings were removed from VH-ASB in 2005 for overhaul at the owner’s request. These wings were then fitted to VH-TSG’s overhauled fuselage in 2006 and remained fitted to the aircraft until the accident. All of the flying wires and aileron cables were replaced in VH-TSG on 17 December 2012. The flying wires were re-rigged on 27 June 2013 after the owner noticed that the aircraft was not flying in normal alignment.
Technical News Sheet CT Moth 32 (TNS 32) stipulated a major wing internal wood inspection at each Annual Inspection, including of the structure of the wings. This inspection was last conducted on VH-TSG on 16 October 2013, the first of these inspections to occur in about 1,252 flight hours and nearly 7 years. No defects were noted during this last inspection.
Joint H fitting upper attachment bolts
The Joint H fitting upper attachment bolts were special-to-type items with specific design features and their own part number. A review of the aircraft’s maintenance documentation did not identify the manufacturer of the Joint H upper attachment bolts, but they were not the correct bolt as defined by the DH82A Tiger Moth design standard and parts list. Similarly, the organisation that installed the bolts could not be determined from the documentation.
Despite the lack of supporting documentation, the overhaul of the aircraft’s fuselage in 20052006 would have resulted in the Joint H fittings being removed and refitted during that period. However, the ATSB was unable to determine if:
- the pre-fuselage overhaul Joint H upper attachment bolts were re-fitted as part of the overhaul
- a replacement set of locally-manufactured Joint H upper attachment bolts was installed at that time.
For more information on the upper attachment bolts refer to the section titled Joint H Upper Attachment Bolts and appendix A.
Aircraft and parts traceability
A detailed inspection of VH-TSG did not identify a data or build plate to confirm the aircraft’s serial number. This meant that the only means to confirm the aircraft was VH-TSG was the painted registration on the aircraft’s wings and fuselage. Furthermore, a review of the logbooks for VHTSG and VH-ASB indicated that both aircraft had a history of numerous parts and components being transferred between multiple aircraft and being supplied with little or no documentation.
As well as being a regulatory requirement, aircraft and component traceability is an important aspect of serviceability assurance. Without it, a clear understanding of the aircraft’s history cannot be formed.
Meteorological information
Gold Coast Airport is about 35 km south-south-east of South Stradbroke Island. The Automatic Terminal Information Service (ATIS)[12] for that airport at the time of the accident reported an east-south-easterly wind at 12 kt, scattered cloud[13] at 2,300 ft and a temperature of 25 °C. These conditions were suitable for flight under the visual flight rules.
The Bureau of Meteorology weather observations for Banana Bank (about 40 km north of South Stradbroke Island) at 1230 recorded a south-easterly wind at 11 kt, gusting to 13 kt.
Air traffic control
Recorded information
Radio calls
There was no requirement for the pilot to contact air traffic control as the flight was planned to remain outside controlled airspace. No radio calls from the pilot were recorded on any of the air traffic control frequencies in the area.
Radio calls made on the Southport common traffic advisory frequency[14] were not recorded. The ATSB was unable to confirm any radio calls on this frequency by the pilot that day.
Radar data
A review of Airservices Australia recorded radar data showed aircraft primary radar returns[15] near the Pimpama airstrip at 1217:40 and disappear near South Stradbroke Island at 1223:25. This aircraft did not appear on secondary radar[16] and its altitude was not indicated.
Use of the aircraft’s transponder
The Aeronautical Information Publication Australia (AIP)[17] allowed for general exemptions from the need to carry secondary surveillance transponders for aircraft not certified with an engine driven electrical system. This included balloons, gliders and antique aircraft. The operator indicated that the aircraft did not have an engine-driven alternator or generator and that its electrical system was solely reliant on a small battery.
The operator reported that the aircraft had a mode C[18] transponder but that it was common practice not to turn it on when operating outside controlled airspace. AIP EN ROUTE (ENR) 1.1 Section 56 OPERATING REQUIREMENTS FOR TRANSPONDERS, paragraph 56.1 stated that:
Pilots of aircraft fitted with a serviceable Mode 3A or Mode S transponder must activate the transponder at all times during flight, and if the Mode 3A transponder is Mode C capable, that mode must also be operated continuously.
Pilots were required to ensure that their transponder and its associated altitude function (Mode C) were selected as primary radar coverage only existed within 50 NM (92.6 km) of major airports. In addition, the remainder of the air traffic service surveillance system relied on secondary surveillance radar transponder information. Furthermore, aircraft traffic collision avoidance systems[19] rely on transponder information for their traffic alerting and collision avoidance functions.[20]
The pilot of VH-TSG was conducting aerobatics near the inbound flight path to Brisbane Airport from the south. Aircraft using this flight path were routinely assigned a standard descent to 4,000 ft by air traffic control. In that area, the base of controlled airspace was 3,500 ft.
The operator advised that they normally conducted aerobatics in that area, commencing with a maximum altitude of 3,500 ft.
Airstrip information
The operator had conducted flights from their privately-owned airstrip at Pimpama since 2004. The airstrip was located about 4 NM (7 km) to the west of South Stradbroke Island and had two grass runways:
- the main runway 01/19, which was oriented approximately north-south/south-north and was 820 m long
- a second, crossing runway that was oriented southeast/north-west and was 600 m long.
A 24 May 2010 surveillance inspection of the airstrip by CASA found that it was suitable for the operation. Inspection of the main runway during the on-site phase of the ATSB’s investigation found that the runway had a rough, uneven surface and a drainage ditch in the centre.
Recorded information
Video cameras
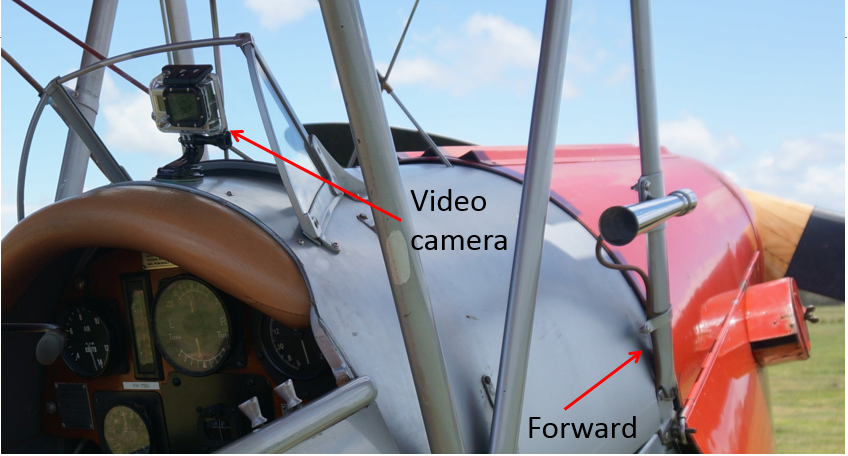
The aircraft was fitted with two cameras to record the joy flights. One camera, mounted on the right wing rear interplane support strut, was not recovered. The second camera, mounted in the front cockpit position facing rearwards (Figure 9), was set to record video in high definition at 60 frames per second. That camera had separated from its mount but was located and recovered from the accident site.
Full video and audio was recovered from the camera’s memory card, except for about the last 10 seconds of data. The premature termination of full recording was attributed to water ingress and subsequent power supply disconnection, rather than a normal unit shut down.
Figure 9: Rear-facing front cockpit camera
Source: Witness, modified by the ATSB
Video footage
The video footage showed a rearward view, predominantly in line with the fuselage. A small portion of the rear of each lower wing, including the inboard sections of the left and right ailerons, was visible. The video started before take-off and showed what appeared to be a normal takeoff and climb. The aircraft transited to an area just east of South Stradbroke Island, where the pilot commenced aerobatics.
After approximately 1 minute of aerobatic manoeuvres and while pulling out at the bottom of a loop, the left lower wing appeared to fail in an area forward and outside of the camera’s view. A very short time later, the upper left wing failed and both left wings folded back towards the fuselage.
The video footage did not show any manoeuvres that were considered outside of the aircraft’s limitations. The audio indicated that the engine and propeller were running normally before the inflight break-up sequence.
Left wings break-up sequence
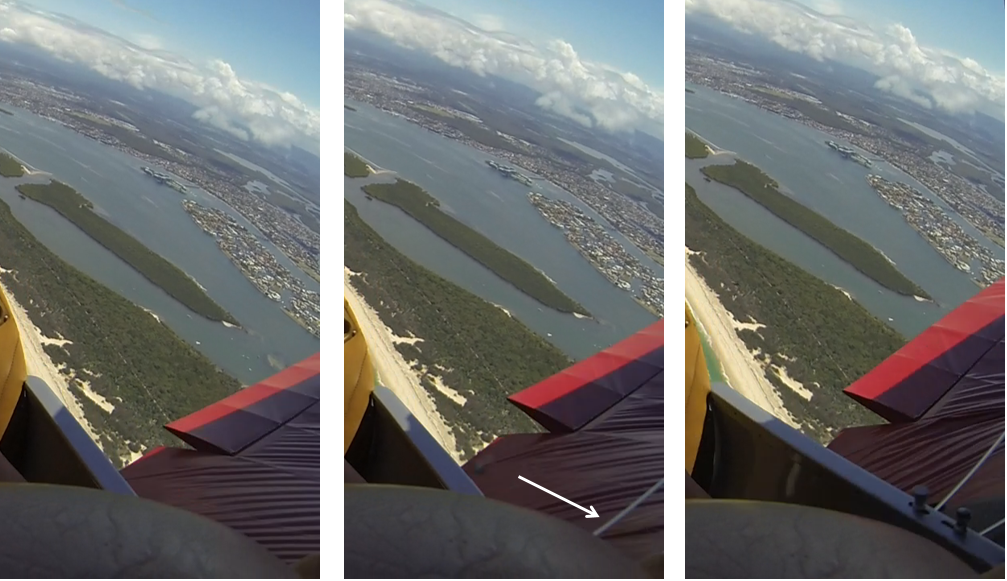
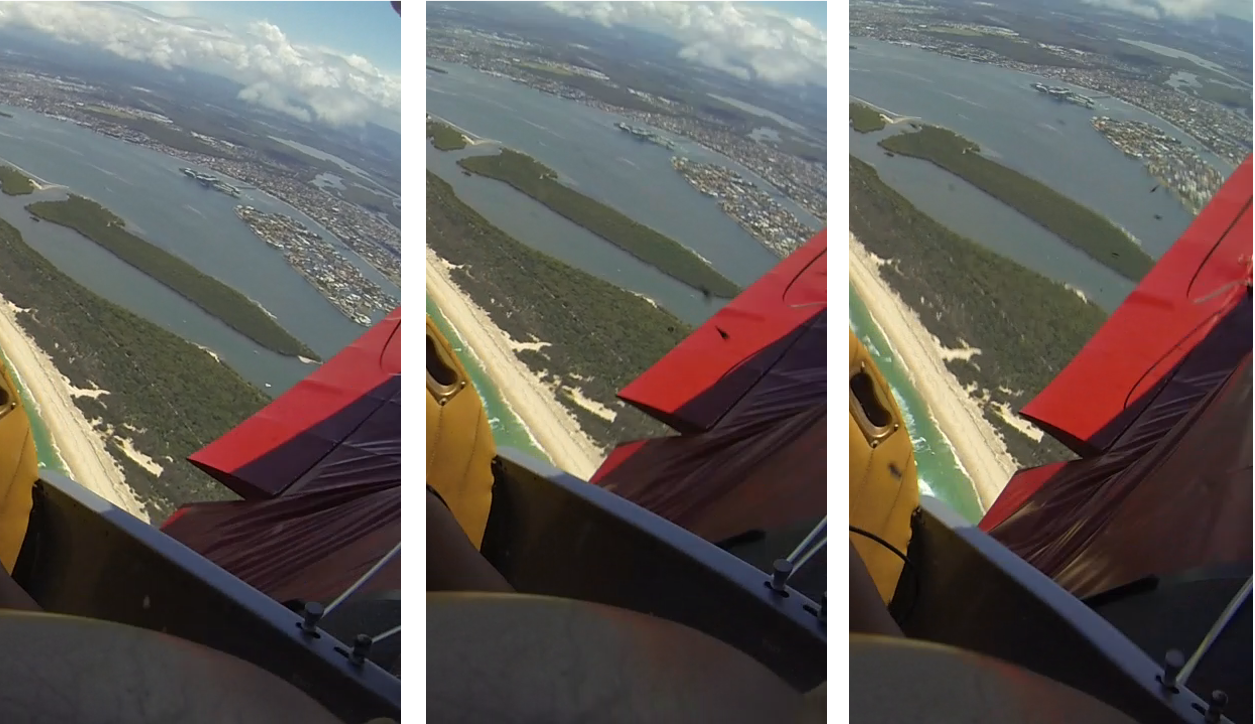
Figures 10–19 are a series of still images from the video recording that have been cropped to highlight relative information. They show the front-left cockpit fuselage and rear section of the left lower wing.
Figure 10 is the final picture of the aircraft’s wing in what would be considered a normal state. A white dashed line was added to Figures 10, 11 and 12 to highlight the rearward movement of the wing trailing edge from its original position. The first notable indications of an abnormality were the ripples on the left lower wing’s upper fabric skin (Figure 10). The rippling amplifies and moves outboard through Figures 11 to 13.
Figure 10: Initiation point Figure 11: +0.016 sec Figure 12: +0.032 sec
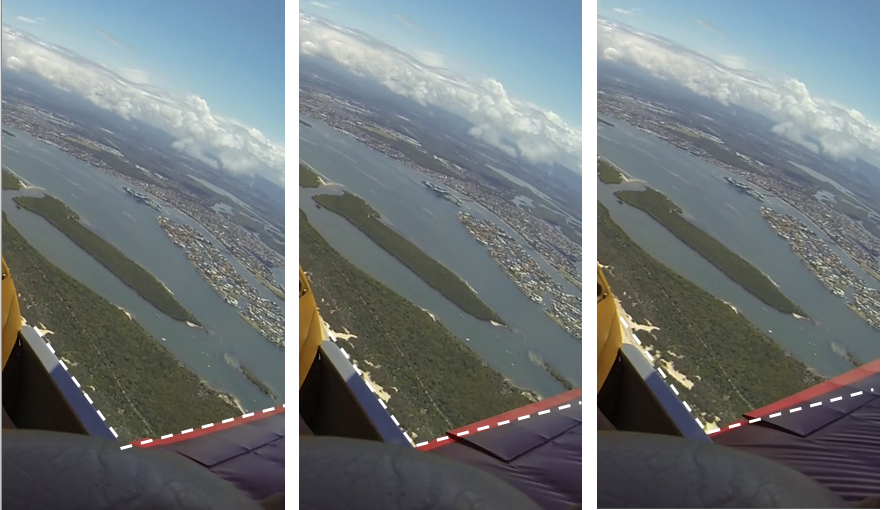
Figure 14 shows the rear of the two flying wires coming into view, indicated by the white arrow. Wing twisting also becomes apparent from this point. Figure 15 shows the front flying wire and the wing walk area also coming into view. Both flying wires are attached to the front spar inboard end and the wing walk area is also located in that area. Visibility of these features indicates movement of the inboard leading edge upwards by a considerable amount. Further, wing skin creases and wing shape indicate that the wing structure was significantly disrupted at this point.
Figure 13: +0.048 sec Figure 14: +0.064 sec Figure 15: +0.08 sec
Source: Stills from the on-board video recording, modified by the ATSB
Figures 16, 17 and 18 show the end of the raised section of wing walk continuing into view. It also shows the midsection of the wing rising, which indicates further wing structural disruption.
Figure 16: +0.096 sec Figure 17: +0.112 sec Figure 18: +0.128 sec
Source: Stills from the on-board video recording
As the left lower wing moves rearwards and upwards, more of the wing structure comes into view. Figure 19 shows failure of the wing structure, initially at two main points along the front spar (indicated by the arrows):
- at approximately mid-span between the fuselage and the interplane struts
- at a point immediately inboard of the interplane struts.
The front spar between the mid-span failure and the inboard end appeared to be intact at that point.
Figure 19: +0.336 sec - front spar fractures
Source: Still from the on-board video recording, modified by the ATSB
The video continued until both left wings were parallel to the fuselage. During that time the flying and landing wires remained attached to their anchor points. The left wing interplane struts were in place during the break-up sequence.
The time between normal operations to complete failure of the lower and upper left wings was less than 1 second.
Aircraft recovery and wreckage examination
Aircraft recovery
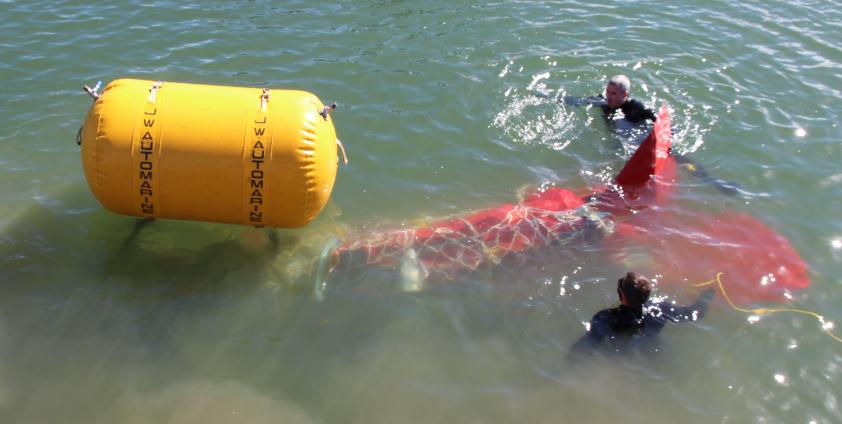
The aircraft was located in about 15 m of water on the eastern side of South Stradbroke Island. The Queensland Police Service floated and recovered the main wreckage 2 days after the accident (Figure 20), in conditions including rough seas, high winds and reduced underwater visibility.
One of the two video cameras fitted to the aircraft was located on the ocean floor, having separated from the aircraft during the accident sequence. Other items of wreckage were collected floating on the ocean surface or washed up on South Stradbroke Island.
Figure 20: Aircraft recovery by the Queensland Police Service
Source: ATSB
Wreckage examination
The aircraft was significantly damaged, consistent with water impact. Though the fuselage was relatively intact, the wing structures were severely disrupted, having broken into numerous pieces. Some of these pieces were recovered as flotsam. The engine had separated from the fuselage during the impact sequence and the propeller had fragmented. However, the majority of the propeller hub remained attached to the engine’s attachment flange.
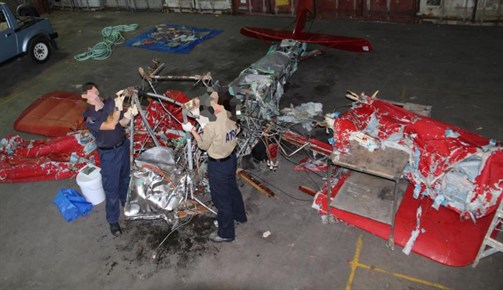
The fuselage structure and flight control systems were inspected with no pre-impact defects identified. The fuselage and wings were reconstructed to assist with determining the aircraft break-up sequence (Figure 21).
Figure 21: Wreckage reconstruction
Source: ATSB
Wing inspections
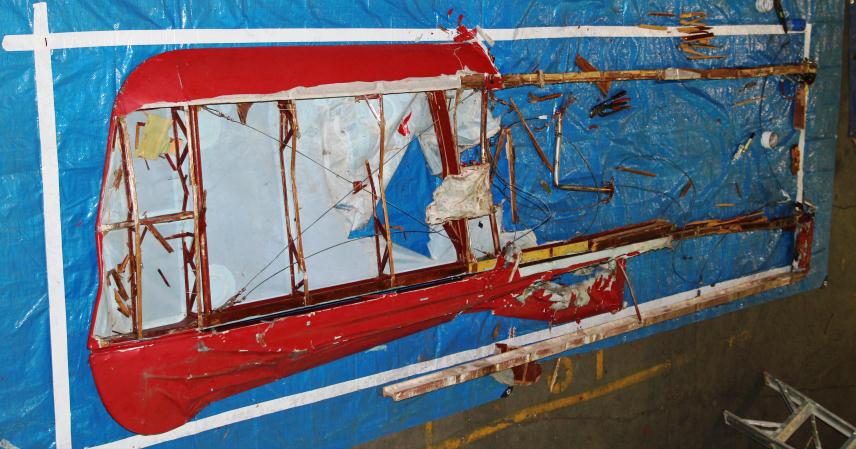
The wings were reconstructed with about 95 per cent of the main spar structures accounted for. The left-wing flying wires and landing wires were still attached to their corresponding attachment points. The internal wing bracing wires were also intact. Figure 22 shows the partially reconstructed left lower wing.
Figure 22: Left lower wing looking at the upper surface
Source: ATSB
Wing attachment points
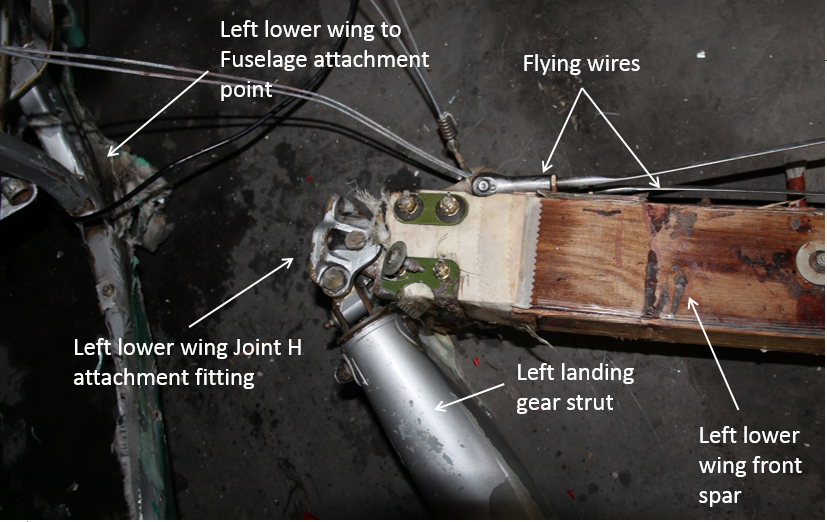
The lower wing attachment point Joint H fittings were still attached to the wings, but had separated from the fuselage on both sides. Both lateral tie rods were fractured through the threaded section at the left-wing attachment point. The remaining part of the threaded section and nut for each tie rod were not recovered. Figure 23 shows the left lower wing Joint H attachment fitting, left lower wing front spar and corresponding fuselage structure to which it is normally attached.
Figure 23: Left lower wing to fuselage attachment
Source: ATSB
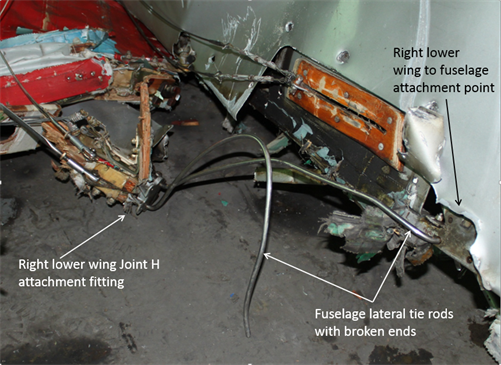
The remaining sections of the forward and aft tie rods had pulled through the fuselage and remained attached to the right lower wing Joint H wing attachment fitting (Figure 24).
Figure 24: Right wing-to-fuselage attachment point
Source: ATSB
Compression strut
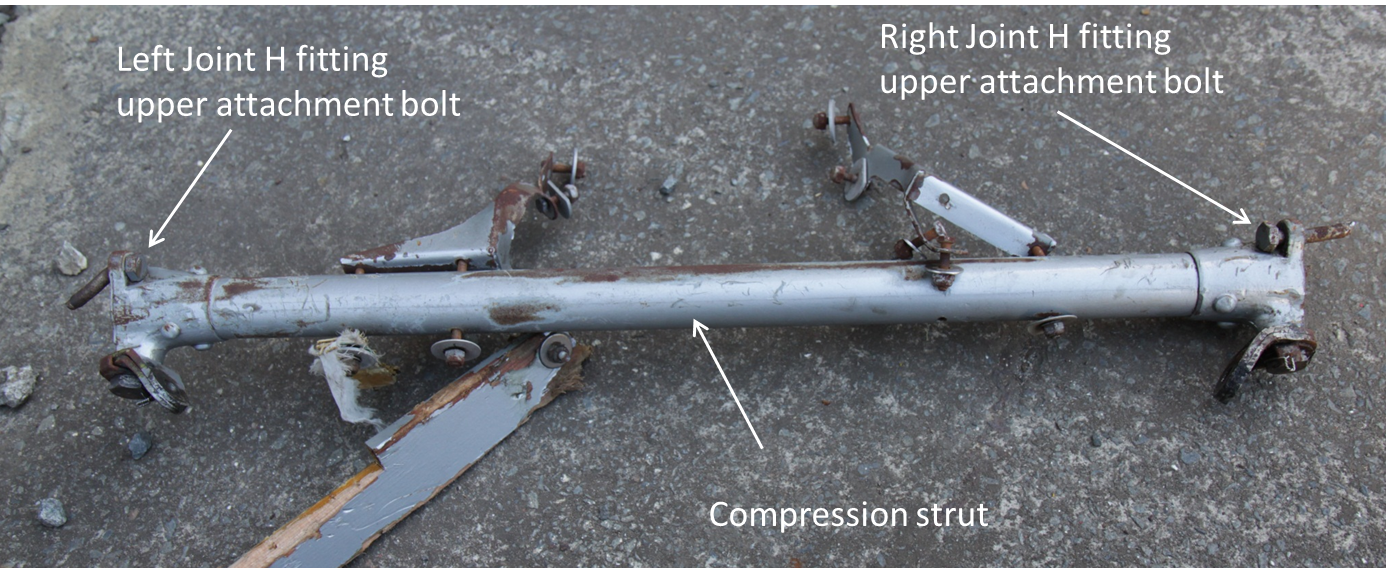
The compression strut was removed from the wreckage and inspected with no pre-accident defects identified (Figure 25). Three of the four Joint H fitting upper attachment bolts were retained within the compression strut. The left forward Joint H upper attachment bolt was not identified or located within the wreckage.
Figure 25: Compression strut viewed from the rear
Source: ATSB
Further component examinations
A number of items and components were taken to the ATSB’s technical facilities in Canberra, Australian Capital Territory for further detailed examination. These included the:
- inboard two thirds of the left lower wing front spar
- fuselage lateral tie rods
- compression strut with retained hardware
- Joint H wing-to-fuselage attachment fittings
- Joint H fuselage sections
Survival aspects
Underwater footage taken by the Queensland Police Service divers confirmed the correct function of the aircraft seats and safety harnesses. The impact forces were considered not survivable.
Component examination and testing
The following is a summary of the main findings from examination of the lower left wing spar structure, lateral tie rods, and upper attachment bolt technical examinations.
Additional detail is available in the report of the full technical examination in appendix A.
Lower left wing front spar
Examination of the inboard end of the lower left wing front spar identified an inscription indicating that it was manufactured in 1943. The spar was constructed from one piece of timber (not of laminated construction) and was severely fragmented with numerous fracture surfaces.
There were no indications of a significant pre-existing defect, wood decay or rot in the lower left wing front spar that would have contributed to its premature failure.
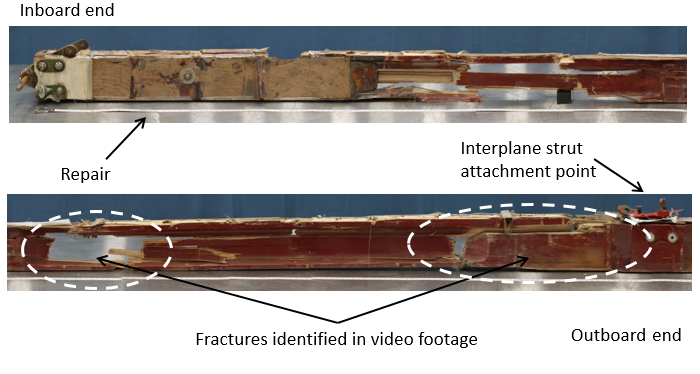
Figure 26 shows the inboard two thirds of the front face of the lower left wing front spar. The areas of fracture as determined from the video footage from Figure 19 are highlighted.
Figure 26: Inboard two thirds of the front face of the lower left wing front spar (showing fractures)
Source: ATSB
Lateral tie rods
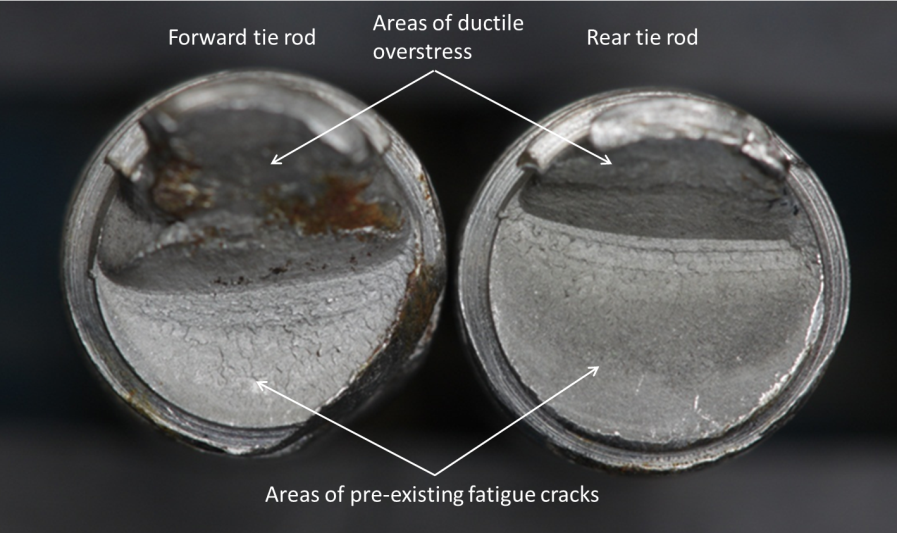
Both lateral tie rods fractured through the threaded section at the left-wing attachment point. The fractures resulted from the initiation and propagation of fatigue cracks (Figure 27). The rear tie rod cracking extended across approximately 70 per cent of the total rod cross-sectional area and the forward tie rod cracking extended across approximately 50 per cent. The remaining material on both rods fractured due to ductile overstress.
No significant corrosion or other defect was evident at or surrounding the points of fracture. The corrosion on the fracture surface of the forward tie rod in Figure 27 is the result of superficial surface corrosion associated with contact between the tie rod and surrounding components during the break-up sequence and the tie rod’s submersion in salt water.
Figure 27: Fuselage lateral tie rod fracture surfaces showing the left side thread ends
Source: ATSB
A fatigue crack was also present in the threaded section of the right side of the forward tie rod. This tie rod had not completely fractured but the crack had propagated through about 40 per cent of its cross-section.
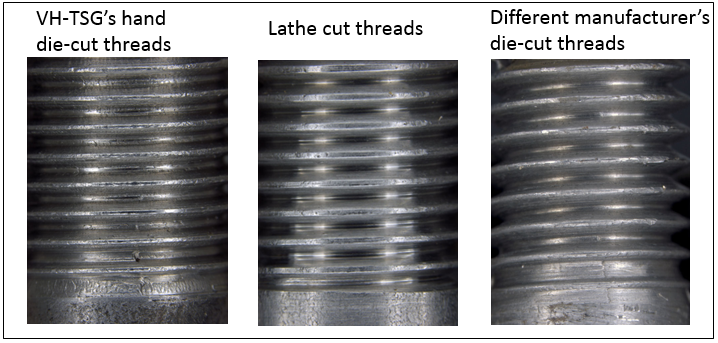
All of the fatigue cracking originated in the thread roots, at areas of mechanical scoring that were artefacts of die-cutting the threads during manufacture. The tie rod threads appeared to have been hand die-cut[21].
The ATSB examined other tie rods produced by the same Australian manufacturer using diecutting and single-point lathe-cutting techniques. Tie rod threads from other manufacturers were also examined[22] for comparison.
Visually significant variation was evident in the quality of the threads across all of the Australianmanufactured tie rods examined. Those threads that appeared to have been hand diecut were characterised by significant scoring in the thread root and galling of the thread flanks.
The other manufacturers’ tie rods also had what appeared to be die cut threads as per the original design. However, these rods had a visibly superior finish to those fitted to VH-TSG in terms of surface finish (Figure 28).
Figure 28: Two tie rods from the same Australian manufacturer and one from another manufacturer showing significant thread form differences
Source: ATSB
The material properties of the Australian manufacturer’s tie rods were consistent with type 431 stainless steel. Hardness testing of tie rods from the same batch indicated that their strength conformed to the part drawing requirements. However, this was inconsistent with the material certification of the rod stock used to manufacture VH-TSG’s tie rod batch. That material certification indicated tensile strength values approximately 5 per cent lower than the required minimum.
Two different sets of tie rods that were recorded as being from the same manufacturing batch were examined and found to be visually different in terms of surface finish and thread quality. In addition, they displayed inconsistent tensile strength properties, suggesting they were not, in fact, from the same batch. Although a requirement for life-limited parts, the tie rods were not marked with part or serial numbers. This meant that there was no way to accurately trace the origin of the two sets of tie rods.
The ATSB examined over 20 shipsets of used JRA-776 and other manufacturers’ tie rods that had accumulated varying amounts of service hours, flight cycles and aerobatic usage. Some of the other manufacturers’ tie rods had operational profiles consistent with the tie rods fitted to VHTSG. This included one set provided by the operator that were reported to have been fitted to VHASB and:[23]
- were not a JRA product
- were exposed to the same type of operational stresses as those fitted to VH-TSG
- had about 1,000 more flight hours than the tie rods fitted to VH-TSG
- had exceeded their mandatory expiry life by 282 hours due to a maintenance oversight
- were not individually identified or marked to enable confirmation of history.
In general however, the JRA-776 tie rods examined were well below the service life of those fitted to TSG. Nevertheless, there were no cracks identified in any of the tie rods examined.
Joint H upper attachment bolts
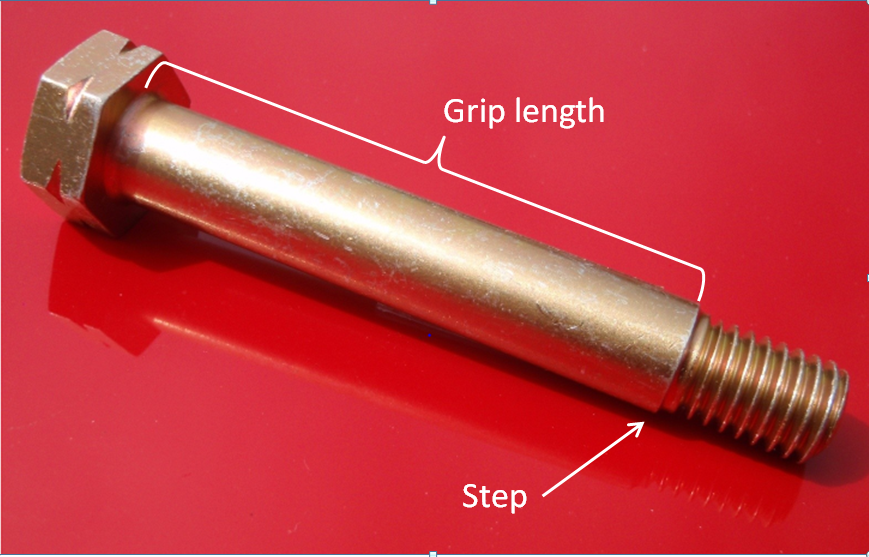
The DH82A was normally fitted with four de Havilland part number H37868 special bolts in the upper bolt holes on the Joint H fitting. Figure 29 shows a ‘step’ in the bolts such that the diameter was greater in the grip region than in the thread. The bolts were designed to support the Joint H upper attachment fitting and take shear loads imparted on the fitting through to the fuselage.
Figure 29: Exemplar special bolt showing grip length and step
Source: de Havilland Support, modified by the ATSB
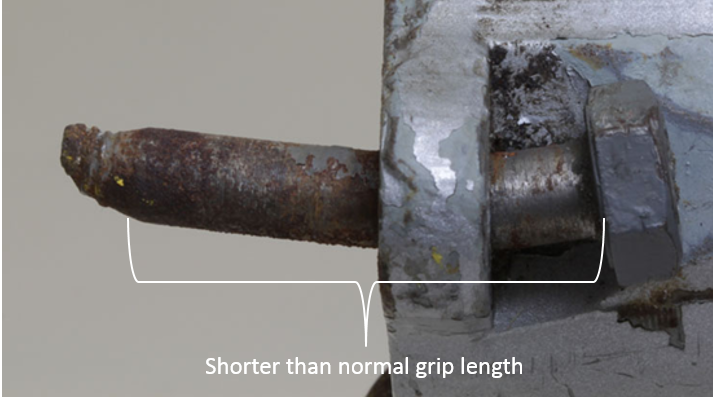
Examination of the three recovered special bolts from VH-TSG showed that the bolts failed under ductile overstress. The bolts were non-standard and had been machined from larger bolt stock. The grip length of two of the three bolts recovered from the compression strut were about 5 mm shorter than the drawing specification requirements (Figure 30). This meant that the grip area did not fully engage in the Joint H fitting upper attachment holes.
Figure 30: One of the non-standard upper attachment bolts fitted to VH-TSG showing the shorterthannormal grip length
Source: ATSB
The insufficient grip length had the potential to adversely affect the shear loads imparted on the tie rods. Deformation in some of the associated holes of the Joint H fitting was consistent with indentations from the thread form on these bolts.
During its investigation, the ATSB became aware of two other sets of non-standard upper attachment bolts that were fitted to other Australian Tiger Moth aircraft. Those bolts were similarly machined out of larger bolt stock before their use as Joint H fitting upper attachment bolts. Subsequent advice from the Type Design Organisation for aircraft owners to ascertain if the upper attachment bolts in their aircraft were of the original design, resulted in a significant increase in orders for those bolts.
Organisational and management information
Operator
Tiger Moth Joy Rides had operated since 1978 under various names. The owner at the time of the accident was also the chief pilot. He had owned the company since 2001 and was approved by CASA under an Air Operator’s Certificate to conduct charter and aerial work flights. This predominantly entailed joy flights in the local area, with the majority of those flights incorporating aerobatics.
At the time of the accident the operator owned and operated two DH-82A Tiger Moth aircraft. Each averaged about 200 hours flight time per year. The flights were usually of no more than 30 minutes duration, equating to over 400 landings per aircraft per year.
The organisation was sold and the new owner commenced operations about 18 months after the accident.
Regulatory oversight
CASA conducted 29 surveillance activities in the period 1998–January 2014. This included 20 safety trend indicators[24], six on-site inspections, and three authorisation holder performance indicators. A review of the CASA surveillance records indicated that, when compared with the performance of similar organisations, the operation was considered ‘about average’. The most prevalent issues identified over the period related to the:
- maturity and functionality of the organisation’s safety system
- operator’s procedures for addressing problems
- operator’s commitment to ongoing staff training.
Of the 20 safety trend indicator questionnaires conducted, six noted that the operator’s aircraft were being utilised to the limit of their performance.
Lateral tie rod history and maintenance requirements
Previous tie rod fatigue cracks
In July 1996, during routine maintenance activity on a UK-registered DH82A aircraft, the aft lateral tie rod was found to have fractured at the thread root. Subsequent examination found significant pre-existing fatigue cracking at the point of fracture. De Havilland Support Ltd advised that the tie rods fitted to that aircraft had 4,220 hours in service. The tie rods were of the original design and had the part number H37869A.
A report provided by de Havilland Support Ltd indicated that, during the inspection of those failed tie rods in 1996, fatigue cracking was also found in the threaded section of both ends of the aircraft’s other (forward) tie rod. That rod had not completely fractured.
De Havilland Support Ltd was not aware of any reports of fatigue cracking in any Tiger Moth tie rods prior, or subsequent to the 1996 event.
Technical News Sheet CT (Moth) No 29
In March 1998, the aircraft Type Design Organisation at that time[25] issued Technical News Sheet (TNS) CT (Moth) No 29.[26] The version of the TNS that was current at the time of the accident, issue 3, was released in March 1999 and stated:
Reason
During routine maintenance on a DH 82 aircraft it was found that the lateral Fuselage Tie Rod at the aft position had sheared at its location with the spar attachment fitting. Subsequent investigation found the failure was the result of fatigue cracking in the thread root. In addition the forward Tie Rod (which had not fractured) was distorted and found to have been manufactured from material of incorrect specification with a lower tensile strength.
Description
This Technical News Sheet (TNS) CT (MOTH) No 29 Issue 3 calls for both lateral Fuselage Tie Rods to become “lifed items” restricted to a service life of 2000 flying hours or 18 years (whichever is sooner) and introduces a procedure for the examination of the aircraft structure following a heavy landing, following undercarriage trauma and at annual inspection. Undercarriage trauma is defined as hitting an obstacle or deep rut in the landing or taxi area, distortion, buckling or other impact damage to undercarriage, including collapse.
De Havilland Support Ltd advised that the retirement life for fuselage lateral tie rods was developed by BAe for tie rods that met the original de Havilland design standard. It was not known whether the same assumptions would apply to tie rods made from a different material and/or manufactured in a different way.
The UK Civil Aviation Authority (CAA) mandated the requirements of TNS 29 in Airworthiness Directive (AD) CAA AD 006-10-97 Fuselage - Lateral tie rods – Fracture at wing joint fittings. CASA subsequently issued AD/DH 82/10 Amendment 1 Cockpit Lateral Tie Rods and Aircraft Structure in June 1999, reflecting the requirements of the UK CAA directive.
TNS 29 tie rod specifications
TNS 29 issues 2 and 3 contained drawings and specifications for tie rods fitted to DH 60, DH 82 and DH 83 series aircraft. The ATSB queried why detailed drawings were contained in the TNS documentation. In response, de Havilland Support Ltd reported that they were not the Type Design Organisation when TNS 29 was produced and were therefore unaware of all of the analysis and factual information that formed the safety action and basis for the document. They did however provide a document authored by the previous aircraft Type Design Organisation titled BAE Collation of Industry Tie Rod Comments.This documentstated that:
In light of the customers’ comments and to avoid the possibility of rod manufacture to incorrect standards, TNS 29 at issue 2 will include manufacturing data for the rods based on the current manufacturing standards.
Approval and manufacture of local replacement tie rods
Requirements for Civil Aviation Regulation 35 design approval of replacement components
The regulatory requirements for Civil Aviation Regulation (CAR) 35 approvals at the time of the local tie rod design approval was Air Navigation Order (ANO) 100.6 Issue 5 Administration and Procedure – Design Approval of Modifications, Repairs and Replacement Components.[27]
ANO 100.6 stipulated that:
1 - Applicability
This section of the Air Navigation Orders specifies the procedures to be followed and the means of establishing compliance with the requirements of Air Navigation Regulation 40 and 41 [regulations 35 and 36 of the Civil Aviation Regulations 1988 (CAR 1988)] to obtain approval of:
(a) the design of a modification or repair of an aircraft or aircraft component; and
(b)an aircraft component as a replacement for another aircraft component.
…
4 - Design standards
…
4.2 – The design of a modification or repair relating to an aircraft component shall, unless otherwise directed or approved by the Secretary, comply with either –
the design standards which were applied to the aircraft component when it was approved; or
the design standards appropriate to the aircraft component which are contained in Air Navigation Orders Part 102 or Part 103 current at the date of application for approval of the design.
4.3 –Unless otherwise directed by the Secretary, a replacement aircraft component shall conform with the design standards specified in paragraph 4.2 as if the aircraft it is to replace were to be modified or repaired.
Note 2 – For the purposes of safety the secretary from time to time issues Airworthiness Directives, under Air Navigation Orders Parts 105, 106 and 107, which must be complied with over and above the requirements of the design standards.
…
5- Proof of Compliance
5.2 - Unless it can be shown to the satisfaction of CASA or authorised person that the design of a modification or repair which involves primary structural components is not inferior to the original from a fatigue point of view, a fatigue substantiation shall be made and submitted to CASA.
Note: Primary structural components are those parts of the structure which contribute significantly to carrying flight, ground and pressurisation loads and whose failure could result in catastrophic failure of the aircraft…
Tie rod manufacturer history
The tie rods from VH-TSG were manufactured in Australia by J & R Aerospace (the tie rod manufacturer). The tie rod manufacturer commenced business in 1990 to service the aviation industry component replacement market. This included supplying parts for aircraft ranging from ultralights through to medium capacity commercial transport aircraft.
The tie rod manufacturer provided documentation indicating that 234 JRA-776-1 tie rods were manufactured and supplied to Tiger Moth owners, operators and maintainers between September 1998 and October 2012. Most were supplied between 1998 and 2000. The vast majority of the tie rods were supplied to Australian owners/operators, with about 20 per cent also being sent to New Zealand.
The company was in the process of concluding the business when the accident involving VHTSG occurred and ceased trading around mid-2014. No JRA-776-1 tie rods were in stock at that time.
During their period in operation, the tie rod manufacturer made over 1,000 different types of standard replacement parts. One-off components were also manufactured on request for customers wishing to replicate a part.
Tie rod design engineer history
The design engineer had his own company with a CASA instrument of appointment for approval of modifications and repairs under CAR (1988) part 35 (CAR 35) [28] and contracted services to various organisations throughout Australia. The design engineer reported carrying out a significant amount of work for the tie rod manufacturer and was very familiar with their organisation.
The design engineer was the only engineer in the company and, as such, was responsible for the preparation and approval of the engineering documentation. No independent check was carried out on the design engineer’s work, either within his company or by the tie rod manufacturer. Nor was there a requirement for independent reviews or validations to be completed as part of the design process within the company’s CASA-approved procedures.
The design engineer’s company ceased operation prior to the accident. In 2011, with the approval of CASA, the design engineer disposed of his records. The following information regarding the design engineer’s work is based on copies of the final approval documents and statements made by the engineer to the ATSB.
History of the JRA-776-1 tie rod design approval
CAR 35 approval
A number of approvals were issued by the design engineer for the manufacture of replacement tie rods for the DH 82 Tiger Moth.
According to the design engineer, the tie rod manufacturer initiated the request for a tie rod design. The manufacturer indicated that an Australian Tiger Moth owner had come to them with a request for a one-off set of replacement tie rods. These were reportedly needed to replace a set of tie rods in that owner’s aircraft that were corroded to a point where they were considered no longer serviceable.
The tie rod manufacturer verbally supplied the design engineer with all of the tie rod specifications, including measurements, material type, material hardness[29] and cadmium plating requirements. Based on the hardness measurement supplied, the design engineer assessed that the original parts were likely 4130, or similar, grade steel, with a strength of 125145 kilo pounds per square inch (ksi).
The design engineer issued an engineering order (EO) that was approved under CAR 35 for the manufacture of a set of replacement tie rods and the associated nuts.
The tie rod manufacturer constructed one set of tie rods in accordance with the EO and supplied them to the Australian Tiger Moth owner as requested. The tie rod manufacturer reported that the tie rods replicated the original design. That was, the EO stipulated the same material[30] and that cadmium plating was required. A copy of the initial issue of the EO could not be located. The date of the original EO is not known; however, it was understood to have been only a month or two before Issue 2 of the tie rod design.
Engineering order - Issue 2 of the tie rod approval (Material substitution)
The design engineer reported that the tie rod manufacturer queried whether they could make the tie rods out of 431 stainless steel. This was on the basis that the tie rods that they had just replaced from the Australian Tiger Moth were corroded to a point that they were no longer considered serviceable. The tie rod manufacturer reportedly also indicated to the design engineer that if stainless steel was used, it removed the requirement for a cadmium plating process.
Based on the previously-determined hardness test, the design engineer found that the 431 stainless steel was of ‘equivalent strength’ (see the following section Equivalent strength and fatigue analysis) to the original tie rods. No further analysis of the suitability of the material substitution was undertaken.
The design engineer told the tie rod manufacturer that the material substitution would be possible and subsequently approved issue 2 of the EO, with the addition of 431 stainless steel as an alternative material, on 20 August 1998.
The EO noted that the approval was justified on the basis that the tie rods were replaced with new material per the tie rod manufacturer’s information. Reference was also made to de Havilland TNS No 29 issue 2.
A new tie rod manufacturer part number, JRA-776-1, was issued for the replacement tie rods. The tie rod manufacturer reportedly commenced mass production of the tie rods around this time.
Engineering order - Design drawing Issue 1
On 9 November 1998, the design engineer approved an engineering drawing, designated as Drawing number JRA 776 Issue 1, prepared by the manufacturer. The only technical changes in the design from Issue 1 of the EO were an increase in the strength requirements to 140–150 ksi and the provision of dimensional information for the nuts. This removed the need for sample nuts to be referenced during manufacture.
It was likely that the development of the drawing was primarily to present the EO design in a format that was more suitable to a manufacturing environment. The drawing retained the same part numbers for the rod and nuts as those referenced on the EO. A note was included stating that all machining was to be performed in accordance with the tie rod manufacturer’s manual.
Design drawings - Issue 2 and 3 of the tie rod approval
Further revisions to the design drawings were approved on 29 March 1999 and 28 October 1999. These revisions were approved by the same design engineer and expanded the applicability of the drawings to include two additional aircraft types (DH.83 and DH.60M). As per previous issues of the design, a note was included stating that all machining was to be performed in accordance with the tie rod manufacturer’s manual.
Design drawing Issue 4 of the tie rod approval
Issue 4 of the drawing was changed to a computer aided drafting (CAD) format and included the option of a 5/16-inch British Standard Fine thread. It also specified that the outside diameter of the tie rod was to have a ground surface finish. The revised Issue 4 of the drawing was approved under CAR 35 on 30 May 2002 by the same design engineer.
Associated with Issue 4 of the design drawing, the design engineer produced a report that provided the engineering justification. The report noted that the justification was by comparative analysis and that the original material was 4130 or 4140 steel of a hardness of 32 on the Rockwell C scale.[31] The replacement material was 4130 or Type 431 stainless steel bar stock with a strength of 140–150 ksi.
Further, the report noted that the dimensions were the same as the original, that there were no special manufacturing features or tolerances on the original part, and that the failure of the original part was due to corrosion.[32] There was no mention of CASA airworthiness directive AD/DH 82/10 or TNS 29 on either the design drawing or the justification report.
On 24 November 2003, CASA approved the tie rod design under an Australian Parts Manufacturer Approval (APMA). This approval was based on Issue 4 of the design drawings and the justification supplied by the design engineer.
Equivalent strength and fatigue analysis
Equivalent strength analysis is a comparative analysis method commonly used in aircraft repair situations to ensure that the repair or replacement part provides the same, or better, strength than the original. Equivalent strength analysis provides a means of showing that the aircraft still complies with the original design standard, without having to show direct compliance with that standard.
There can be two aspects to equivalent strength justification, static strength equivalence and fatigue strength equivalence. Static strength equivalence is where the engineer need only show that the repair or replacement part can sustain the same loads, statically applied, as the original without failure.
Unless a part is known or thought to be prone to fatigue, static strength equivalence is often all that is required. In cases where the part, or affected structure, is known to be fatigue critical, equivalent strength justification would also require fatigue strength equivalence. In this case, the engineer would need to perform an analysis to show that the repair or replacement part has the same, or better, fatigue resistance.
The equivalent strength method does not require the engineer to have knowledge of, or determine, the actual design loads for the part/structure. The analysis simply ensures the same total strength, which in some cases may be well above the design loads.
The Type Design Organisation reported that the 1930s military design code to which the DH82 was designed prescribed a design using static strength principles.
Part service history considerations
In the case of the original tie rod design approval, the design engineer reported that he was informed that the tie rods were unserviceable due to corrosion. The design engineer stated that, when approached to revise the engineering order to include the stainless steel, he did not know that the tie rods had been removed because of the requirements of an AD (AD/DH 82/10). No further research of the original part’s service history, such as a search of the ADs was undertaken by the design engineer. Static strength and corrosion prevention were the primary design considerations when the design was approved.
The design engineer reported that TNS 29 was used as a reference, after being told by the tie rod manufacturer that the document contained information on the original tie rod design. However, he was not provided with a copy of TNS 29, nor did he obtain a copy himself. As such, the design engineer was unaware when developing the EO of all of the information provided in that document, in particular the failure of a tie rod due to fatigue.
The design engineer reported that if he had been aware of the failure of a previous part due to fatigue, and that the original design tie rods were subject to an expiry life limit, as documented in TNS 29, he would have possibly stipulated in the EO that the thread be rolled instead of cut. This was on the basis that rolled threads have better fatigue resistance.[33] The design engineer also indicated that they would not have permitted the use of 431 stainless steel as an alternative material.
Australian Parts Manufacturer Approval
In 1998, the requirements for the manufacture of parts changed with the introduction of the Civil Aviation Safety Regulations (CASR). Subpart 21.K Approval of materials, parts, processes and appliances covered the regulations for the manufacture of parts for sale. A transition period permitted parts to continue to be manufactured under the previous CAR 30 approvals until 30 November 2003.
An Australian Parts Manufacturer Approval (APMA) was a comprehensive approval process that covered design and manufacture approvals. The regulations in CASR subpart 21.K included the requirements for the design of the part and the manufacturing quality control system to ensure conformity of the manufactured parts with the design. CASR 21.303 (4)[34] stated that an APMA for a replacement or modification part would be given if (emphasis added):
(a) following examination of the designs, CASA is satisfied that the design meets the airworthiness requirements of these regulations applicable to the aircraft, aircraft engine or propeller on which the part is to be installed; and
(b) the applicant submits a statement certifying that the applicant has established the fabrication inspection system required by sub regulation (11).
Under the regulations, responsibility for demonstrating compliance with the airworthiness requirements rested with the APMA applicant. Two ways of showing compliance with the applicable airworthiness requirements were permitted. These included:
- demonstrating compliance with the specific requirements through tests and/or computations
- showing that the part is identical to the original part.[35]
An applicant for an APMA was responsible for all inspections and tests necessary to determine:
- compliance with the applicable airworthiness requirements;
- that materials conform to the specifications in the design;
- that the part conforms to the drawings in the design;
- that the fabrication process, construction, and assembly conform to those specified in the design.
In addition, the applicant was required to establish and maintain an acceptable manufacturing quality control system, referred to in the CASRs as a fabrication inspection system.
CASA was required to issue an APMA if the applicant was eligible, entitled and applied for the APMA in accordance with the requirements of Subpart 21.K.
CASA procedures for APMA approval
The procedures for granting production approvals was contained in the CASA Production Approval Procedures Manual (PAPM).[36] The PAPM provided for national and standard procedures to assess and approve applications for production approvals under CASR (1998) Part 21.
The PAPM contained procedures and policies to assist the CASA officers assessing an APMA application to determine that it complied with all of the appropriate regulations. Those policies and procedures included an engineering assessment to ensure that a part’s design complied with the applicable airworthiness requirements required by CASR 21.303 (4)(a). Aspects considered as part of this engineering assessment in the PAPM included:
- the service history of the part to verify that it was not the subject of:
- an airworthiness directive (AD)
- other continued airworthiness problems
- an incident/accident investigation
- substantiation of any life-limited part to accurately establish its life limits and airworthiness.
The PAPM permitted variation of the depth of assessment for engineering design modifications approved under CAR 35/36. However, there was no guidance on such variations, or on responsibility for determining the variation permitted.
When assessing an application for a critical part, coordination with the Section Head Certification Support Services and Type Manager Certification was required by the PAPM. In this context, a critical part was defined as:[37]
…a part that must be inspected, overhauled, or removed or retired from the aircraft within a period specified:
in the Airworthiness Limitations section of the Manufacturer's Maintenance Manual (as published from time to time by the aircraft's manufacturer) for the aircraft; or
in the Manufacturer's Instructions for Continued Airworthiness (as published by the manufacturer from time to time) for the aircraft.
Although the PAPM was an internal CASA document, CASA provided a copy of the PAPM on their publicly accessible website.
Guidance on APMAs
CASA advisory circular (AC) 21.16 (0) Approval of Materials, Parts, Processes and Appliances provided guidance to industry on applying for an APMA. The AC described an acceptable means of showing compliance with CASR subpart 21.K, including design and manufacturing aspects.
With regard to the design aspects, AC 21.16 (0) identified the data that the applicant was required to submit to CASA with the application. This included detailed drawings and specifications, together with the testing or other substantiating data showing that the part design complied with the applicable airworthiness requirements. However, there was no mention in the AC regarding consideration of the service history of the original part or ensuring that the life limit of the replacement part was substantiated as part of the application.
AC 21.16 (0) advised that the final inspection stage of the fabrication inspection system ensured that each part completed was subject to a final inspection. This inspection was to ensure that the part:
- conformed with the approved design data
- complied with applicable ADs or Service Bulletins
- was safe for installation on the type-certified product.
Tie rod manufacturer APMA’s
Engineering Support Branch approvals
A number of CAR 30 manufacturing organisations were selected by CASA to trial the new procedures for transition to Part 21. This included the tie rod manufacturer, who commenced transitioning to the APMA system when CASA were still in a learning phase themselves.
The tie rod manufacturer’s initial APMA was processed by CASA’s Engineering Support Branch (ESB). This review took some time as the tie rod manufacturer’s quality system required changes to align with the new requirements of a fabrication inspection system. The initial APMA was issued on 18 July 2000 and related to a number of components for Embraer aircraft listed in an associated APMA supplement.
The tie rod manufacturer had more than one thousand different CAR 35-approved parts manufactured under their CAR 30 (Legacy) approval. As a result, CASA requested that they make their APMA applications in batches. At the time the ESB, in addition to their other regulatory responsibilities, was processing APMA applications from a number of other organisations. As a consequence, significant delays were occurring in processing the applications. In addition, the APMA approval process required a significant amount of additional information for the ESB to be satisfied that the designs complied with the applicable airworthiness requirements.
On 20 January 2003, the ESB approved three more APMA supplements for the tie rod manufacturer that included various Embraer and Partenavia P68 aircraft parts.
CASA’s files showed the use by the ESB of a checklist for the ‘assessment of production drawings for manufacture’. The checklist, which had a document generation date of 1 July 2002, included the specific check ‘Is the item [subject] to an Airworthiness Directive’. Subsequent APMA supplements approved by the ESB identified AD’s that were applicable to a number of the tie rod manufacturer’s parts. For example, APMA Supplement 016 of 31 March 2004 included a note that:
Airworthiness Directive AD/SWA226/89 is applicable to Part No. JRA-249-1. The manufacturer must include a statement in Block 13 of the Authorised Release Certificate (CASA Form 917) issued with the part, that this AD is applicable.
Correspondence in CASA’s files suggested an at times quite tense relationship between the tie rod manufacturer and the ESB. A number of letters were written by the tie rod manufacturer to senior CASA personnel and federal and state ministers. In their letters, the tie rod manufacturer expressed concerns about the time taken and level of detail necessary in support of the APMA applications. These concerns were in the context of what the manufacturer considered to be acceptable designs, as they were already approved under CAR 35.
Regulatory Reform Programme Implementation team
About 12 months before the end of the CAR 30 to CASR part 21 transition period, a large number of the tie rod manufacturer’s parts approvals had still not been processed. In response, CASA set up a Regulatory Reform Programme Implementation (RRPI) team specifically to process these applications. From January 2003 until the end of the implementation period, the ESB no longer processed any of the tie rod manufacturer’s APMAs.
The RRPI team processed and approved over 1,000 parts in 11 supplements to the tie rod manufacturer’s APMA as follows:
- on 10 November 2003, supplements 005, 006, 007, 008, and 009
- on 24 November 2003, supplements 010, 011, 012, 013 and 014
- on 28 November 2003, supplement 015.
These supplements included replacement parts for Transport Category aircraft such as the Embraer EMB-120, de Havilland Canada DHC-8 and Fokker F28.
The intended replacement Tiger Moth tie rods, part number JRA-776-1, were included amongst a variety of other parts contained in Supplement 010. This supplement documented that in respect of the DH82 and DH82A tie rods, JRA-776 Issue 4 was the basis for the design data and approval for replacement parts.
There was no mention of airworthiness directive AD/DH 82/10 or TNS 29 in Supplement 010.
The tie rod manufacturer and design engineer indicated that the data package for the tie rods consisted of a copy of Issue 4 of the CAR 35approved drawing and the engineering justification report prepared by the design engineer. However, CASA were unable to provide any files that contained information on the engineering assessment of any of the parts approved by the RRPI team. CASA could not confirm the creation by the RRPl team of such files. However, CASA did provide a copy of a RRPI file that contained some administrative information and copies of the tie rod manufacturer’s APMA supplements that were approved by the RRPI.
The CASA Director of Aviation Safety issued a policy notice to the RRPI team in November 2002. That notice, RRPI Policy Notice 004 APMA Use of CAR 35 Authorised Persons, provided guidance to the RRPI and stated that:
In order to streamline implementation of Part 21 Civil Aviation Regulations 1998 (‘CASRs’), CASA has decided that persons authorised to approve designs of modifications and repairs to aircraft under regulation 35 of the Civil Aviation Regulations 1988 (‘CARs’) can determine compliance of those designs with applicable airworthiness standards, for the purposes of CASA issuing Australian Parts Manufacturer Approvals (‘APMAs’) under Subpart K of CASR Part 21.
and that:
For the purposes of CASR 21.303 (4)(a), drawings and other design data which have been approved by a CAR 35 authorised person may be regarded as satisfactory evidence that the approved design meets the airworthiness requirements of the regulations.
Where a design of a modification or repair has not been approved under CAR 35, industry should be encouraged to obtain approval from a CAR 35 authorised person.
The policy notice did not make reference to consideration of the original part’s service history, including the review of any applicable airworthiness directives, nor was there any reference to life substantiation for life-limited parts.
The policy notice expired on completion of the RRPI program. The RRPI’s activities were completed by the end of November 2003 and responsibility for processing the tie rod manufacturer’s APMA applications returned to the ESB.
Comparison of the APMA system with the United States Federal Aviation Administration Parts Manufacturer Approval system
The APMA system was based on the Parts Manufacturer Approval (PMA) system that had been functioning under the US Federal Aviation Administration (FAA) since 1972. A review of the FAA regulations and guidance material in FAA AC 21-303.1A Certification Procedures for Products and Parts found that the regulations and advisory circular were effectively the same as for the APMAs.
CASA’s Production Approval Procedures Manual (PAPM) was also compared to FAA Order 8110.42A. This order described the procedures for FAA personnel responsible for approving replacement or modification parts.[38] Although they were for the same purpose and supported effectively the same regulations, a number of significant differences were identified.
In the first instance, the FAA permitted Designated Engineering Representatives (DERs)[39] to make findings of compliance with the applicable airworthiness requirements. Those findings were to be made in accordance with FAA Order 8110.42A, of which DERs were included on the distribution list. Together, this ensured DER awareness of the need to consider aspects such as the intended replacement part’s service history and life-limitations.
A difference was also noted between the definitions of ‘critical’ in the two documents. The CASR definition only applied to parts with repetitive, time-based inspection and/or replacement requirements. However, the FAA definition was broader, and included consideration of the effect of the failure [emphasis added]:
Critical is a term applicable to parts, appliances, characteristics, processes, maintenance procedures, or inspections when if failed, omitted, or nonconforming, may cause significantly degraded airworthiness of the product during takeoff, flight, or landing.
There were other differences, including a greater emphasis on continued airworthiness requirements in the FAA documentation. For example, in FAA Order 8110.42A and depending on the criticality of the part, the applicant was required to provide a life management plan to assure continued airworthiness of the PMA part. That life management plan had to include continued monitoring of the in-service parts and review of the design assumptions. The FAA requirement for a life management plan was partially covered in the PAPM, but did not include consideration of the criticality of the part.
Similarly, FAA Order 8110.42A, included consideration of the applicant’s instructions for continued airworthiness. If the applicant was proposing that no instructions were necessary, then the assessing officer was to review the applicant’s substantiation for their position.
In March 2014 the FAA cancelled advisory AC 21-303.1A and replaced it with a number of new advisory circulars covering different aspects of PMA approvals. Although FAA AC 21.303-4 Application for Parts Manufacturer Approval via Test and Computation or Identicality was not released until after the accident involving VH-TSG, it was reviewed by the ATSB to assess the current state of the system on which the APMA system was based.
FAA AC 21.303-4 was a complete rewrite that included a significant change in the guidance provided. That guidance was in much greater detail and required a significantly greater level of justification for PMA compliance with the FAA regulations. New aspects of the guidance in AC 21.303-4 included:
- a safety assessment for all applications that considered the nature of the part[40] and the impact of its failure modes on safety. The safety assessment was also to consider the service history of the original part
- the need for a continued operational safety plan that was reflective of the part’s safety significance
- guidance on the approval of critical and life-limited parts
- a fatigue evaluation of parts subjected to cyclic loads, even if the original part was not lifelimited
- a section on parts that were the subject of airworthiness directives requiring the applicant to show that their design does not reproduce the unsafe condition
- inclusion of a checklist for applicants to complete when applying for a PMA.
Although there were some differences, FAA advisory circular AC 21.303-4 more closely matched the procedures in FAA Order 8110.42A.
Changes to APMA rules and guidance since 2003
Since November 2003, CASR 21.303 has had several changes. The most significant of these changes was the addition of an option for CASA to satisfy itself that a design met the airworthiness requirements on the basis of design data approved by CASA or an authorised person.
A later revision of CASR 21.303, current at the time of this report, permitted CASA to satisfy itself that the design complied with the applicable airworthiness requirements on the basis of a certificate from an approved design organisation.[41] This only applied for approved design organisations that were specifically authorised by CASA to issue such certificates. The supporting advisory circular has, however, remained unchanged.
The only change with regard to the acceptance of design data approved by authorised persons in the PAPM was the inclusion of the following point within the ‘Design Assessment’ process:
Design data as defined in CASR 21.303(c) that has been approved by an AP [Authorised Person] for CASR 21.303(4) is to be reviewed at the discretion of the PO [Project Officer], commensurate with the knowledge and experience that CASA has of the AP.
Parts traceability
Traceability of critical parts
CASR 21.Q.3 Critical parts, section 21.850 stipulated that any critical part manufactured after 1 October 2000 must be permanently and legibly marked with its part number and a serial number.
Although the original drawings for the manufacture of the replacement tie rods were completed before October 2000, subsequent issues of the drawings after that date, including those submitted during the APMA approval process, did not address the parts marking requirement. Tie rods manufactured after October 2000 did not incorporate those requirements.
None of the JRA-776-1 rods inspected by the ATSB, including those manufactured after October 2000, had a part number or serial number affixed.
APMA parts traceability
Regardless of the criticality of the part, all APMA parts were required to be marked in accordance with CASR 21.Q.4. This included the following information:
(a) the capital letters APMA; and
(b) the trade mark, name or symbol of the holder; and
(c) the part’s part number; and
(d) the part’s serial number (if any); and
(e) the name and model designation of each type certificated product to which the part may be fitted.
The CASRs accepted that in some circumstances it may have been impractical to mark the parts. In these circumstances, and with the agreement of CASA and the APMA holder, it was possible for the stipulated information to be provided on the item’s release certificate. No such agreement was identified for the JRA-776-1 tie rods in any of the CASA files, or in the information supplied by the manufacturer.
Previous ATSB Tiger Moth investigations and similar accidents involving other aircraft types
ATSB investigations[42]
Investigation 199800648, VH-TMK
A review of the ATSB’s occurrence database identified one previous known case of an in-flight breakup involving Tiger Moth aircraft in Australia between 1969 and 2013. That accident involved aircraft VH-TMK on 28 February 1998, when the aircraft broke-up in-flight during aerobatics.
Witness evidence and the disposition of the wreckage indicated that the right upper wing failed while the pilot was pulling out from a loop. The wing failed in the area of the right upper wing spar where the inter-plane strut was attached. Evidence indicated that the upper right wing spar was significantly weakened around the inter-plane strut attachment point by the effects of fungal decay and a partially de-bonded doubler.
Following that investigation, guidance on the inspection of Tiger Moth aircraft wooden structures was enhanced with the release by the Type Design Organisation of TNS CT (Moth) No. 32 (now at Issue 3). Under the Australian regulations, unless mandated by the issue of an airworthiness directive by CASA, or by CASA adoption of a State of Design airworthiness directive, TNS CT (Moth) No. 32 Issue 3 provides for a series of non-mandatory inspections done at the discretion of the aircraft operator and maintainer.
At the time of the accident involving VH-TSG, the TNS 32 inspections were not mandated in Australia.
Investigation 200200377, VH-AJG
In another accident, on 16 February 2002, VH-AJG was reported seen by a number of witnesses with the wings folding during straight and level flight. However, wreckage examination could not determine if any part of the aircraft structure failed prior to the aircraft departing level flight.
Similar accidents involving other aircraft types
UK Air Accidents Investigation Branch investigation NO: 2/88, Stampe SV4C G-ATKC[43]
The Stampe SV4C (Stampe) is a French-built biplane with an almost identical wing design to that of the DH 82 Tiger Moth. On 2 August 1987 a UK-registered Stampe was conducting aerobatics on a private flight when the left wings folded back alongside the fuselage and the aircraft subsequently impacted terrain.
Inspection of the aircraft wreckage indicated that both fuselage lateral tie rods failed on the left side due to fatigue in the thread roots. Further, the right-rear tie rod also had a fatigue crack that similarly initiated from the thread root.
Stampe tie rods were the subject of a service bulletin issued by the French Type Design Organisation in 1971, following an earlier tie rod failure that occurred to a foreign-registered Stampe aircraft. The service bulletin revised the tie rod design by specifying high strength steel with ends having rolled (as opposed to cut) threads. A 500-hour life was also imposed on the tie rods. Shortly afterwards, a UK manufacturer offered an alternate design that was approved by the UK CAA as a minor modification. The alternate design had several differences from the revised 1971 design. These included cut instead of rolled threads, slightly lower strength material and a slightly smaller diameter.
The UK-manufactured and designed tie rods were fitted to G-ATKC at the time of the accident. The tie rods had accumulated about 365 hours in service in an aircraft with a high aerobatic use. After the accident the UK CAA reduced the life of the tie rods by half to 250 hours.
Effective investigation techniques
The recovery of the video recording device and successful download of the data was pivotal in the ATSB’s understanding of the left lower wing failure in this accident. Interpretation of the data informed the ATSB’s understanding of the:
- weather conditions at the time
- duration of the flight and aerobatic manoeuvres preceding the failure
- nature of those aerobatic manoeuvres
- failure sequence.
The increasing prevalence of all manner of aircraft, engine and other systems and personal recording devices is well known. The availability and utility of the on-board video equipment in this case reaffirms the need for investigators to be open to the presence to these types of equipment, and to recover them for possible later download and analysis of the recorded data.
__________
- A humpty bump is a combination of an ascending and descending line with a half-loop between both lines.
- The last entry in the pilot’s logbook was on 2 November 2013. The pilot also recorded hours flown in a notebook.
- The specific websites accessed by the Type Design Organisation were not stipulated.
- REF _Ref416857708 \h REF _Ref431466902 \h Figure 3 is a drawing of a de Havilland DH-82C wing structure. The internal structure is very similar to that of the DH82A wing.
- This serial number is based on maintenance information. No data plate was located on the aircraft to confirm the serial number of the aircraft.
- Visual flight rules (VFR) are a set of regulations which allow a pilot to only operate an aircraft in weather conditions generally clear enough to allow the pilot to see where the aircraft is going.
- The ATSB examined the potential effect of varying taxi times on the determination of this total time in service. Such variations were not identified as a factor in the accident.
- The tie rods were not required to be removed for the visual examination. As a result, any cracks that existed in the threaded sections would not have been identified.
- BASI was the predecessor to the ATSB.
- BASI did not investigate this accident.
- An automated pre-recorded transmission indicating the prevailing weather conditions at the aerodrome and other relevant operational information for arriving and departing aircraft.
- Cloud cover is normally reported using expressions that denote the extent of the cover. The expression scattered indicates that cloud was covering between a quarter and a half of the sky.
- A Common traffic advisory frequency is the frequency on which pilots operating at a non-towered aerodrome should make positional radio broadcasts.
- Primary radar returns are produced by radar transmissions that are passively reflected from an aircraft and received by the radar antenna. The received signal is relatively weak and provides only position information, not the aircraft’s altitude.
- Secondary radar returns are dependent on a transponder in the aircraft replying to an interrogation from a ground station. An aircraft with its transponder operating is more easily and reliably detected by radar and, depending on the mode selected by the pilot, the aircraft’s pressure altitude is also displayed to the air traffic controller.
- A package of documents that provides the operational information necessary for the safe and efficient conduct of national (civil) and international air navigation throughout Australia and its Territories.
- An aircraft transponder signal with barometric information from an encoding altimeter, encrypted so that it enables altitude presentation on air traffic control radar screens.
- An aircraft collision avoidance system that monitors the airspace around an aircraft for other aircraft equipped with a corresponding active transponder and gives warning of possible collision risks.
- AIP ENR 1.6 Section 7.1 Operation of SSR Transponders, paragraph 7.1.2.
- Hand die cutting is a method of forming a thread on a rod by manually-rotating a die down a rod. During this process the die’s rotation is reversed several times to remove swarf and for die removal from the formed thread. Hand die cutting has a tendency to leave specific tool marks in the thread form, which identify it as the method used. Another method is called Coventry die cutting, which uses a die head fixed in a metal machining lathe. In this method, the rod rotates as it is fed into the die. While the thread is being cut, the rod only rotates in one direction and the head opens automatically at a pre-set thread depth. Similarly, lathe cut threads also use a fixed cutting tool and the rod is rotated in one direction as it is fed into the tool to cut a thread. Generally speaking, Coventry die cutting and lathe cutting leaves a superior quality thread finish to that achieved with hand die cutting.
- There are several manufacturers of tie rods for installation in DH82A aircraft. Only the Australian manufacturer’s tie rods were constructed from stainless steel, making them distinguishable from the other manufacturers’ tie rods.
- Removed from VHASB in June 2010 and replaced with JRA rods. Whereas the life limit of the tie rods was 2,000 hours in accordance with AD/DH 82/10, these rods had accumulated about 2,282 hours at the time of their removal.
- The Safety Trend Indicator was a questionnaire designed to identify unsafe situations within an organisation. It was completed every 6 months by a CASA inspector who had the best knowledge of that organisation.
- British Aerospace (BAe). The Aircraft Type Certificate Holder changed to de Havilland Support Ltd in 2001.
- Corresponding to the industry-standard Service Bulletin. The requirements of a TNS can be mandated by a National Airworthiness Authority.
- The ANO was issued on 10 December 1979 and was replaced on 12 December 2004 by Civil Aviation Order 100.6. This order updated the content of the ANO to reflect the regulations of the day.
- An approval under CAR 35 signifies that the design of a repair or modification to an aircraft complies with the design standard that was applicable to that aircraft.
- The strength of steels can be inferred from measurement of their hardness.
- Although the material stipulated in the engineering order was very similar to the original design specification, it was not exactly the same.
- The Rockwell scale is a hardness measurement based on the depth to which a specific indenter can penetrate into the material. A number of different Rockwell scales are available. The particular scale designations depend on the shape of the indenter used and the load applied to the indenter. The Rockwell C scale uses a 120° diamond cone indenter and a 150 kg load.
- In this context, and with reference to the need to replace the tie rods in the Australian Tiger Moth, the degree of corrosion meant that the rods’ serviceability was compromised to the extent that they could no longer fulfil their duties as defined.
- Steel components with rolled threads can be 10–20 per cent stronger through the threads and have a much higher resistance to fatigue when compared to the same components with cut or ground threads.
- Note that unless otherwise stated, all references to the CASRs in this report refer to the amendment status in force in November 2003. That is, including amendments up to SR 2003 No. 189 of 1 October 2003.
- Showing that a part is identical includes showing that the dimensions and tolerances, material specifications, and processes are identical to the original part. This is typically very difficult unless the applicant has access to the original manufacturer’s data through a licensing agreement.
- The version applicable at the time the tie rods APMA was approved was version 1.1 dated September 2003. Unless otherwise indicated, all references to the PAPM in this report are a reference to version 1.1.
- CASR Dictionary (regulation 1.4) Part 1 Definitions.
- Whereas the PAPM was for a range of production approvals, FAA Order 8110.42A was specific to PMA approvals.
- DERs effectively filled the same role as Australia’s CAR 35 authorised persons.
- Referred to as an ‘article’ in FAA AC 21.303-4.
- Approved design organisations are those that have been approved under CASR Subpart 21.J.
- Investigation reports available on the ATSB website at www.atsb.gov.au.
- Investigation report available on the UK AAIB website at https://www.gov.uk/government/organisations/air-accidents-investigation-branch.
Introduction
The on-board video footage indicated that the left-wing break-up sequence initiated with the left lower wing inboard leading edge moving upwards, before the front spar and associated structure was compromised. Inspection of the wreckage showed that the left-wing forward attachment Joint H fitting had separated from the fuselage. The fuselage lateral tie rods (tie rods), which linked the Joint H fittings in tension across the fuselage, had fractured on the left side.
Inspection of the tie rod fracture surfaces revealed areas of pre-existing fatigue cracking that had propagated through 60 per cent of the combined surface area of their threaded sections. When the tie rod fatigue cracks propagated to a critical size, the remaining material failed in overstress during operation within the aircraft’s normal flight load envelope.
Inspection of the aircraft, including a detailed inspection of the left lower wing structure, did not reveal any other pre-existing defects that may have contributed to the accident. Further, the video footage did not indicate any adverse weather conditions or manoeuvring that would suggest abnormal flight loads preceding the inflight break-up.
The following analysis examines the in-flight break-up sequence, tie rod history and fatigue crack initiation and propagation. The analysis also reviews the Australian Parts Manufacturer Approval (APMA) process as applied to the development and approval of the replacement JRA-776-1 tie rods that were installed in the aircraft.
Break-up sequence
Wing attachment fitting separation
With the fracture of the two tie rods on the left side, the two upper attachment bolts and nuts were the only remaining attachment hardware securing the Joint H fitting to the left side of the fuselage. The flight loads from the left wings acted on the Joint H fitting at the left lower wing attachment point, below the remaining attachment hardware. The upper attachment hardware was not designed for, and not capable of sustaining the loads applied by the wings in the absence of the tie rods. The upper attachment bolts failed in overstress.
Figure 31: The left Joint H fitting and left lower wing forward attachment point then detached from the fuselage

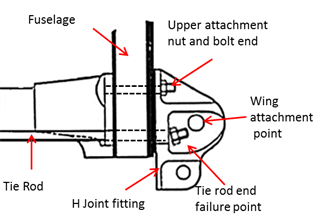
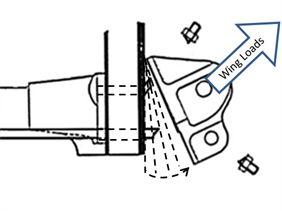
Source: de Havilland Support Ltd, modified by the ATSB
Progression of the left wing failures
When the wing attachment fitting separated, it allowed the fitting to move upwards until the movement was restrained by the landing gear. The left lower wing was still partially supported by the rear attachment fitting and the interplane struts, resulting in the inboard leading edge moving upwards, increasing the incidence of the inboard lower left wing (Figure 32).
Figure 32: Initiation of the left wings failure (looking aft)
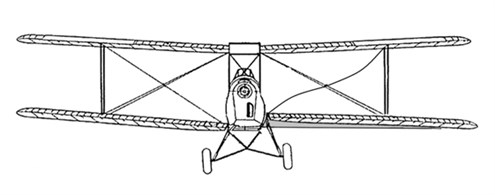
Source: de Havilland Support Ltd, modified by the ATSB
The increase in the incidence of the left lower wing increased the aerodynamic loads generated by that wing. Those loads continued to increase until the left lower wing front spar failed due to bending between the wing attachment fitting and the interplane struts (Figure33).
The upper wing transfers some of its loads into the fuselage through the flying wires. These flying wires connect to the lower wing attachment fitting. When the attachment fitting separated from the fuselage, the structural integrity of the upper wing was also degraded.
The failure of the tie rods resulted in a loss of structural integrity of the lower and upper left wings, leading to the in-flight break-up of the aircraft.
Figure 33: Left wing structural collapse
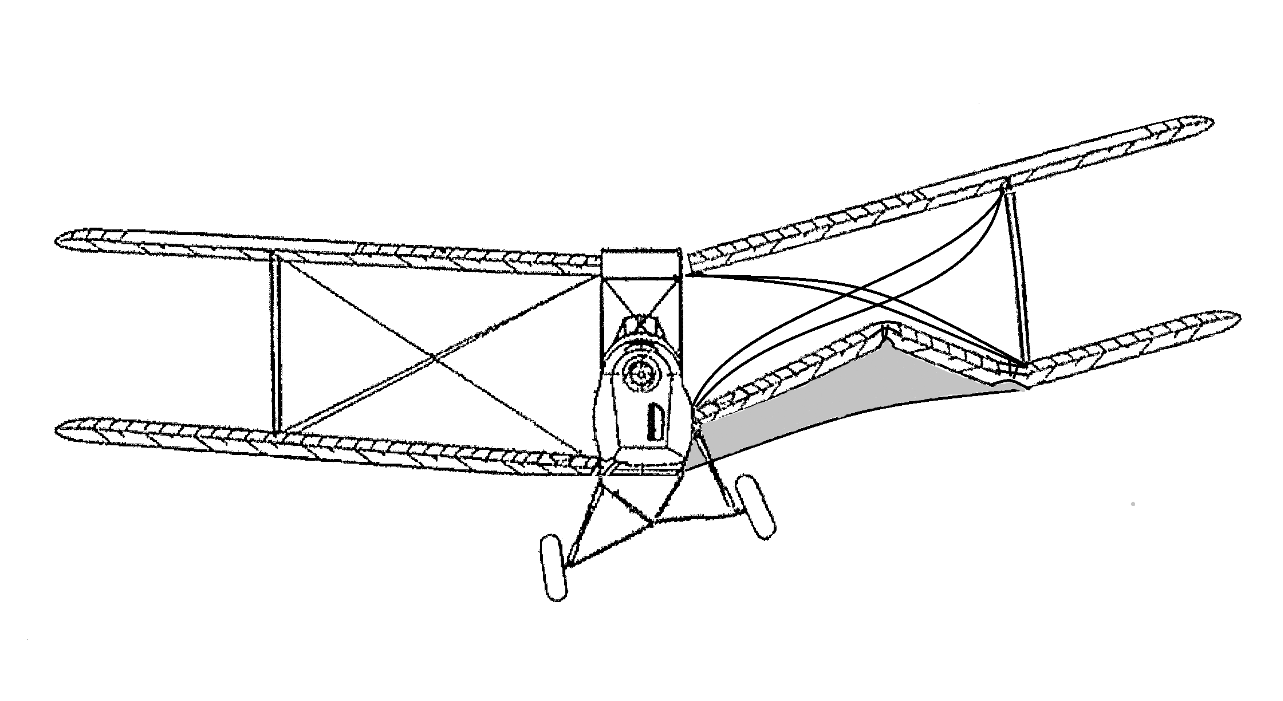
Source: de Havilland Support Ltd, modified by the ATSB
Tie rod information
General tie rod history
The tie rods on the Tiger Moth are a safety-critical component. Tie rods manufactured to the original design had been used for over 65 years of varied operations in thousands of aircraft. In that time there had been only one known tie rod fatigue cracking-related failure. In that instance, the tie rods had accumulated about 4,220 flight hours in service. Since the introduction by the then aircraft Type Design Organisation (now de Havilland Support Ltd) of the tie rod retirement life in 1997, no other fatigue cracks had been identified in original design tie rods.
About 234 of the Australian-manufactured JRA-776-1 replacement tie rods were made from 1998 to 2011 and distributed predominantly in Australia and New Zealand. The Australian tie rods incorporated a material substitution and differences in manufacturing standards.
VH-TSG tie rod fatigue cracks
The fatigue cracks in the tie rod threaded sections could have been influenced by a number of factors including design, manufacture, maintenance and operational aspects. Despite there being insufficient evidence to quantify their influence, these factors may have contributed either individually or in combination to the initiation and propagation of the cracking and ultimate failure of the tie rods fitted to VH-TSG. Each aspect is discussed in the following sections.
Design
The design of the replacement tie rods differed from the original design primarily because of a change in the material. The fatigue properties of the stainless steel used in the replacement tie rods are likely to differ from those of the material used in the original tie rods. When approving the replacement tie rod design under Civil Aviation Regulation (CAR) 35, the design engineer, unaware of any history of fatigue issues with the tie rods, only considered the static strength and corrosion properties of the substitute material. The fatigue properties of the substitute material were not considered.
The design engineer did not check the airworthiness directives applicable to the aircraft and as such did not identify the applicability of Civil Aviation Safety Authority (CASA) airworthiness directive (AD) AD/DH 82/10. This AD identified that a tie rod had failed in the United Kingdom due to fatigue cracks in the threaded sections, and that a life limit was imposed on them by the then aircraft Type Design Organisation’s Technical News Sheet (TNS). This news sheet was referenced in the AD.
It appeared that during the preparation of the engineering order, only information relating to the tie rod dimensions and basic material information was verbally passed to the design engineer by the tie rod manufacturer. Although the tie rod manufacturer made the design engineer aware of the TNS, by not obtaining a copy of the entire document, the design engineer missed the opportunity to become aware of the important information contained therein. This included the part’s fatigue critical nature and the associated life limitation.
By chance, the tie rods that initiated the original version of the engineering order were replaced due to corrosion. Without the important background information in the TNS, the design engineer perceived that corrosion was the major issue. Therefore, when considering the replacement material, it is likely that the design engineer’s focus was on the static strength and corrosion resistance properties of the alternative material, rather than on its fatigue properties.
When approving a repair or modification under CAR 35, the design engineer was required to ensure that the design complied with the design standard for the aircraft. One difficulty was that the Tiger Moth did not have a recognised civil design standard that was available to the engineer.
The absence of a recognised civil design standard specifically for the Tiger Moth in itself meant that the CAR 35 approval did not necessarily need to include a fatigue justification. However, the continued airworthiness requirements for the aircraft implicit in the TNS, and mandated by AD/DH 82/10 meant that those issues should have been considered during the CAR 35 approval of the tie rods.
Similarly, when the replacement tie rods were approved under the Australian Parts Manufacturer Approval (APMA) in 2003, an opportunity to identify that the AD was not considered was missed. This is examined in detail in the section Australian Parts Manufacturer Approval design approval process.
The ATSB did not have access to detailed fatigue data for either the original or replacement materials to enable a comparison of their respective properties. Given this, and other variable factors, the ATSB was unable to determine whether the alternative materials used in the manufacture of the replacement tie rods contributed to their premature failure in VH-TSG. However, the lack of a fatigue assessment by the design engineer resulted in replacement tie rods being manufactured and released into service with an unknown fatigue life.
Manufacture
The original design stipulated a die cut thread but the JRA-776-1 tie rod drawings did not specify a method for thread manufacture. All of the tie rods examined by the ATSB had hand or Coventry die-cut, or single-point lathe-cut threads. Each showed a variation in thread quality depending on the manufacturing method. In this regard, single-point, lathe-cut threads had a visually superior surface finish to any of the die-threaded tie rods (including those from VH-TSG).
The presence of surface defects such as notches, nicks and gouges, as seen on VH-TSG’s tie rod threads, can have a significant impact on the fatigue performance of a component. In this occurrence, the thread root scoring acted as a stress concentrator, providing a preferential fatigue crack initiation point. However, the overall influence on the premature failure of the tie rods from these artefacts could not be determined.
Other JRA-776-1 tie rods examined during the investigation had a similar quality thread form to that of VH-TSG’s rods, but no cracking was observed in any of the threads. Of note, all of the JRA776-1 tie rods examined had less time in service than those in VH-TSG and likely a less demanding operational history. The JRA-776-1 tie rod manufacturer did not have a specific quality control standard for acceptance of the manufactured threads.
In addition, in contrast to the intent of the manufacturer’s quality system, the associated processes did not prevent the production and release of tie rods that did not conform to the approved design specifications. In this regard, the ATSB identified that:
- The surface finish was different to that specified on the approved design drawing.
- Tie rods that were reportedly from the same batch as those in VH-TSG had varying surface finishes and tensile strength properties. This indicated that they were either in fact from different batches, or that different material stock was used in the manufacture of the same batch, contradicting the manufacturing documentation.
- The measured strength of the tie rods from VH-TSG differed from the strength identified on the test report that was referenced as the material source for the batch. This indicated that they were likely manufactured from different material stock.
- The material test report referenced as the source material for the manufacture of the tie rods in VH-TSG indicated that the strength of the material was less than the minimum requirement for the approved design. As such, the material was inappropriate for use in the manufacture of JRA-776-1 tie rods.
Although these quality issues probably did not influence the premature formation of fatigue cracks in the tie rods in VH-TSG, they indicate that the manufacturer’s quality system was not functioning as intended.
Maintenance aspects
The Joint H attachment bolts fitted to VH-TSG were not original parts and their origin could not be established. Non-standard bolts were also identified in two other Australian Tiger Moth aircraft.
The non-standard bolts were of approximately the correct strength and diameter but the grip length on some of the bolts recovered from VH-TSG was significantly shorter than specified. This meant that the Joint H attachment fitting was not being sufficiently supported by the grip portion of at least two of these bolts.
Assembly with undersized bolts had the potential to cause excessive shear loads to be imparted into the tie rods because of in-flight or landing loads (Figure 34). The ATSB was not able to determine the effect that this may have had on the fatigue life of the tie rods, but was likely to have been detrimental.
Figure 34: Joint H fitting bolts showing different grip lengths and the effect that had on Joint H attachment fitting shear load support
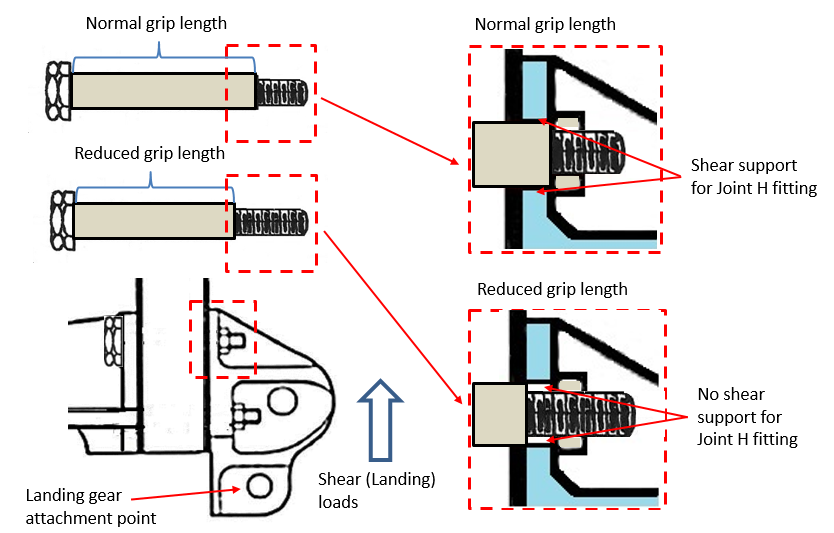
Source: de Havilland Support Ltd, modified by the ATSB
Similarly, incorrect tie rod installation as a result of improper or uneven preload of the nuts can result in higher-than-normal loads in one or both of the tie-rods. The fracture of VH-TSG’s tie rods precluded a determination of nut preload, and therefore whether incorrect installation of the tie rods was a factor.
Operation
Structural examinations were introduced by British Aerospace (the previous Type Design Organisation) as part of the requirements of TNS 29. The news sheet indicated that excessive loads from ‘undercarriage trauma’ (as defined in TNS 29) might be transferred to the fuselage through the Joint H fitting and as such, had the potential to damage the tie rods. It was possible that the thread indentations in the Joint H fitting special bolt holes in VH-TSG occurred as a result of a significant upwards force. These forces could be expected to be transferred through the fittings, such as during an especially hard landing, hitting a deep rut or, possibly as a result of the accident. However, despite its operation from an uneven runway surface and previous involvement in a number of accidents and incidents, there was no direct evidence to indicate that VH-TSG sustained recent undercarriage trauma.
VH-TSG was subjected to frequent, short duration joy flights that involved a high proportion of aerobatics. Increased exposure to stresses above a certain level (the fatigue limit of the component) increases the likelihood of fatigue crack initiation. However, there was no available data on the magnitude and frequency of stresses as a result of this type of operation.
The Tiger Moth had certain restrictions on the type of aerobatics, but not the amount of aerobatics that could be conducted in the aircraft type. However, the design assumption for the Tiger Moth was for occasional aerobatic usage. De Havilland Support Ltd considered that VH-TSG’s role, which included an aerobatic component in nearly every flight, represented high aerobatic usage. De Havilland Support Ltd indicated that following this accident, and a review of other current commercial Tiger Moth usage, they were considering introducing new restrictions in the area of aerobatic flights.
Australian Parts Manufacturer Approval design approval process
JRA-776-1 tie rods
At the time that the tie rod APMA was approved, the requirements for APMAs in the Civil Aviation Safety Regulations (CASR) contained two basic criteria for an aircraft part to be eligible for an APMA. These were that:
- CASA was satisfied that the design meets the applicable airworthiness requirements (CASR 21.303 (4)(a))
- the manufacturer had a suitable fabrication inspection system to ensure conforming parts could be produced (CASR 21.303 (4)(b)).
The CASRs did not explain what was required to satisfy CASA that the design met the applicable airworthiness requirements. However, CASA provided policies and procedures to assist their officers make a determination in the CASA Production Approval Procedures Manual (PAPM).
As part of the procedures in the PAPM for determining if the design met the airworthiness requirements, the CASA officers assessing the application were to consider the service history of the part. This was to verify that the part was not the subject of an airworthiness directive (AD), other continued service difficulties, or an accident/incident investigation. It also included a requirement for the applicant to establish the life of life-limited parts.
There was evidence that CASA was following the PAPM policies and procedures when the tie rod manufacturer’s APMAs were processed by CASA’s Engineering Support Branch. However, when responsibility for processing the remaining APMAs was transferred to a Regulatory Review Program Implementation (RRPI) team, an internal CASA policy notice was issued to the RRPI by the Director of Aviation Safety. That policy notice permitted, even encouraged, the RRPI to regard CAR 35-approved designs as meeting the airworthiness standards per CASR 21.303 (4)(a).
In the case of the tie rods, this likely resulted in the RRPI team’s engineering assessment of the design to not consider the service history of the original tie rods and, as such, not identifying that it was subject to AD/DH 82/10. As a consequence, the RRPI, like the CAR 35 design engineer, was unaware that the original tie rods were subject to a life limitation and did not require the applicant to establish the life limits for the replacement part.
Because of the change in CASA policy under the RRPI, the opportunity to identify that the fatigue life of the replacement parts had not be established was missed. Also, because the design engineer operated within a CASA-approved system that did not require an independent check of their design work, CASA inadvertently introduced a single point of failure within its approval process as applied to the tie rods.
Other APMA approvals
In addition to processing the APMA for the JRA-776-1 tie rods, the RRPI team also approved over 1,000 other replacement parts for manufacture by the tie rod manufacturer. All of those parts had previously been approved under CAR 35 and affected a range of aircraft types, including Transport Category aircraft.
The previous approvals were made by a number of CAR 35 authorised persons, including the design engineer who approved the tie rods. Those organisations’ supporting procedures may similarly have lacked an independent check of the engineering behind the approvals.
CASA’s policy at the time was to accept CAR 35 approvals without further detailed engineering assessment of the design per the PAPM. There was also a lack of records of CASA’s engineering assessment for those parts. In combination this meant that, in addition to the JRA7761 tie rods, there was the potential that the service history and life limitations of other safety critical parts were not independently considered by the RRPI during their respective approval processes.
Parts manufacturer approval procedures
A comparison of the CASA APMA process with the US Federal Aviation Administration’s (FAA) Parts Manufacturer Approval (PMA) system found an important difference in the PMA definition of ‘critical’. The FAA’s definition was broader in its application than that in the APMA, as it applied to more than just parts (for example, it also applied to materials and processes). Most importantly, the FAA included the need to consider the effect of the failure, or non-conformance, of the part on the safety of the aircraft to determine if it was critical. That difference influenced a number of other areas in the approval process where the criticality of the part could affect the requirements for consideration of continued airworthiness. This included the need for a life management program for critical parts.
Even though there have been a number of changes to the requirements of Civil Aviation Safety Regulation Subpart 21.K since its introduction in 1999, the related advisory circular had not changed in support. As a result, there were significant differences between the advice provided to industry by CASA and the regulator’s own processes and requirements for assessing APMA applications for approval. Those discrepancies increased the potential for important aspects of the approval process to be missed due to there being only one opportunity for their review. The revised FAA advisory circular, AC 21.303-4, more closely matches the FAA assessment and approval process. As such, the revised FAA PMA process is more likely to ensure all aspects have been appropriately considered.
It could not be determined if an improved definition of ‘critical’, and closer alignment of the advisory circular to the CASA Production Approvals Procedures Manual would have made a difference to the approval of the tie rods. In addition, there was no evidence to indicate a safety issue with the current CASA APMA approval process and associated advisory material, provided it is adhered to. However, the ATSB believes that aspects of the current FAA PMA approval system may, if adopted, further enhance the CASA APMA system and ensure best practice.
Parts traceability and serviceability
JRA-776-1 tie rods
A release note for the JRA-776-1 tie rods fitted to VH-TSG confirmed their production by the Australian tie rod manufacturer. The regulations stipulated that any critical part manufactured after 1 October 2000 must be permanently and legibly marked with part and serial numbers. Inspection of the Australianmanufactured tie rods supplied to the ATSB did not identify any signs of such markings.
Regardless of the criticality of the parts, any part made under an APMA was required to be permanently marked with its part and serial numbers. A dispensation against these requirements was possible if it was impractical to mark the parts. However, this required agreement with CASA. There was no indication of such an agreement with CASA for the tie rods.
Traceability of parts, and in particular critical parts, used on aircraft is vitally important in ensuring the serviceability of those parts. Marking of the parts provides ready determination of their origin should any service issues arise and assists the operator/maintainer track the in-service use of lifelimited components. This helps ensure that such parts are removed from service before they exceed their life limit.
The ATSB was unable to determine why the tie rod manufacturer did not appropriately mark the tie rods that were examined by the ATSB.
Other parts
Inspection of aircraft maintenance logs for the operator’s two Tiger Moths identified that various aircraft parts were fitted to both aircraft without the appropriate documentation and/or inspections. This makes it difficult to prove the authenticity and/or the serviceability of the parts fitted.
Proof of parts serviceability and traceability becomes more important as the age of the aircraft and parts increase. Without strict controls over aircraft parts, serviceability cannot be assured.
Transponder use
VH-TSG was fitted with a Mode C transponder. This meant that the transponder and associated altitude function (Mode C) should have been operating during the flight.
The lack of secondary radar returns from VH-TSG during the accident flight was consistent with the operator’s report that they would operate with the transponder switched OFF when outside controlled airspace.
The pilot of TSG was conducting aerobatics near the southern inbound flight path to Brisbane Airport. Aircraft using this flight path were routinely assigned a standard descent to 4,000 ft by air traffic control. In that area, the base of controlled airspace was 3,500 ft, which the operator reported was the height from which they commenced their aerobatics.
Given the proximity of the aerobatics to the inbound flight routes to Brisbane Airport, in terms of the location and operating height, operation of the aircraft’s transponder (including Mode C) would have allowed for an important dual defence against a breakdown of separation with aircraft inbound to that airport. In the first instance, air traffic control would have been aware of the height of VH-TSG and, if needed, been able to take action to manoeuvre inbound aircraft to maintain separation. Secondly, appropriately-equipped aircraft would have been alerted to VH-TSG by their on-board traffic collision avoidance systems and, if necessary been able to initiate avoidance action to maintain separation.
From the evidence available, the following findings are made with respect to the in-flight break-up of a de Havilland DH82A Tiger Moth, registered VH-TSG that occurred 300m east of South Stradbroke Island, Queensland on 16 December 2013. These findings should not be read as apportioning blame or liability to any particular organisation or individual.
Safety issues, or system problems, are highlighted in bold to emphasise their importance. A safety issue is an event or condition that increases safety risk and (a) can reasonably be regarded as having the potential to adversely affect the safety of future operations, and (b) is a characteristic of an organisation or a system, rather than a characteristic of a specific individual, or characteristic of an operating environment at a specific point in time.
Contributing factors
- Both fuselage lateral tie rods failed at the left lower wing end, which resulted in separation of the left lower wing forward attachment point and the subsequent in-flight break-up.
- The two JRA-776-1 tie rods fitted to VH-TSG had significant pre-existing fatigue cracks in the threaded sections. [44]
Other factors that increased risk
- The threads on the tie rods fitted to VH-TSG were manufactured with thread surface artefacts that would have reduced the fatigue life of the tie rods.
- The operation of VH-TSG in frequent aerobatics and from an uneven runway surface increased the risk of a reduction in the fatigue life of the tie rods.
- Together with a number of other Australian Tiger Moths, VH-TSG was fitted with nonstandard Joint H attachment bolts that did not conform to the original design with the result that the integrity of the Joint H could not be assured. [Safety issue]
- When approving the change in material for the manufacture of the replacement tie rods, the design engineer did not identify that the original parts had a life limitation, or that they had shown susceptibility to fatigue cracking. As a result, the engineer did not compare the fatigue performance of the alternative design to the original, and the replacement tie rods were manufactured to that design and released into service with an unknown fatigue life. [Safety issue]
- It was likely that, because of the Civil Aviation Safety Authority’s policy at the time, their engineering assessment of the tie rod design for inclusion in the manufacturer’s Australian Parts Manufacturer Approval did not consider the service history of the original tie rods or identify that they were subject to airworthiness directive AD/DH 82/10. Consequently, the assessment team was likely unaware that the original tie rods were subject to a life limitation, and did not require the life limits for the replacement tie rods to be established. [Safety issue]
- Over 1,000 parts were approved by the Civil Aviation Safety Authority for Australian Parts Manufacturer Approval using a policy that accepted existing design approvals without the authority confirming that important service factors, such as service history and life-limits, were appropriately considered. [Safety issue]
- The manufacturer’s quality system did not prevent non-conforming tie rods from being released for use on aircraft. [Safety issue]
- The JRA-776-1 fuselage lateral tie rods that were inspected by the ATSB were not appropriately marked with part and serial numbers, affecting the traceability and service history of the parts in a number of aircraft. [Safety issue]
- The operator regularly flew their aircraft near controlled airspace with the transponder switched OFF, reducing their aircraft’s surveillance visibility to air traffic control and other traffic collision avoidance system-equipped aircraft operating in their vicinity.
- A number of parts were fitted to both of the operator’s aircraft without the appropriate documentation and/or inspections, making it difficult to prove the authenticity and/or serviceability of the aircraft and parts fitted.
- Although a number of aerobatic manoeuvres were permitted in Tiger Moth aircraft, there was no limitation on the amount of aerobatic operations that was considered to be safe. As a result, operators may be unaware that a high aerobatic usage may exceed the original design assumptions for the aircraft. [Safety issue]
- Publicly available video recordings showed that some Australian commercial Tiger Moth operators conducted aerobatic flick (otherwise known as ‘snap’) and tailslide manoeuvres, which were prohibited by the Type Design Organisation.
Other findings
- Although examination of numerous other tie rods produced by the Australian tie rod manufacturer did not identify any fatigue cracks, none of those rods had been subjected to the frequent, short duration joy flights involving large numbers of aerobatics, or accumulated the same or a greater number of flight hours and cycles as those fitted to VH-TSG.
- A set of original equipment manufacturer tie rods from the operator’s other Tiger Moth, which was operated in a similar manner to VH-TSG, had exceeded the 2,000 hour life limit for application to original design tie rods by 300 hours, but did not contain any fatigue cracks.
- No preexisting defects were identified in the left-wing structure of VH-TSG that may have contributed to its in-flight failure.
- The on-board video recording showed that the types of aerobatic manoeuvres conducted during the accident flight were permitted in the Tiger Moth.
__________
- This finding was identified in the ATSB’s preliminary report as a safety issue because the ATSB’s understanding of the factors that may have led to the formation of the cracks was then incomplete. Actions were taken in response to this initial safety issue. These are detailed in the following section titled Safety issues and actions (see safety issue AO-2013-226-SI-01).
Sources of information
The sources of information during the investigation included:
- the aircraft operator
- a number of previous pilots of VH-TSG
- the Queensland Police Service
- the Civil Aviation Safety Authority (CASA)
- the United Kingdom (UK) Civil Aviation Authority (CAA)
- the UK Air Accidents Investigation Branch (UK AAIB)
- the New Zealand CAA
- the New Zealand Transport Accident Investigation Commission
- Australian operators and maintainers of Tiger Moth aircraft
- de Havilland Support Ltd.
References
Lampman S, 1996, Fatigue and Fracture Properties of Stainless Steels, ASM Handbook, Volume 19 - Fatigue and Fracture, ASM International, pp 712-732.
Thread Rolling, Die Threading, Machining of Stainless Steels, Surface Finish and Surface Integrity, Metals Handbook, Ninth Edition, Volume 16 – Machining, ASM International, Metals Park OH, 1989.
ASTM International A370 – 03a: Standard Test Methods and Definitions for Mechanical Testing of Steel Products.
Machinery’s Handbook – 27th Edition, Industrial Press Inc., New York, 2004.
Submissions
Under Part 4, Division 2 (Investigation Reports), Section 26 of the Transport Safety Investigation Act 2003 (the Act), the ATSB may provide a draft report, on a confidential basis, to any person whom the ATSB considers appropriate. Section 26 (1) (a) of the Act allows a person receiving a draft report to make submissions to the ATSB about the draft report.
A draft of this report was provided to de Havilland Support Ltd, the Australian Parts Manufacturer Approval tie rod manufacturer, the tie rod design engineer, the aircraft operator, the aircraft maintenance providers, CASA, the UK CAA and the UK AAIB.
Submissions were received from de Havilland Support Ltd, the UK AAIB, the aircraft operator and CASA. The submissions were reviewed and where considered appropriate, the text of the draft report was amended accordingly.
Appendix A - Component technical examination report
Introduction
On 16 December 2013, a de Havilland DH82A (Tiger Moth) aircraft, registered VH-TSG, impacted water while conducting a joy flight in the Gold Coast area, Queensland. On-board video footage showed that the aircraft had sustained a failure of the left wings. The exact point of failure initiation was not captured by the video, due to the restricted angle of viewing, but it was reasoned to have occurred in either the lower left wing, front spar, or alternatively, at the forward wing to fuselage attachment point (Joint H). The spar and the Joint H hardware were retained by the ATSB and examined at the ASTB’s engineering facility in Canberra.
The following components were examined;
- fractured front spar from the lower left wing.
- lateral tie rods
- Joint H and attachment fittings
- fuselage compression strut with three fractured bolts in situ.
Lower left wing front spar
The manufacturing label on the inboard end of the front spar indicated that it was manufactured in 1943. The spar was manufactured from a single piece of spruce that had been repaired at the inboard end; comprising a timber doubler, faced with plywood (Figure A1). The location of the repair was removed from the identified areas of initial spar failure (refer to Recorded information – Video Footage) and therefore not considered to be a contributing factor in the wing failure.
Figure A1: Left lower wing inboard two thirds of forward spar viewed from the front
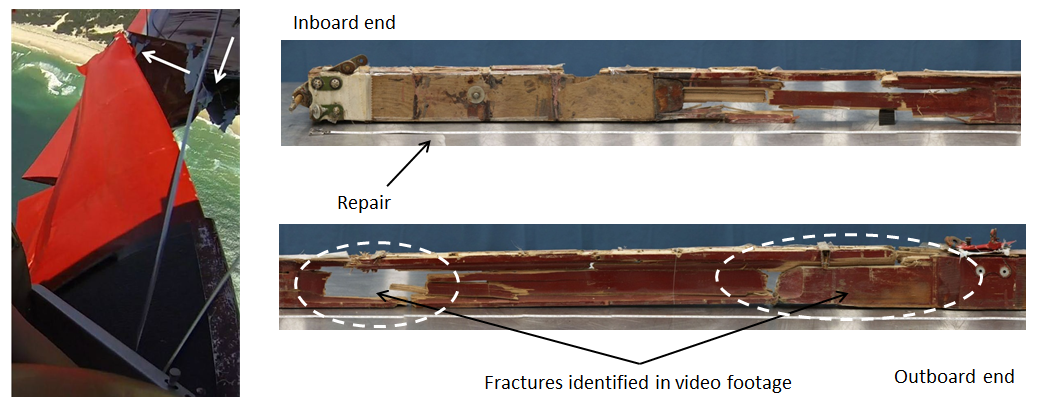
Source: ATSB
There was some evidence of corrosion of the spar hardware (bolts, screws, brackets) and associated timber discolouration. However, there were no indications of any significant preexisting defect, wood decay or rot in these areas or in the spar timbers more generally that would have contributed to premature failure of the spar. A moisture content test of the spar was conducted, with the results indicating that the moisture content was within the design specification of the timber[45].
Fuselage lateral tie rods
Both tie rods fractured at an area of pre-existing fatigue cracking within the threaded section, originating at the thread roots (Figure A2). The rear tie rod cracking extended across approximately 70 per cent of the total rod cross-sectional area and the forward tie rod cracking extended across approximately 50 per cent.
The remaining material on both rods fractured by ductile overstress. No significant corrosion or other defect was evident at or surrounding the points of fracture. The corrosion product on the forward tie rod picture below is superficial surface corrosion associated with contact between the tie rod and surrounding components during the breakup sequence.
Figure A2: Fuselage lateral tie rod fracture surfaces showing the left side thread ends

Source: ATSB
A fatigue crack was also present in the threaded section of the right end of the forward lateral tie rod. The crack had originated in the same thread-root area as the fractures on the left side, although the rod had not completely fractured in that area (Figure A3). The crack extended across about 50 per cent of the cross-sectional area. The crack origin was defined by a small, relatively smooth area of the fracture surface, originating at the root of the last fully-formed thread before the thread runout. The location of the crack origin was associated with mechanical scoring at the thread root, bounded by two irregularities (arrowed), all of which were artefacts of die-threading during manufacture (Figure A4 and Figure A5).
Figure A3: Forward fuselage lateral tie rod showing right side thread with fatigue crack
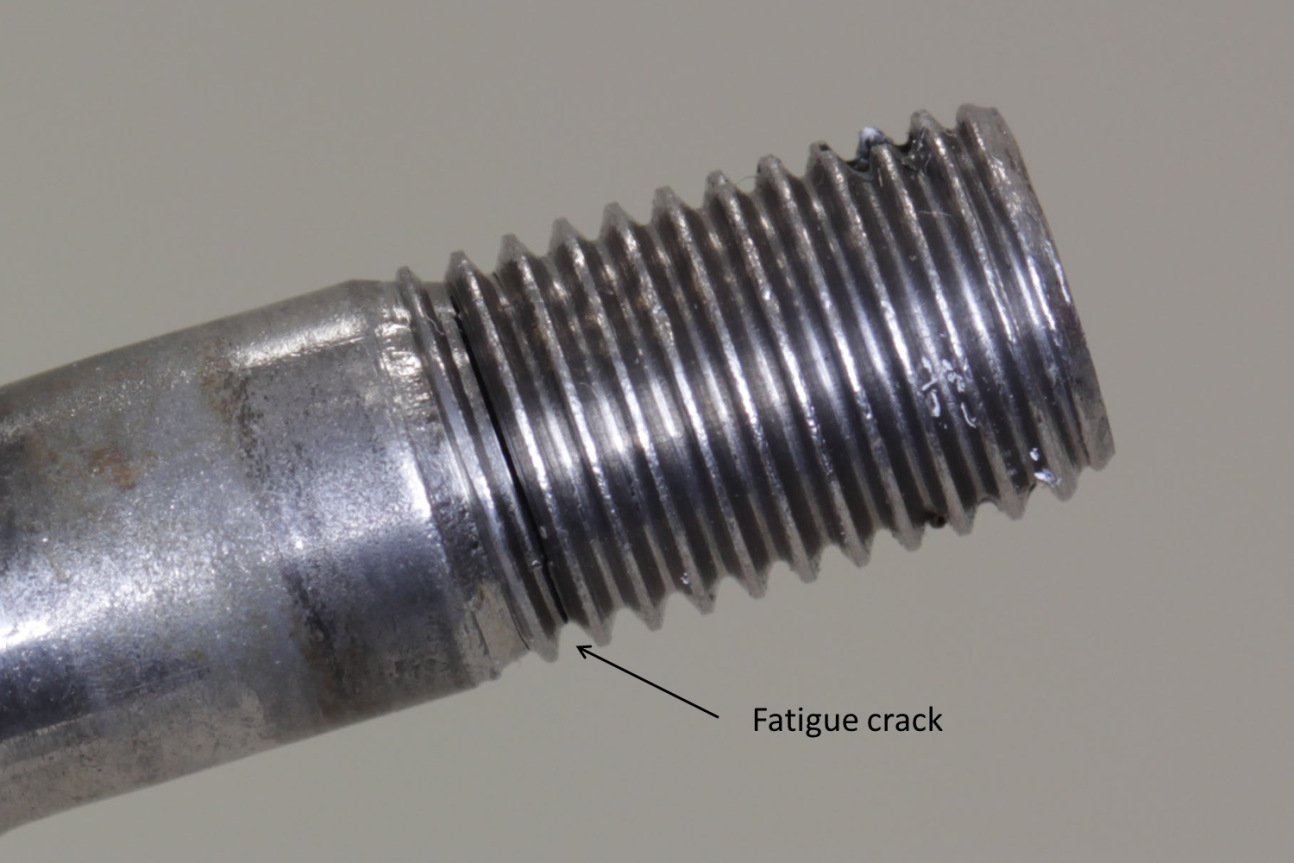
Source: ATSB
Figure A4: Fatigue crack in featured in Figure A3 opened to expose crack surface
Source: ATSB
Figure A5: Thread irregularities at fatigue crack origin
Source: ATSB
The method of thread production was not specified on the JRA-776-1 (JRA) part drawing, whereas the original de Havilland drawing specified die-cut threads. The appearance of the threads on VH-TSG’s tie rods was consistent with hand die-threading, which had resulted in galling and scoring on the thread flanks and at the thread root.
The lengths of VH-TSG’s tie rods could not be accurately measured due to deformation and the fractures through the threads, however the other significant dimensions conformed to the drawing requirements. The surface of the rods appeared to be in the as-drawn condition, rather than surface ground as-specified. However, this would not have been detrimental to the tie-rod’s performance as the failure occurred within the threads.
Material
The chemical composition of VH-TSG’s tie rods was consistent with the drawing-specified 431 stainless steel and this was in line with the material certification supplied with the rod stock used to manufacture the Batch 7 tie rods. This included VH-TSG’s rods.
The JRA-776 drawing specified that the material be heat treated to a tensile strength of 140150ksi (965 to 1034 MPa). An initial strength indication of VH-TSG’s rods was obtained from converted hardness measurements[46] and found to be approximately 141ksi (972 MPa) and therefore within specification. However, the material certification reported a tensile strength of 133ksi (918 MPa) which was about 5 per cent below the required 140ksi (965 MPa) minimum.
As a result of the above discrepancy, two other Batch 7 tie rods were tensile tested.[47] The results (Table A1) showed that the two tested rods had approximately 7 per cent variation in proof stress and a 4–7 per cent higher ultimate strength than reported on the material certification. The ultimate strength of the tested rods was more consistent with the hardness-converted strength values obtained.
Table A1: Tensile test results of Batch 7 rods
| Production certificate | Batch 7 Rods | ||
| A | B | ||
| 0.2% Proof Stress (MPa) | 823 | 776 | 836 |
| Ultimate strength (MPa) | 918 | 979 | 957 |
| Elongation (%) | 14 | 20 | 16 |
| Reduction in Area (%) | 55 | 58 | 48 |
In addition to the tensile test results it was noted that the two tested rods differed visually from those of VH-TSG. Only one of the rods appeared to have been surface ground, per the drawing requirements, and there was visible variation between all three rods in the quality of the thread form.
In summary, the raw material certification data for the 431 stainless steel rod stock was about 5 per cent below the minimum tensile strength requirement per the JRA drawing. The variation in mechanical properties and visual appearance between the Batch 7 tie rods suggested that the rods were not all manufactured using material from the same production lot and had probably not been manufactured by the same machinist.
Other tie rods
Over 20 sets of used tie rods were forwarded to the ATSB for examination. The rods examined had varying service histories including hours and type of operation (amount of aerobatics). Variation in visual appearance, especially in terms of the method of thread manufacture and the resultant thread form, was observed when comparing the JRA rods. The tie rods examined that were not manufactured by JRA had a higher degree of manufacturing consistency than the JRA product.
The other JRA tie rods examined had considerably fewer hours, cycles and aerobatic operations than those fitted to VH-TSG. Some of the tie rods manufactured to the original design had a closer operational profile, including a set supplied by the operator of VH-TSG that had exceeded the stipulated expiry life of tie rods by 300 hours. There was no observed thread root cracking in any of the examined tie rods.
Figure A6 shows representative tie rod thread profiles. The top image from VH-TSG’s tie rods exhibited galling and scoring on the thread flanks and at the thread root. For comparison, the middle image shows a set of used tie rods from the same manufacturer, but a different production batch, that had single-point, lathe-turned threads and a visibly superior surface finish. The bottom image shows the thread form on a set of die-threaded tie rods from another manufacturer (with cadmium plating removed) that were also visibly superior to those from the accident aircraft in terms of surface defects.[48]
Examination of the tie rods with their associated nuts found that the thread fit was also variable, with VH-TSG’s nuts noticeably looser when engaged. The three rods were sectioned and polished with the nuts in situ to illustrate this difference.[49] The effect of a loose thread fit on fatigue endurance of the components was not determined.
Figure A6: JRA-776 tie rod thread comparison
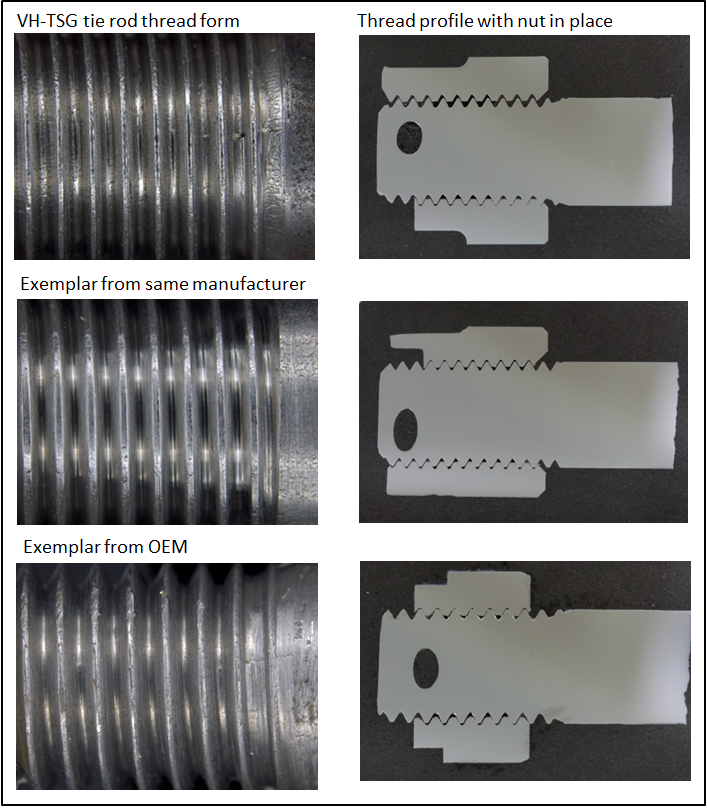
Source: ATSB
Recovered Joint-H components
The left side Joint H is shown in Figure A7, with the associated compression strut and fitting. The frame section displayed deformation associated with impact forces sustained as a result of the water impact, as well as corrosion, at least some of which was associated with saltwater submersion. The fittings (left and right) and associated bolts (not pictured) are described in more detail in the following sections.
Figure A7: Left side Joint H components. Note that the retaining nut (immediately below the arrow associated with the ‘Joint H fitting’ label) is non-standard and should be a split pinned, slotted nut
Source: ATSB
Joint H upper attachment bolts
The DH82A was fitted with four special bolts (de Havilland part number H37868), located in the upper bolt holes at Joint H. Three of the four bolts were recovered, attached to the compression strut (Figure A8). The fourth bolt, from the left side, forward position, was not recovered. It was not determined if the missing bolt was present at the time of the accident. The three recovered bolts had all fractured through the threaded area in a manner consistent with ductile overstress.
The H37868 drawing specified a high-tensile steel, shouldered bolt with a 0.28” grip diameter and a step down to a 0.25 inch BSF (British Standard Fine) thread. The grip length of the bolt was specified as 1.45 inches (36.8 mm), with an overall bolt length of 1.8 inches (45.7 mm).
The recovered bolts were non-standard, and their origin was not recorded in the aircraft logbooks. The hardness of the bolt material was consistent with high tensile steel and in line with the original design part drawing specification. However, it was evident that the bolts had been machined down from larger bolt stock and re-threaded to suit the application. The bolts displayed non-standard bolt head markings and had one flank ground down to fit against the compression strut (Figure A9).
Figure A10 shows a genuine part highlighting the grip length and step down to a smaller diameter thread. The step in the bolts is necessary for correct assembly and substitution with bolts that have a reduced grip length may cause excessive shear loads to be reacted by the tie rods.
The grip diameter of the recovered bolts complied with the part drawing, however the grip length of the bolts were about 33 mm for the bolts on the right and 37 mm for the remaining bolt fitted to the left rear position. The combined width of the Joint H as an assembly was measured at approximately 38 mm and therefore the right-side bolts, being about 5 mm below specification, would not have had any of the grip length correctly engaged with the associated hole in the Joint H fitting, which was 4 mm in depth.
During this investigation, the ATSB became aware of two other sets of non-standard upper attachment bolts that were fitted to other Tiger Moth aircraft in Australia. Those bolts had similarly been machined out of larger bolt stock in order to be used as Joint H fitting upper attachment bolts.
Figure A8: Fractured upper attachment bolts on right side of compression strut
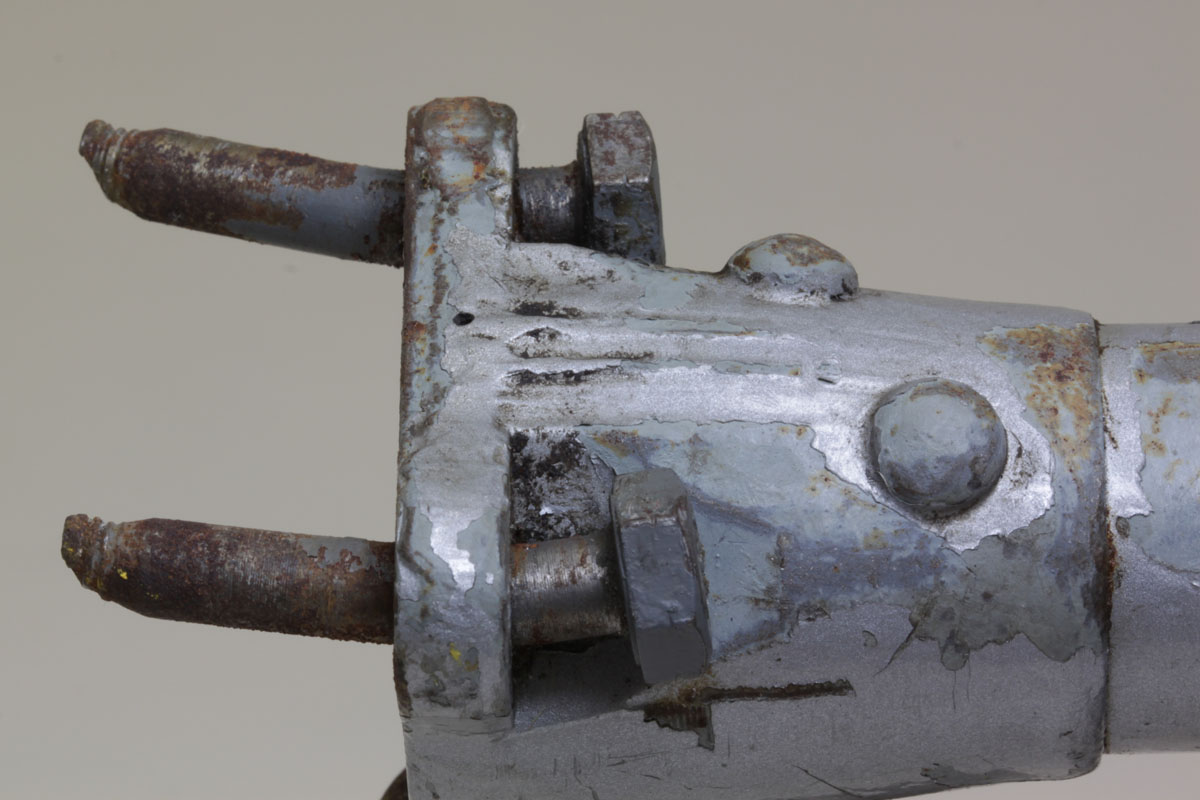
Source: ATSB
Figure A9: Bolt on right side showing head markings
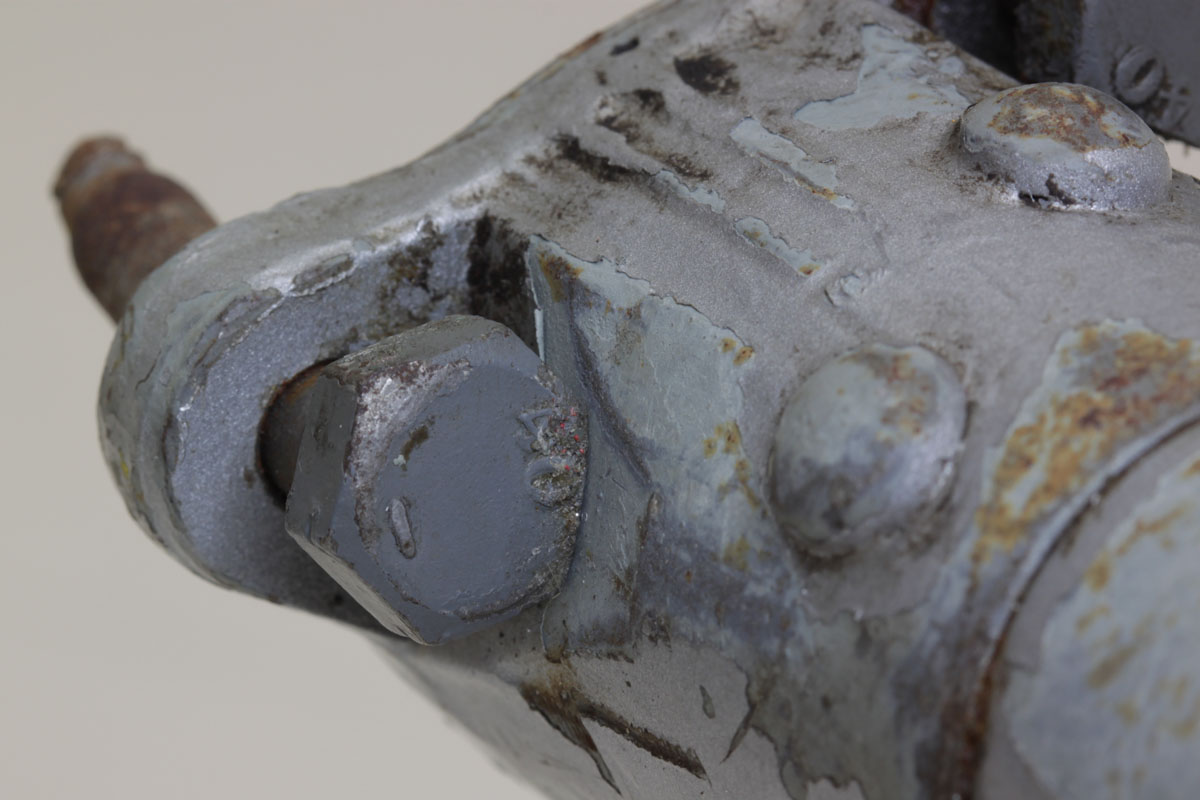
Source: ATSB
Figure A10: Exemplar bolt showing grip and step

Source: de Havilland Support
Joint H fittings
The Joint H fittings and associated hardware are responsible for transferring flight and landing loads to the airframe. The left and right fittings were each recovered separate from the main airframe, but still attached to both their respective lower wing front spars and landing gear compression legs, although the left leg had separated at its base.
The left forward and right rear special bolt holes showed deformation consistent with indentations from the threaded portion of the short upper attachment bolts described in the previous section (Figure A11).
Figure A11: Joint H left forward fitting showing bolt thread indentations
Source: ATSB
Findings
A summary and analysis of the main findings of the component examination are presented in the main report.
__________
- The mechanical properties of timber are significantly affected by moisture content, with strength increasing as moisture content decreases. Timber strength values for use in aircraft design are typically based on a 15 per cent moisture content, which was found to be the maximum average moisture content under actual service conditions.
- Using Approximate Hardness Conversion Numbers for Nonaustenitic Steels, Table 2 ASTM A370 – 03a: Standard Test Methods and Definitions for Mechanical Testing of Steel Products. The table footnote indicates that ’The data in this table should not be used for austenitic stainless steels, but have shown to be applicable for ferritic and martensitic stainless steels’. Type 431 is a martensitic stainless steel.
- VH-TSG’s tie rods were significantly deformed during the accident and did not present a suitable length of material for accurate tensile testing.
- Die-threading is one method of thread manufacture and can be accomplished with a solid die or a self-opening, chaser die. Solid dies are most commonly used by hand and require reversing the die to remove it from the cut threads, which can result in trapped chips and damage to the threads. Self-opening dies withdraw the chasers from the work piece at the end of the cut, eliminating the need for die reversal.
- The tie rod nuts were castellated and the cross-sectional appearance varied depending on the location of the cut through the peaks or troughs of the castellations.
Purpose of safety investigationsThe objective of a safety investigation is to enhance transport safety. This is done through:
It is not a function of the ATSB to apportion blame or provide a means for determining liability. At the same time, an investigation report must include factual material of sufficient weight to support the analysis and findings. At all times the ATSB endeavours to balance the use of material that could imply adverse comment with the need to properly explain what happened, and why, in a fair and unbiased manner. The ATSB does not investigate for the purpose of taking administrative, regulatory or criminal action. TerminologyAn explanation of terminology used in ATSB investigation reports is available here. This includes terms such as occurrence, contributing factor, other factor that increased risk, and safety issue. Publishing informationReleased in accordance with section 25 of the Transport Safety Investigation Act 2003 Published by: Australian Transport Safety Bureau © Commonwealth of Australia 2016
Ownership of intellectual property rights in this publication Unless otherwise noted, copyright (and any other intellectual property rights, if any) in this report publication is owned by the Commonwealth of Australia. Creative Commons licence With the exception of the Coat of Arms, ATSB logo, and photos and graphics in which a third party holds copyright, this publication is licensed under a Creative Commons Attribution 3.0 Australia licence. Creative Commons Attribution 3.0 Australia Licence is a standard form licence agreement that allows you to copy, distribute, transmit and adapt this publication provided that you attribute the work. The ATSB’s preference is that you attribute this publication (and any material sourced from it) using the following wording: Source: Australian Transport Safety Bureau Copyright in material obtained from other agencies, private individuals or organisations, belongs to those agencies, individuals or organisations. Where you wish to use their material, you will need to contact them directly. |


