Safety summary
What happened
At about 0800 on 26 July 2014, Genesee & Wyoming Australia (GWA) freight train 6DA2 derailed at the 1036.541 km mark near Marryat, South Australia.
The train was travelling at about 80 km/h when it derailed. The trailing locomotive, crew van and 17 wagons derailed, with the train separating into two portions that came to a stand about 108 m apart. The wagons (consisting of 35 platforms) and 340 m of track were significantly damaged.
There were no injuries sustained by the driving train crew or drivers resting in the derailed crew van.
What the ATSB found
The ATSB found the train had derailed on a section of 80 lb/yd rail, while travelling over a flash-butt welded joint that had fractured through a pre-existing defect in the rail foot. The defect most likely occurred during the flash-butt welding process, which subsequently led to crack propagation and brittle fracture that extended vertically through the rail web.
Metallurgical evidence indicated that the fracture had propagated slowly from the initiating defect and had likely been in existence for some time, remaining undetected during track inspections and the passage of trains for a period up to 30 years.
Due to the 80 lb/yd rail’s age, smaller section size and surface condition, all trains travelling those sections of track were speed restricted to 80km/h. While the rail through the area of the derailment had been subject to periodic visual and non-destructive inspections across its lifetime, it was evident that the inspection regime had not been effective in detecting and/or assessing some internal rail defects. Several of those defects had the potential to pose an immediate threat to the safety of rail services.
What's been done as a result
Following the derailment, the track manager (GWA) immediately slowed train speed over 80 lb/yd rail to 40 km/h for passenger trains and 50 km/h for freight trains. GWA then carried out a detailed continuous ultrasonic ‘cleansing test’ of the 80 lb/yd rail between Northgate and Alice Springs. To increase the sensitivity of the inspection, the ultrasonic intensity was increased by 6 dB and the test vehicle operating speed was slowed to between 10-12 km/h.
This inspection detected another broken rail at a flash-butt weld at the 975.244 km mark. This fracture had also initiated from the rail foot and required immediate plating and repair. Another 31 rail defects were found requiring various levels of response.
GWA advised that the continuous ultrasonic inspection frequency of 80 lb/yd rail has been increased to a minimum of four inspections per year and a programme to replace all 80 lb/yd rail is being evaluated.
Safety message
Railway owners and managers should ensure that their inspection and maintenance processes, for sections of rail that have a high incidence of defects, are an appropriate and effective management strategy for mitigating the risk of failure under the passage of a train.
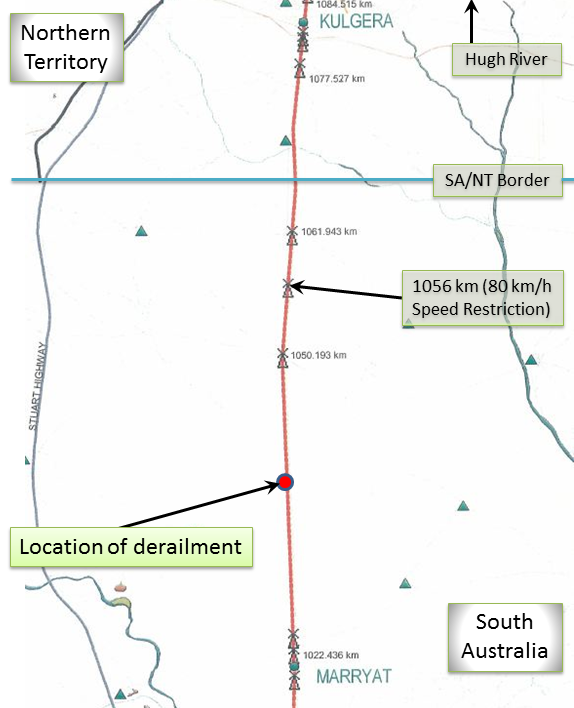
At about 0800[1] on 26 July 2014, Genesee & Wyoming Australia (GWA) freight train 6DA2 changed operating crew near Hugh River, Northern Territory. The train then continued its journey south before crossing the Northern Territory – South Australia border. At about the 1056 km mark[2] the train entered a section of track that had a permanent speed restriction of 80 km/h, due to a known history of more frequent defects being encountered during inspection.
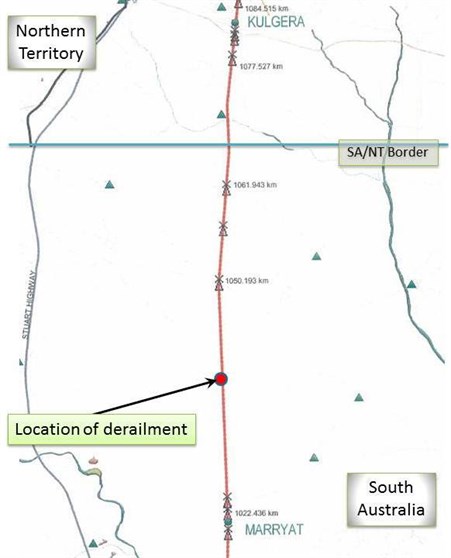
Figure 1: Map of derailment location
Source: FreightLink (annotated by ATSB)
The crew reported that train had been handling well when the driver reduced the speed with throttle and dynamic brake applications to enter the 80 km/h section (Figure 1). At about the 1036.541 km mark, the driver had just acknowledged the vigilance indication and was verifying the train’s speed when the crew heard two ‘large bangs’ and felt the lead locomotive jar. The crew, aware that the ‘bangs’ may have been the locomotive bogies passing over a break in the rail, looked in the rear view mirrors and could see large volumes of dust rising from derailed wagons and displaced containers about 200 m behind the driver’s cab. At this time, the locomotives started shuddering; after which the driver made an emergency brake application and moved the throttle back to idle. The lead locomotive stopped about 360 m from the point of derailment.
Events after the derailment
Neither of the drivers was injured as a result of the derailment. The second driver alighted from the locomotive to check on the crew resting in the crew van, confirming that they were also uninjured. When walking back to the crew van, the second driver observed that the wheelsets of the leading bogie on the trailing locomotive and the wheelsets of the trailing bogie on the crew van had also derailed.
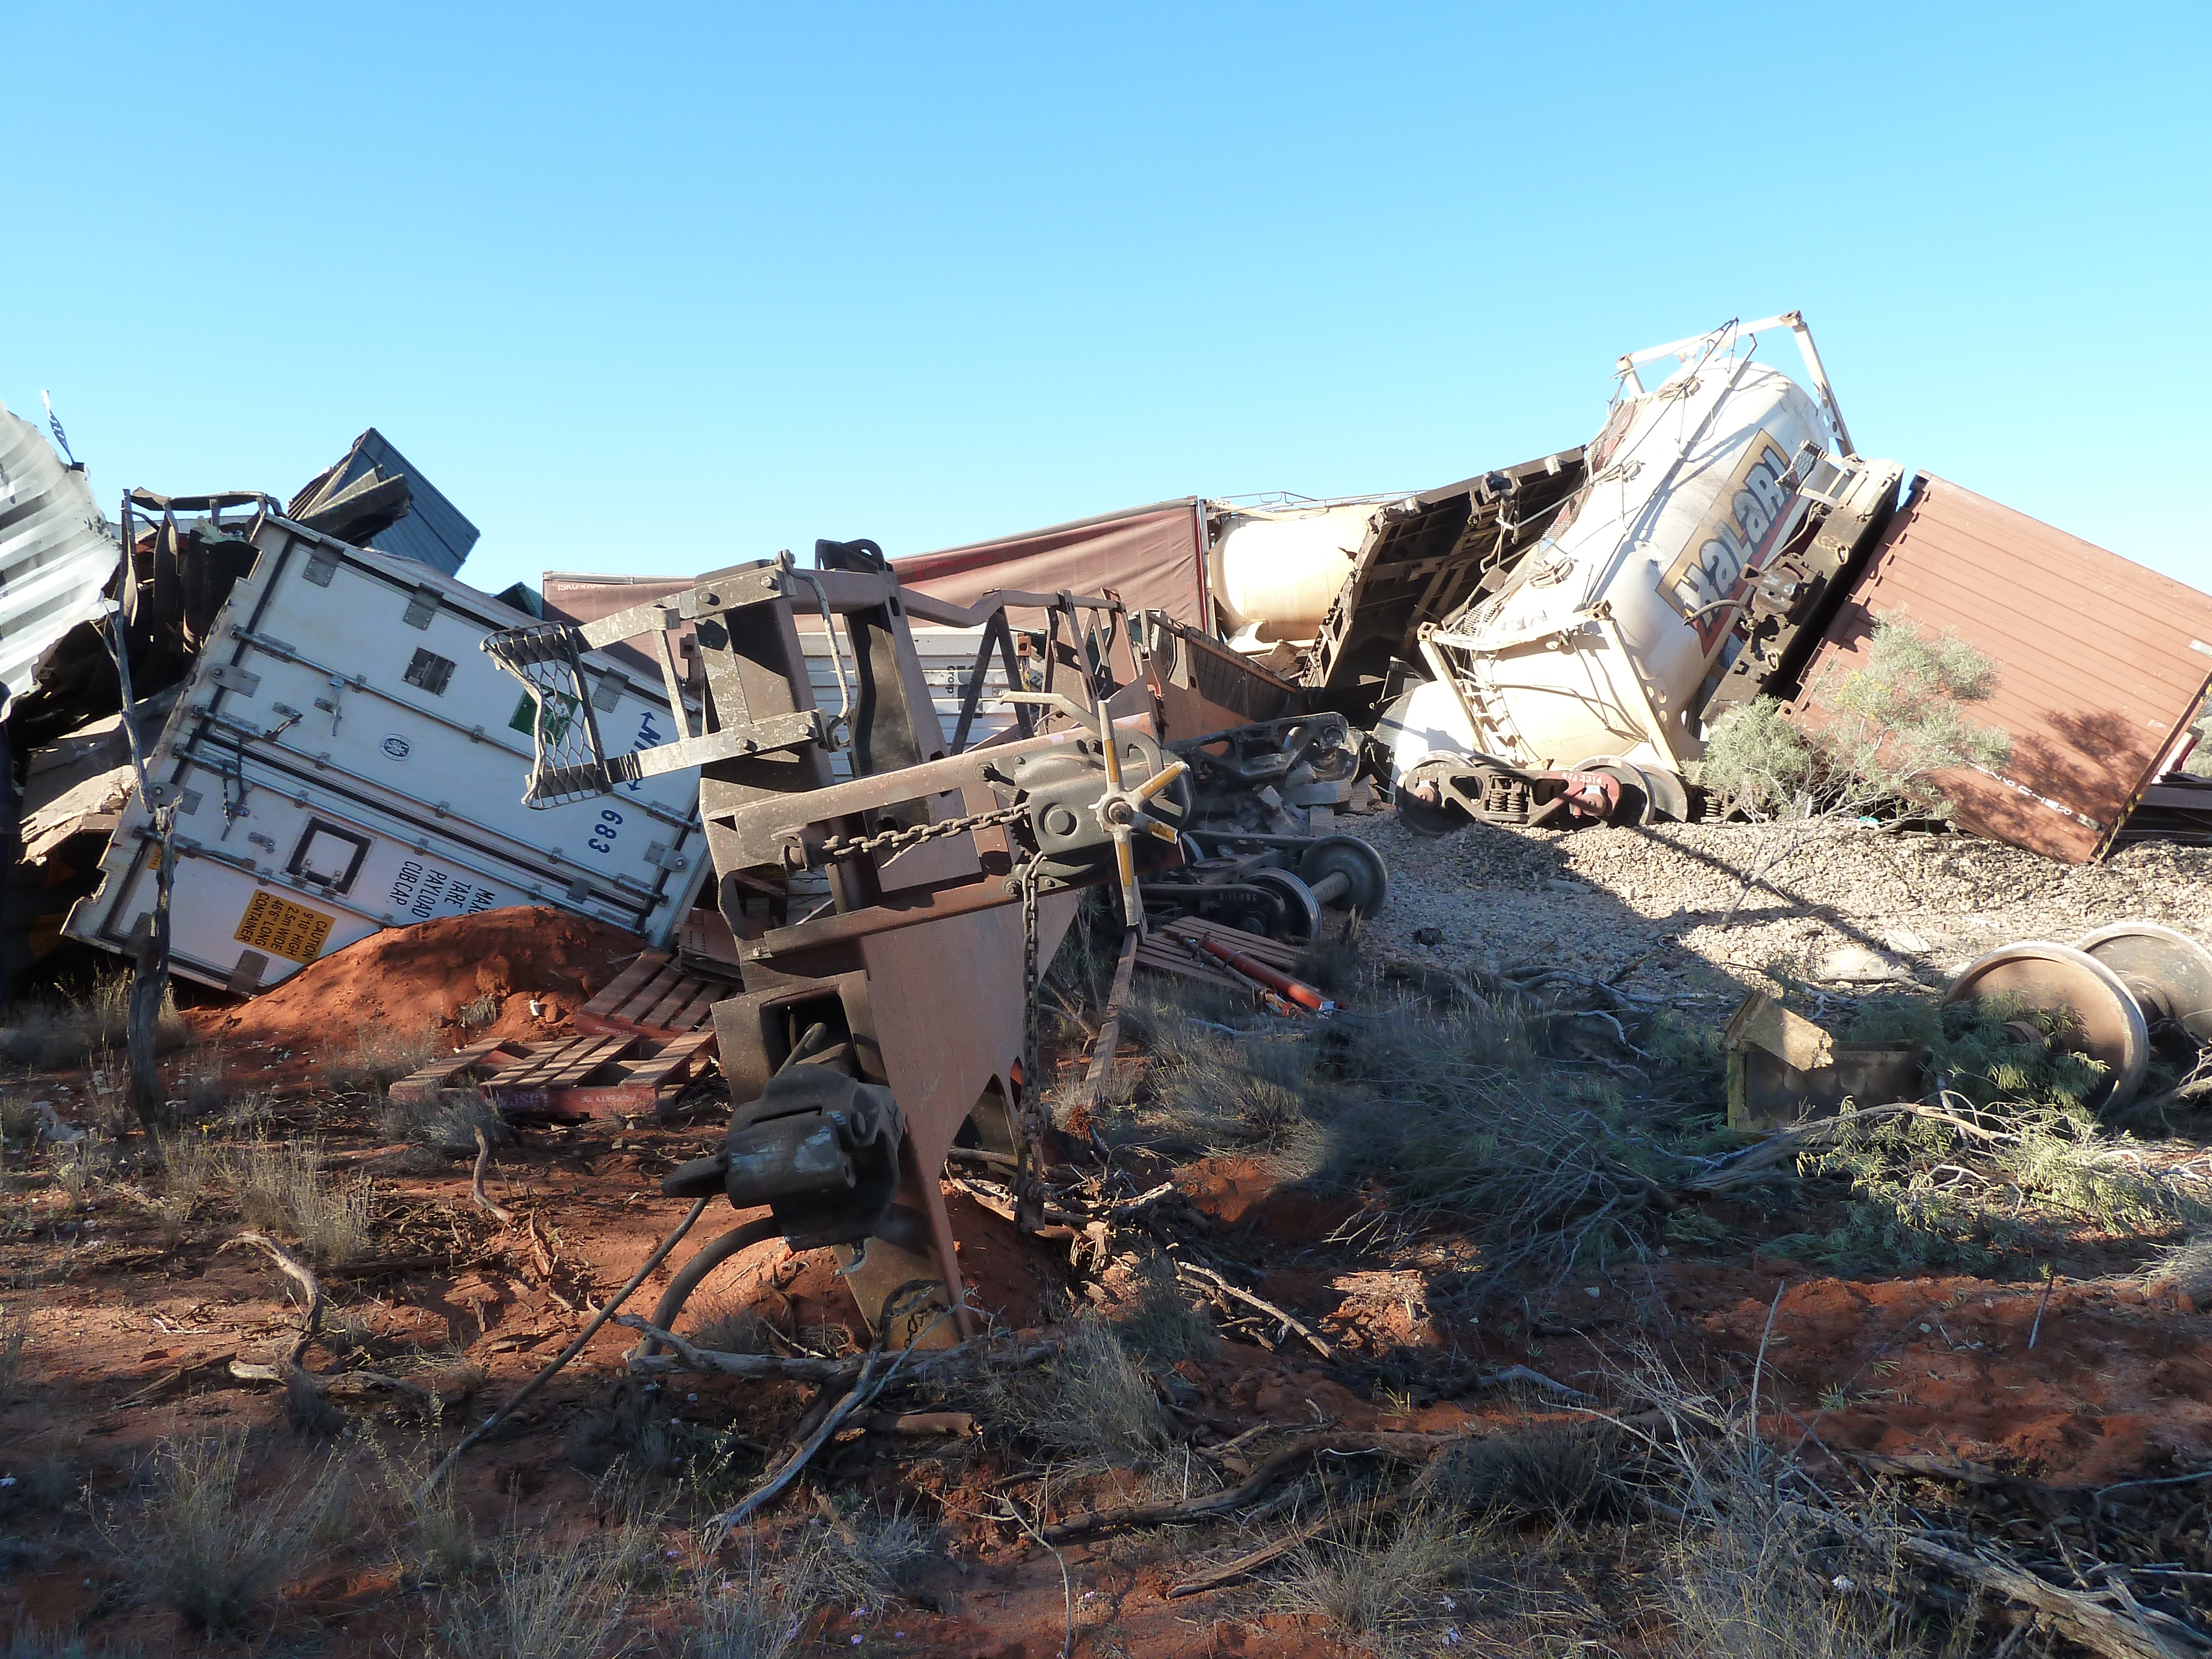
Further inspection of the train found that it had separated into two sections, with the locomotives, locomotive refuelling wagon, crew van and one loaded container flat wagon remaining coupled. There was a gap of about 108 m between the front section of train and the first of the derailed wagons. Seventeen rail vehicles consisting of 35 platforms, freight and containers were scattered either laterally or vertically for about 250 m along the rail corridor (Figure 2). The rear 930 m of the train, extending north beyond the point of derailment, remained on-rail.
The rail vehicles and about 340 m of track infrastructure had sustained significant damage.
Figure 2: Derailed wagon and wreckage about 100m from the point of derailment
__________
The location
The derailment occurred near Marryat (1036.541 km) on the Tarcoola to Darwin railway, about 28 km south of the Northern Territory - South Australia border (Figure 1).
Train and train crew information
Train 6DA2 was a freight service operated by GWA between Darwin and Adelaide. The train consisted of two locomotives (GWU 006 leading and ALF 23 trailing), hauling an in-line fuel wagon, a crew van and 42 freight wagons (including 14 multi-platform wagons). The train was 1543.3 m long and had a trailing mass of 2540.9 t.
At about 0920 on 25 July with a crew of four drivers, train 6DA2 departed from the Berrimah Freight Terminal, Northern Territory. The drivers worked the train in pairs, operating in rotating relay shifts. The drivers operating the train at the time of derailment had about 2.5 and 7 years rail industry experience respectively.
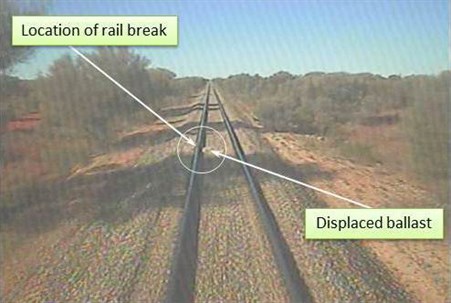
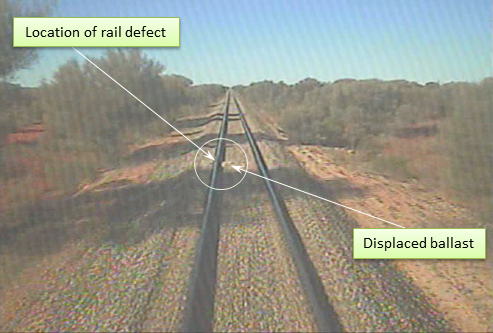
Preliminary examination of on-board recorded data found no evidence of anomalies with the train handling or mechanical condition before the derailment. A review of video and audio recordings extracted from leading locomotive GWU 006 supported the drivers’ report of a ‘large bang’ when they travelled over what they thought was a broken rail (Figure 3).
Figure 3: Location of rail defect & minor ballast displacement near 1036.541 km mark
Source: Genesee & Wyoming – Locomotive GWU 006 video camera
Environmental conditions
The Bureau of Meteorology weather stations nearest the derailment were located at Kulgera (47 km NNW) and Ernabella (120 km E). Daily weather measurements of temperature, humidity, wind and rain at Kulgera were taken twice per day at 0900 and 1500. At Ernabella measurements were more regular and reported at half hourly intervals.
Temperatures recorded at Kulgera and Ernabella on 26 July at 0900 (near the time of the derailment) were 10.4 C and 10.3 C respectively. At Ernabella, a low of 0.9 C was recorded at 0600, with temperatures at 0300 and 0800 recorded as 2.4 C and 2.9 C respectively. It is likely that temperatures at Kulgera would have been similar at these times.
No rainfall was recorded and winds were light; generally from a northerly direction.
Track information
The track infrastructure was owned and maintained by GWA, with the movement of rail traffic controlled from GWA’s Transport Control Centre located at Dry Creek in South Australia.
The standard gauge (1435 mm) track at the derailment location consisted of 80 lb/yd rail fastened to concrete sleepers by resilient clips. The track formation comprised sand/clay based soil, topped with a capping layer and overlaid with ballast to a nominal design depth of 250 mm. The track bed supported prestressed concrete sleepers spaced at 667 mm centres.
Approaching the derailment site from Kulgera, the track was tangent[3] and the terrain slightly undulating. The derailment occurred within a 68 km section of track where the maximum speed was restricted to 80 km/h, due to the age, smaller section size and surface condition of the 80 lb/yd rail.
Rail examination
The ATSB examined the track leading into the derailment site and determined the most likely contributor was a break in the east rail near the 1036.541 km mark. It was evident that the rail had fractured at a point where two lengths of rail had been flash-butt welded[4]. An inspection of the mating ends from two broken rail sections strewn near the point of derailment identified variable oxidisation levels across the fracture surfaces and a localised feature that was characteristic of an internal material defect.
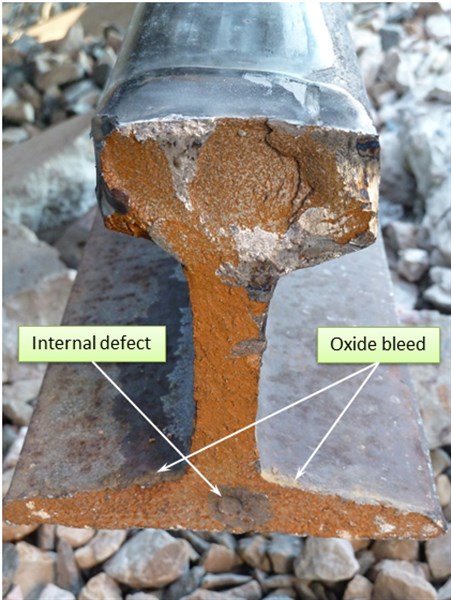
The oxidisation that extended across the fracture through the rail foot and web was noticeably heavier and more prominent than that across the rail head fracture surfaces. This was consistent with the fracture developing in a progressive manner - originating in the rail foot and propagating vertically through the rail web.
Evidence of iron oxide bleed on the top surface of the foot suggested that the fracture had propagated slowly and had been in existence for some period of time – potentially remaining undetected during track inspections and the passage of previous trains.
The rail head at the fracture point showed light battering from train wheels that had traversed the break, before the rail breakup extended into multiple other sections - each about 700 mm long.
Analysis of broken rail sections
The ATSB quarantined sections of the broken rail for the purposes of laboratory metallurgical examination and analysis. The Monash University Institute of Railway Technology (IRT) carried out an analysis of four rail sections removed from the derailment site and, for comparison purposes, one section of 80 lb/yd rail from a stockpile at Kulgera, Northern Territory.
The analysis included:
- examination and characterisation of the fracture surfaces
- assessment of the defect initiation and growth behaviour, including contributing factors
- assessment of the rail material for compliance against relevant manufacturing specifications and standards;
- identification of the root cause(s) of the rail failure
- assessment of a flash-butt weld in a rail section removed from the Kulgera stockpile.
The 80 lb/yd rail that failed at the derailment site was manufactured for the Commonwealth of Australia in 1916, most likely at the BHP, Newcastle steel mills. The track section had been constructed between 1975 and 1980 from a combination of used (reclaimed) rail and unused (stored) rail. The joint was flash-butt welded by the Commonwealth Railways Flash-butt Welding Workshop at Port Augusta, South Australia. The flash-butt welding process was verified through daily sample tensile failure tests and random ultrasonic examination of production welds in the workshop and in the field following track laying.
The IRT examination found that:
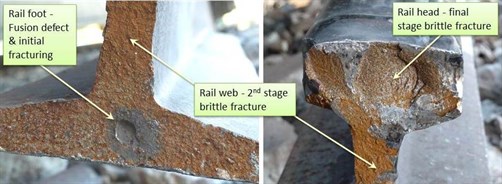
The fractured flash-butt weld contained a fusion defect at the bond line in the rail foot. Differences in the surface condition over the remaining regions of the fracture indicated that failure of the weld occurred progressively, commencing with some initial cracking of the region surrounding the weld defect (possibly immediately following the welding process, and while the weld was cooling to ambient temperature).
A second stage of cracking occurred over the remainder of the foot and most of the web at some unknown time prior to the date of the derailment. The final stage of cracking occurred over the remaining uncracked region in the centre of the head. The second and subsequent stages of failure involved brittle fracture.
All subsequent rail failures, i.e. in parent rail material, occurred by brittle fracture as a result of the conditions created by or during the derailment.
Figure 4 illustrates the fusion defect through failed flash-butt weld region. The defect was present below the web of the rail foot and presented as a depression measuring 8 mm wide by 10 mm high. A surrounding darker region measuring 18 mm in diameter was consistent with pre-existing cracking and subsequent crack surface degradation.
Figure 4: Flash-butt weld fusion defect and brittle fractures
Source: ATSB
Metallurgical analysis (by IRT) of the weld heat affected zone suggested that the defect most likely formed as a fusion-line flaw when the joint was flash-butt welded (between 1975 and 1980). Analysis also suggested that the quality of this weld would not meet the specifications of the current Australian Standard, AS 1085.20 - Railway track material - Welding of steel rail. The presence of the fusion defect ultimately led to the failure the flash-butt weld at the bond line. The fracture surface immediately surrounding the weld defect was ‘extensively degraded’ and most likely developed in the immediate post-weld cooling period.
Second-stage cracking was by brittle fracture over the remainder of the foot and most of the web (Figure 4), however the crack growth rate and interval before the derailment of train 6DA2 could not be determined. The IRT reported that the ambient temperature variations[5], in particular low overnight minimum temperatures, ‘would result in increased longitudinal stresses in continuously welded rail; in turn increasing the risk of rail failure’. A small amount of rain was recorded twice in early July and the levels of humidity would have contributed to the corrosion of the recently formed fracture surfaces.
To assess the quality of the flash-butt welded joints, a random sample of 80 lb/yd rail containing a welded joint was selected as an exemplar from a stockpile at Kulgera. The IRT examination subsequently found a 10 mm defect in the upper weld area of that joint – further raising concerns about the quality of the flash-butt joints in the 80 lb/yd rail. The findings also suggested that before stockpiled rail is used in mainline track, additional detailed manual ultrasonic inspections should be carried out to verify the quality of flash-butt welded joints.
Infrastructure inspections
GWA’s procedures for inspection of track and associated infrastructure are documented in their track maintenance procedure IN-PRC-20 – Inspections, which defines requirements for both scheduled and unscheduled inspections.
The process for scheduled inspections consists of three inspection types:
- Patrol inspections – usually performed while travelling in a road/rail vehicle or while travelling in the cab of a locomotive. Patrol inspections look for obvious abnormal conditions, changes in condition, or evidence of deterioration rates that may indicate unacceptable risk to operations.
- General inspections – usually performed in response to previously identified defects or unusual rail conditions.
- Detailed inspections – examine specific aspects of the infrastructure condition or behaviour and may involve visual inspection, measurements, testing and assessment.
Unscheduled inspections are usually in response to an event (temperature extremes, earth slips, floods, earthquakes) or following reports of a suspected unsafe condition from drivers, other workers or members of the public.
The derailment near Marryat occurred within a section of track laid with 80 lb/yd rail. GWA and former corridor managers[6] had applied an 80 km/h permanent speed restriction to reduce the impact loading on the rail. GWA conducted patrol inspections at a frequency consistent with procedure IN-PRC-20 – Inspections. In the weeks leading up to the derailment on 26 July 2014, scheduled patrol inspections had not reported any track defects near the point of derailment (PoD).
The last track inspection from a locomotive cab before the derailment was on 3 June 2014, where the only defects reported were two track signage issues. Other inspections of this type carried out on 23 July 2013, 20 December 2013 and 25 March 2014 identified various items including rough riding, mud-hole, ballasting and some dip welds[7]. No defects indicating or suggesting rail or track deficiencies were reported through locomotive cabin inspections in the vicinity of the PoD.
GWA records showed that track at the1036.541 km mark had been tamped[8] in September 2013 with a detailed track geometry inspection carried out shortly after (October 2013). About four months later, in February 2014, another detailed track geometry inspection was carried out. No track defects were recorded at or near the PoD.
Ultrasonic inspection
In the context of this investigation, it was evident that a weld fusion defect was present in the foot of the rail, which subsequently led to crack propagation and brittle fracture. Such defects within the rail cannot usually be detected through visual inspection (patrol and locomotive cab inspections) unless the defect subsequently causes a secondary defect such as a broken rail or dip weld. Consequently, detailed ultrasonic inspections are conducted periodically to detect internal rail defects.
Ultrasonic rail testing involves passing sound waves into the rail and monitoring the echo returned by the sound waves reflecting off internal and external surfaces (reflectors). Defects within the rail create reflectors which may return unique echo patterns depending on their type, location and size. Examination of the echo patterns allows an operator to deduce the existence, type and size of suspected rail defects.
A series of ultrasonic probes on the ultrasonic test vehicle are located near the surfaces of both rails, while the electronics are mounted inside the vehicle. A computer monitor is provided in the vehicle cabin to allow the operator to monitor and assess information transmitted from the ultrasonic test equipment.
Ultrasonic probes of differing sound beam angles scan each rail, where:
- A 0-degree probe scans the central part of the railhead, the whole of the rail web and the central part of the rail foot perpendicular to the rail.
- Forward and reverse 37-degree probes scan the central part of the railhead, the whole of the web and the central part of the rail foot.
- Forward and reverse 70-degree probes scan the railhead and part of the upper web.
Portable hand operated ultrasonic equipment is used for manually verifying:
- suspected defects recorded by the continuous ultrasonic inspection process
- suspected defects found by visual inspection
- known defects requiring re-inspection and reassessment
- the integrity of new flash-butt and aluminothermic rail welds.
GWA procedure IN-PRC-20 specified that vehicle-mounted continuous ultrasonic testing of rail should be carried out at a minimum of 12-monthly intervals. In November 2013 (about 8 months before the derailment of train 6DA2), continuous ultrasonic testing was carried out by Speno Rail Maintenance Australia Pty Ltd (Speno), between Northgate, South Australia and Alice Springs, Northern Territory. That inspection found four vertical split head[9] defects over 82.6 km of 80 lb/yd rail. These defects ranged from 200 mm to 600 mm long and were removed. The inspection did not reveal any reportable weld fracture defects near the PoD.
Response to track defects
GWA procedure IN-PRC-010 - Maintenance Standards for Maintenance Procedures defines the standards and tolerances to be adopted when performing maintenance to ensure the condition of infrastructure remains within limits that are compatible with operating requirements. Defects in the foot of welds are managed in accordance with the size limitations specified in Table 1.
Table 1: Defects detected in the foot of existing welds
| Defect Size | Response time | Action |
| <15 mm and full height of rail foot | 30 days | Monitor. Removal is optional |
| 15–35 mm width(if on edge use 10–35 mm) | 1 day | Speed restrict and reassess every day, or remove |
| >35 mm width | Prior to the passage of the next train | Speed restrict and reassess every day, or remove |
| Broken Weld | Prior to the passage of the next train | Pilot, plate or remove (E1) |
Transverse and vertical flaws in the rail foot are difficult to identify due to the narrow web area when using 37 and 70 degree probes. A 90 degree probe (longitudinal to the rail) is ideal for the detection of flaws in the rail foot, however use of this probe is not practical for continuous ultrasonic testing of in-situ rail.
Post-derailment re-examination of the November 2013 ultrasonic test results found an anomaly in the rail foot of a flash-butt weld near the 1036.541 km mark. The anomaly had not activated a defect exceedance alarm and was not noted by the test operator. Subsequent manual assessment of the anomaly suggested the existence of a defect measuring between 9 and18 mm in diameter. Speno advised that a defect of 9.0 mm (or greater) would normally produce a defect alarm, thereby prompting a manual ultrasonic test of the suspected defect. In this case an alarm had not been generated, suggesting that the automatic system assessed the defect as falling below the defined alarm limit.
Following the derailment of 6DA2, GWA implemented immediate risk mitigation strategies by limiting the speed of freight trains to 50 km/h and passenger trains to 40 km/h. These speed restrictions remained in place until all 80 lb/yd flash-butt and aluminothermic welds had been assessed as free of defects. Additionally, track patrol inspections on the 80 lb/yd sections were increased to six times per week, and included an inspection ahead of all passenger train services. Detailed ultrasonic testing frequency was increased from annual to 3-monthly tests for rail south of Alice Springs and 6-monthly north of Alice Springs.
Rail defect growth rate
Factors that influence the growth rate of defects in rail include:
- quality and age of the rail
- residual stresses
- on-site temperature differentials
- track curvature
- axle load
- dynamic train forces due to speed
- cumulative train tonnage over the track.
Of these, the influence of cumulative train tonnage on track integrity is well documented in technical studies/papers and had been factored into GWA’s inspection intervals for continuous ultrasonic inspection. The track infrastructure manager can readily monitor cumulative train tonnage and the history of track defects. Inspection strategies can be adjusted to mitigate the risk of track failure based on this information.
In determining whether there is justification in increasing the frequency of inspection, GWA procedure IN-PRC-10, Construction, Monitoring & Maintenance Standards for Maintenance Procedures, does not address factors such as rail quality/age, on-site temperature and issues such as wagon impact loading. Research indicates that defect growth from initiation to 10 percent of its final (critical) size is relatively slow, but then accelerates quite rapidly through to failure. As a rail defect grows, the chance of detecting it increases, however the internal stress levels also increase - raising the risk of a rail failure. Increasing the frequency of continuous ultrasonic inspection may thus assist in capturing a greater number of defects earlier in their growth phase - before they reach critical size and result in a catastrophic failure.
GWA were aware of the increased risk of defects within the sections of track laid with 80 lb/yd rail and had responded to this by increasing the number of patrol inspections (defined in IN-PRC-020). These inspections increased from one to two or more per week. Inspection effort was also intensified, particularly during winter and spring, where low temperatures increases rail tensile forces that can result in rail breaks. The last continuous ultrasonic inspection before the derailment was carried out in November 2013, about 8 months before the derailment on 26 July 2014. No weld cracks or internal defects were found at this time.
__________
- Straight track with no applied cant.
- The fusion welding of rail ends by electric arc heating and contact under high pressure.
- Bureau of Meteorology records (Kulgera and Ernabella) for the period 1 – 26 July 2014 (derailment of 6DA2)
- Australian National, the Australian Rail Track Corporation and FreightLink
- A downward variation in the running surface of a rail as may occur at welds or rail ends.
- Tamping is the process by which ballast is packed around the sleepers of a track to ensure the correct alignment for the location, speed and curvature of the line.
- An internal vertical seam in the railhead splitting out onto the top of the rail.
On 26 July 2014, GWA freight train 6DA2 derailed at the 1036.541 km mark, near Marryat, South Australia. An examination of the rail at that location determined the most likely contributor to the derailment was a fracture extending through a flash-butt welded joint within the east rail. The fracture had commenced from an internal defect in the rail foot and had propagated vertically towards the rail head.
Detection of rail defects
Following the derailment of train 6DA2, a detailed continuous ultrasonic ‘cleansing test’ of the 80 lb/yd rail between Northgate and Alice Springs commenced on 3 August 2014. To increase the sensitivity of the inspection process, the ultrasonic intensity was raised by 6 dB and the test vehicle operating speed was slowed to 10-12 km/h.
This inspection revealed 31 potential defects, compared to only nine such defects found during the inspection in November 2013. Of these defects, 15 were below the limits requiring any action and 12 required monitoring for deterioration into the future. All defects were within the head of the rail except for two which were in the rail web. There were 13 potential defects detected in flash-butt welds and four in aluminothermic welds. The four higher-priority defects (two in flash-butt welds) were subsequently repaired, including another broken rail at the 975.244 km mark, which had also fractured through a flash-butt weld at a defect in the foot area. In accordance with GWA’s procedures, the broken rail was repaired before the passage of the next train.
Two of the defects detected in the ‘cleansing test’ had also been detected in November 2013, but at that time both were classified as small, low priority and logged for monitoring. The more detailed ultrasonic inspection (August 2014) subsequently rediscovered these defects and assessed them as requiring more frequent monitoring and reassessment until the defects were removed. Having found these higher-priority defects, including a defect similar to that which precipitated the derailment, GWA immediately implemented a 20 km/h temporary speed restriction (TSR) for traffic on all 80 lb/yd rail until all ultrasonic testing was completed.
It was evident that the ultrasonic ‘cleansing test’ of 3 August 2014 was more effective than the inspection carried out in November 2013 for the detection of all classes of defects. Given the extended timeframes over which typical rail foot defects develop, it was likely that growth of the flaws identified at 1036.541 km (the PoD) and 975.244 km was well advanced at the time of the November 2013 inspection. On this basis therefore, it was evident that the ultrasonic testing conducted in November 2013, as part of GWA’s scheduled maintenance processes, had been inefficient at detecting and/or appropriately assessing some internal rail defects in the 80 lb/yd rail between Northgate and Alice Springs.
Special locations
On the Tarcoola to Darwin railway there was a total of 82.6 km of 80 lb/yd rail laid in two locations[10] – including through the derailment site near Marryat. Due to the rail age, smaller section size and surface condition, GWA advised that they managed these sections as special locations, where the 80 km/h permanent speed restriction has been maintained for more than 10 years.
The RISSB[11] Code of Practice for the Defined Interstate Network Volume 4 – Track, Civil and Electrical Infrastructure - Part 1: Infrastructure Management (CoP), describes the term ‘special location’ and states:
Common management practice used by railway managers is to identify certain locations of the infrastructure that exhibit a history of proneness to an event (environmental or other conditions) that may cause the location to have a higher risk of failure. In this Code these locations are called “special locations” and the event(s) that cause each “special location” to be at a higher risk are called the “defined event(s)”. The conditions at “special locations” cannot in general be adequately ascertained through normal scheduled inspections and require additional actions to be taken when the defined event occurs.
Infrastructure affected by defined events described in the Code may be managed as special locations and includes, but is not limited to, infrastructure prone to flooding, earthworks instability and track lateral instability.
Typically, infrastructure locations with a higher rate of deterioration or recurring anomalies are identified and classified as special locations. Where special locations have been identified, the recording and management of risks to train operations should be carried out to manage those risks.
GWA procedure IN-PRC-020 specifies that all defects found through patrol, general and detailed inspections are documented and recorded in the Rail Maintenance Management System (RMMS).
In accordance with IN-PRC-020, GWA’s treatment of track sections affected by previously defined events and identified as a higher risk can be assessed and managed as special locations.
For special locations, GWA track inspectors are required to:
- ‘look for obvious abnormal conditions that may impair the capability of the infrastructure during defined events’ and,
- ‘use a list of specific locations requiring particular attention during inspections’.
During the investigation, GWA advised that the organisation relied on ‘the local knowledge of track inspectors and other track and infrastructure staff to identify locations which may affect network integrity under certain conditions e.g. during periods of high ambient temperatures’.
Contrary to the requirements for special locations, GWA was unable to provide records identifying locations where additional (special) measures had been implemented to manage track areas known to have an increased likelihood of failure. Where this historical information is not recorded, there is limited opportunity to gauge the effectiveness of infrastructure management regimes or the risk levels associated with continued operations.
Reliance on local knowledge of staff, and not maintaining specific records documenting known areas of elevated risk may have reduced the effectiveness of GWA’s inspection and maintenance task. Consequently, there was an increased likelihood of an infrastructure failure and a direct impact on railway safety
__________
From the evidence available, the following findings are made with respect to the derailment of train 6DA2 near Marryat, South Australia on 26 July 2014.These findings should not be read as apportioning blame or liability to any particular organisation or individual.
Safety issues, or system problems, are highlighted in bold to emphasise their importance. A safety issue is an event or condition that increases safety risk and (a) can reasonably be regarded as having the potential to adversely affect the safety of future operations, and (b) is a characteristic of an organisation or a system, rather than a characteristic of a specific individual, or characteristic of an operating environment at a specific point in time.
Contributing factors
- A rail fracture originating from the foot of a defective flash-butt welded joint initiated the derailment of train 6DA2 near Marryat, SA on 26 July 2014.
- The scheduled ultrasonic tests conducted in November 2013 on the 80 lb/yd rail between Northgate and Alice Springs had been ineffective in detecting and quantifying the significant defects present at 1036.541 km and 975.244 km locations. [Safety issue]
Other factors that increased risk
- Contrary to the requirements of procedure IN-PRC-020, GWA had not established a list of specific locations known to have an increased likelihood of failure, such that particular attention may be applied in those locations during inspections. [Safety issue]
Other findings
- There were no identified mechanical defects or deficiencies with the locomotives and trailing vehicles.
- Train handling and speed were not considered factors in the derailment.
- Although visual patrol inspections were carried out regularly, the nature of the developing defect was such that it was unlikely that more frequent inspections of this type would have discovered the defect or the fractured rail before the passage of train 6DA2 and its subsequent derailment.
The safety issues identified during this investigation are listed in the Findings and Safety issues and actions sections of this report. The Australian Transport Safety Bureau (ATSB) expects that all safety issues identified by the investigation should be addressed by the relevant organisation(s). In addressing those issues, the ATSB prefers to encourage relevant organisation(s) to proactively initiate safety action, rather than to issue formal safety recommendations or safety advisory notices.
All of the directly involved parties were provided with a draft report and invited to provide submissions. As part of that process, each organisation was asked to communicate what safety actions, if any, they had carried out or were planning to carry out in relation to each safety issue relevant to their organisation.
The initial public version of these safety issues and actions are repeated separately on the ATSB website to facilitate monitoring by interested parties. Where relevant the safety issues and actions will be updated on the ATSB website as information comes to hand.
Detection of rail defects
The scheduled ultrasonic tests conducted in November 2013 on the 80 lb/yd rail between Northgate and Alice Springs had been ineffective in detecting and quantifying the significant defects present at 1036.541 km and 975.244 km locations.
Safety issue number: RO-2014-014-SI-01
Special locations
Contrary to the requirements of procedure IN-PRC-020, GWA had not established a list of specific locations known to have an increased likelihood of failure, such that particular attention may be applied in those locations during inspections.
Safety issue number: RO-2014-014-SI-02
Sources of information
The sources of information during the investigation included:
Genesee & Wyoming Australia
The drivers and crew of train 6DA2
References
Australian Standard, AS 1085.20-2012 - Railway track material - Welding of steel rail
Australian Standard, AS 4292 Railway Safety Management Part 1 General Requirements - 6.2 Process Control (b), (f)
Bureau of Meteorology – Weather Observations, Ernabella/Pukatja (Station ID 16097)
Bureau of Meteorology – Weather Observations, Kulgera (Station ID 15603)
Code of Practice for the Defined Interstate Network Volume 4 – Track, Civil and Electrical Infrastructure - Part 1: Infrastructure Management
Genesee & Wyoming Australia - Construction, Monitoring & Maintenance Standards for Maintenance Procedures - IN-PRC-10
Genesee & Wyoming Australia - Infrastructure Procedure – Inspections – IN-PRC-020
RISSB Glossary of Railway Terminology - Guideline
Submissions
Under Part 4, Division 2 (Investigation Reports), Section 26 of the Transport Safety Investigation Act 2003 (the Act), the Australian Transport Safety Bureau (ATSB) may provide a draft report, on a confidential basis, to any person whom the ATSB considers appropriate. Section 26 (1) (a) of the Act allows a person receiving a draft report to make submissions to the ATSB about the draft report.
A draft of this report was provided to Genesee and Wyoming Australia, the drivers and resting crew of train 6DA2, and the Office of the National Rail Safety Regulator.
Submissions were received from all parties. These were reviewed and where considered appropriate, the text of the report was amended accordingly.
Purpose of safety investigationsThe objective of a safety investigation is to enhance transport safety. This is done through:
It is not a function of the ATSB to apportion blame or provide a means for determining liability. At the same time, an investigation report must include factual material of sufficient weight to support the analysis and findings. At all times the ATSB endeavours to balance the use of material that could imply adverse comment with the need to properly explain what happened, and why, in a fair and unbiased manner. The ATSB does not investigate for the purpose of taking administrative, regulatory or criminal action. TerminologyAn explanation of terminology used in ATSB investigation reports is available here. This includes terms such as occurrence, contributing factor, other factor that increased risk, and safety issue. Publishing informationReleased in accordance with section 25 of the Transport Safety Investigation Act 2003 Published by: Australian Transport Safety Bureau © Commonwealth of Australia 2015
Ownership of intellectual property rights in this publication Unless otherwise noted, copyright (and any other intellectual property rights, if any) in this report publication is owned by the Commonwealth of Australia. Creative Commons licence With the exception of the Coat of Arms, ATSB logo, and photos and graphics in which a third party holds copyright, this publication is licensed under a Creative Commons Attribution 3.0 Australia licence. Creative Commons Attribution 3.0 Australia Licence is a standard form licence agreement that allows you to copy, distribute, transmit and adapt this publication provided that you attribute the work. The ATSB’s preference is that you attribute this publication (and any material sourced from it) using the following wording: Source: Australian Transport Safety Bureau Copyright in material obtained from other agencies, private individuals or organisations, belongs to those agencies, individuals or organisations. Where you wish to use their material, you will need to contact them directly. |


