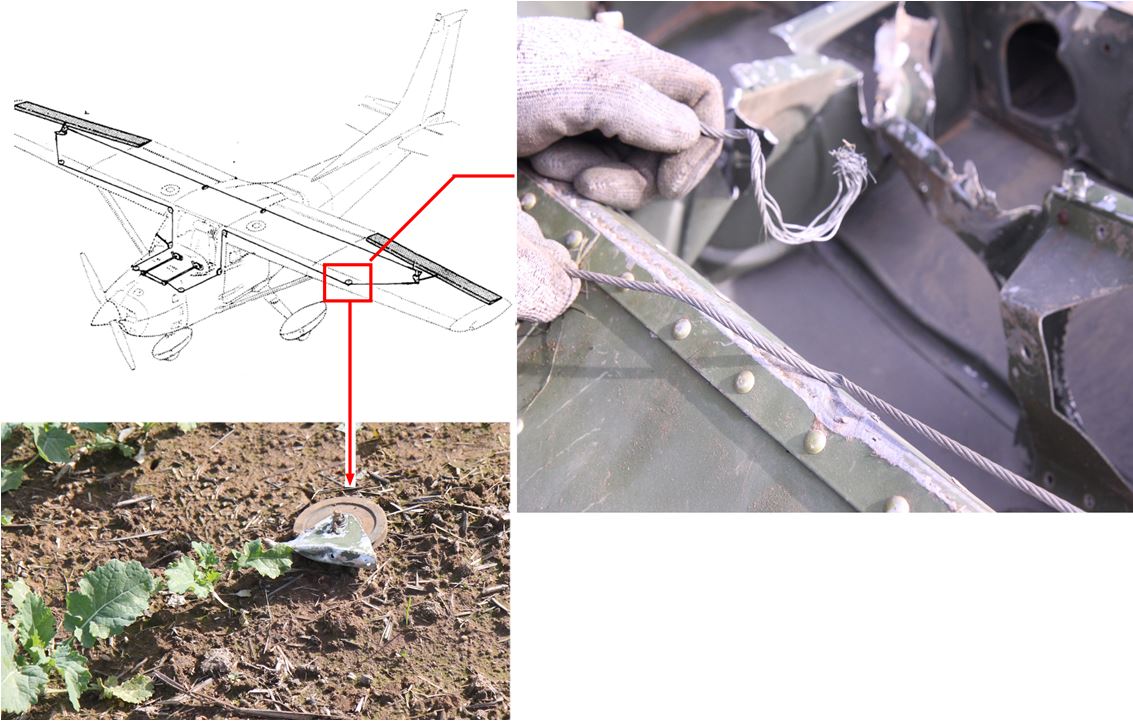
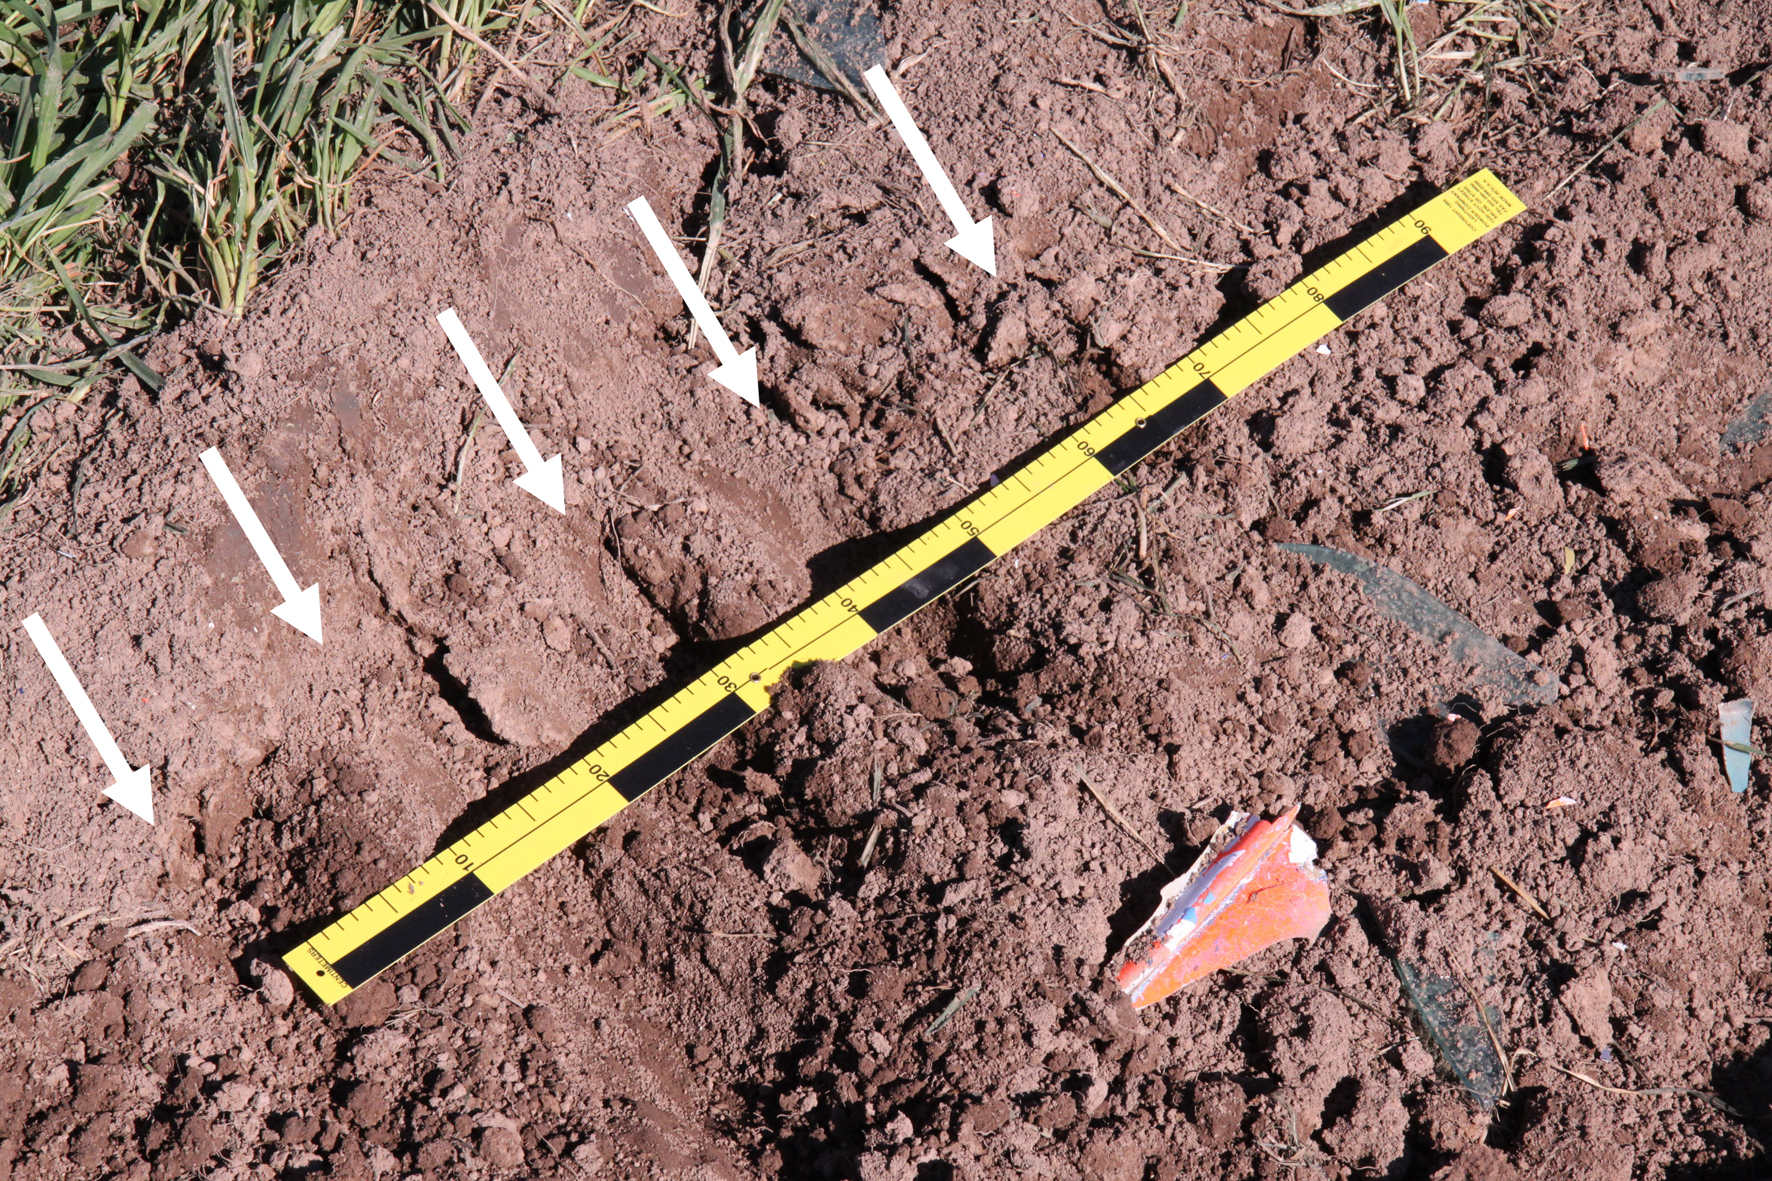
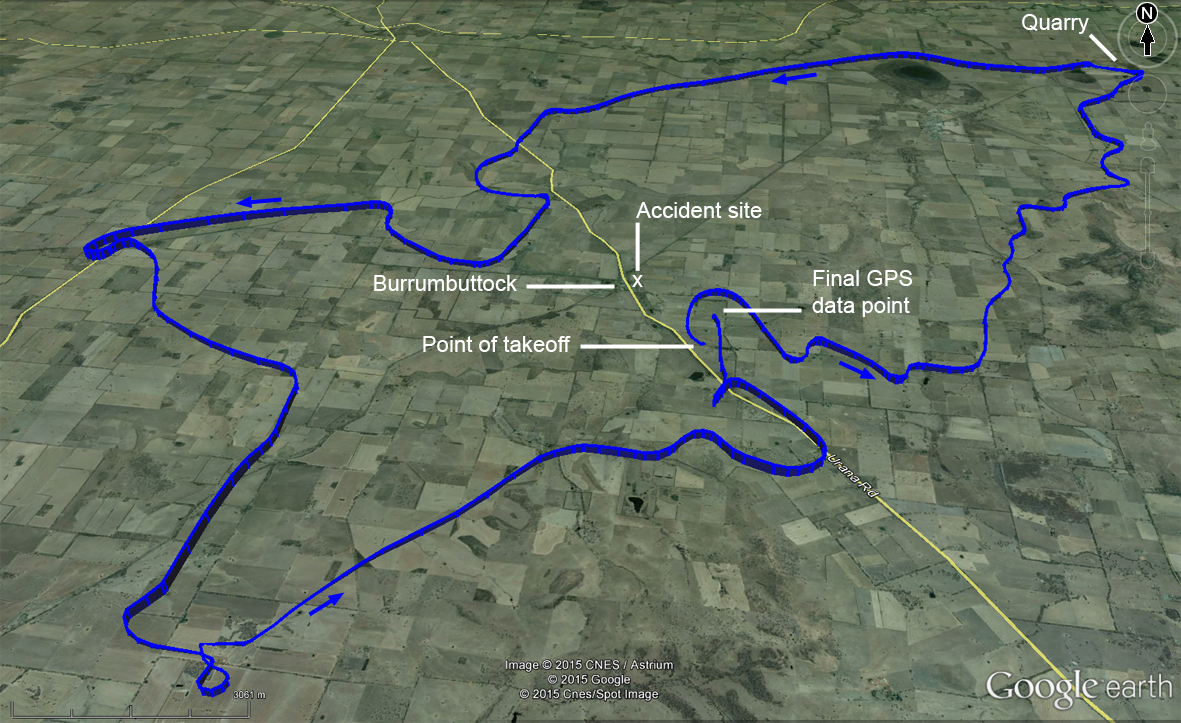
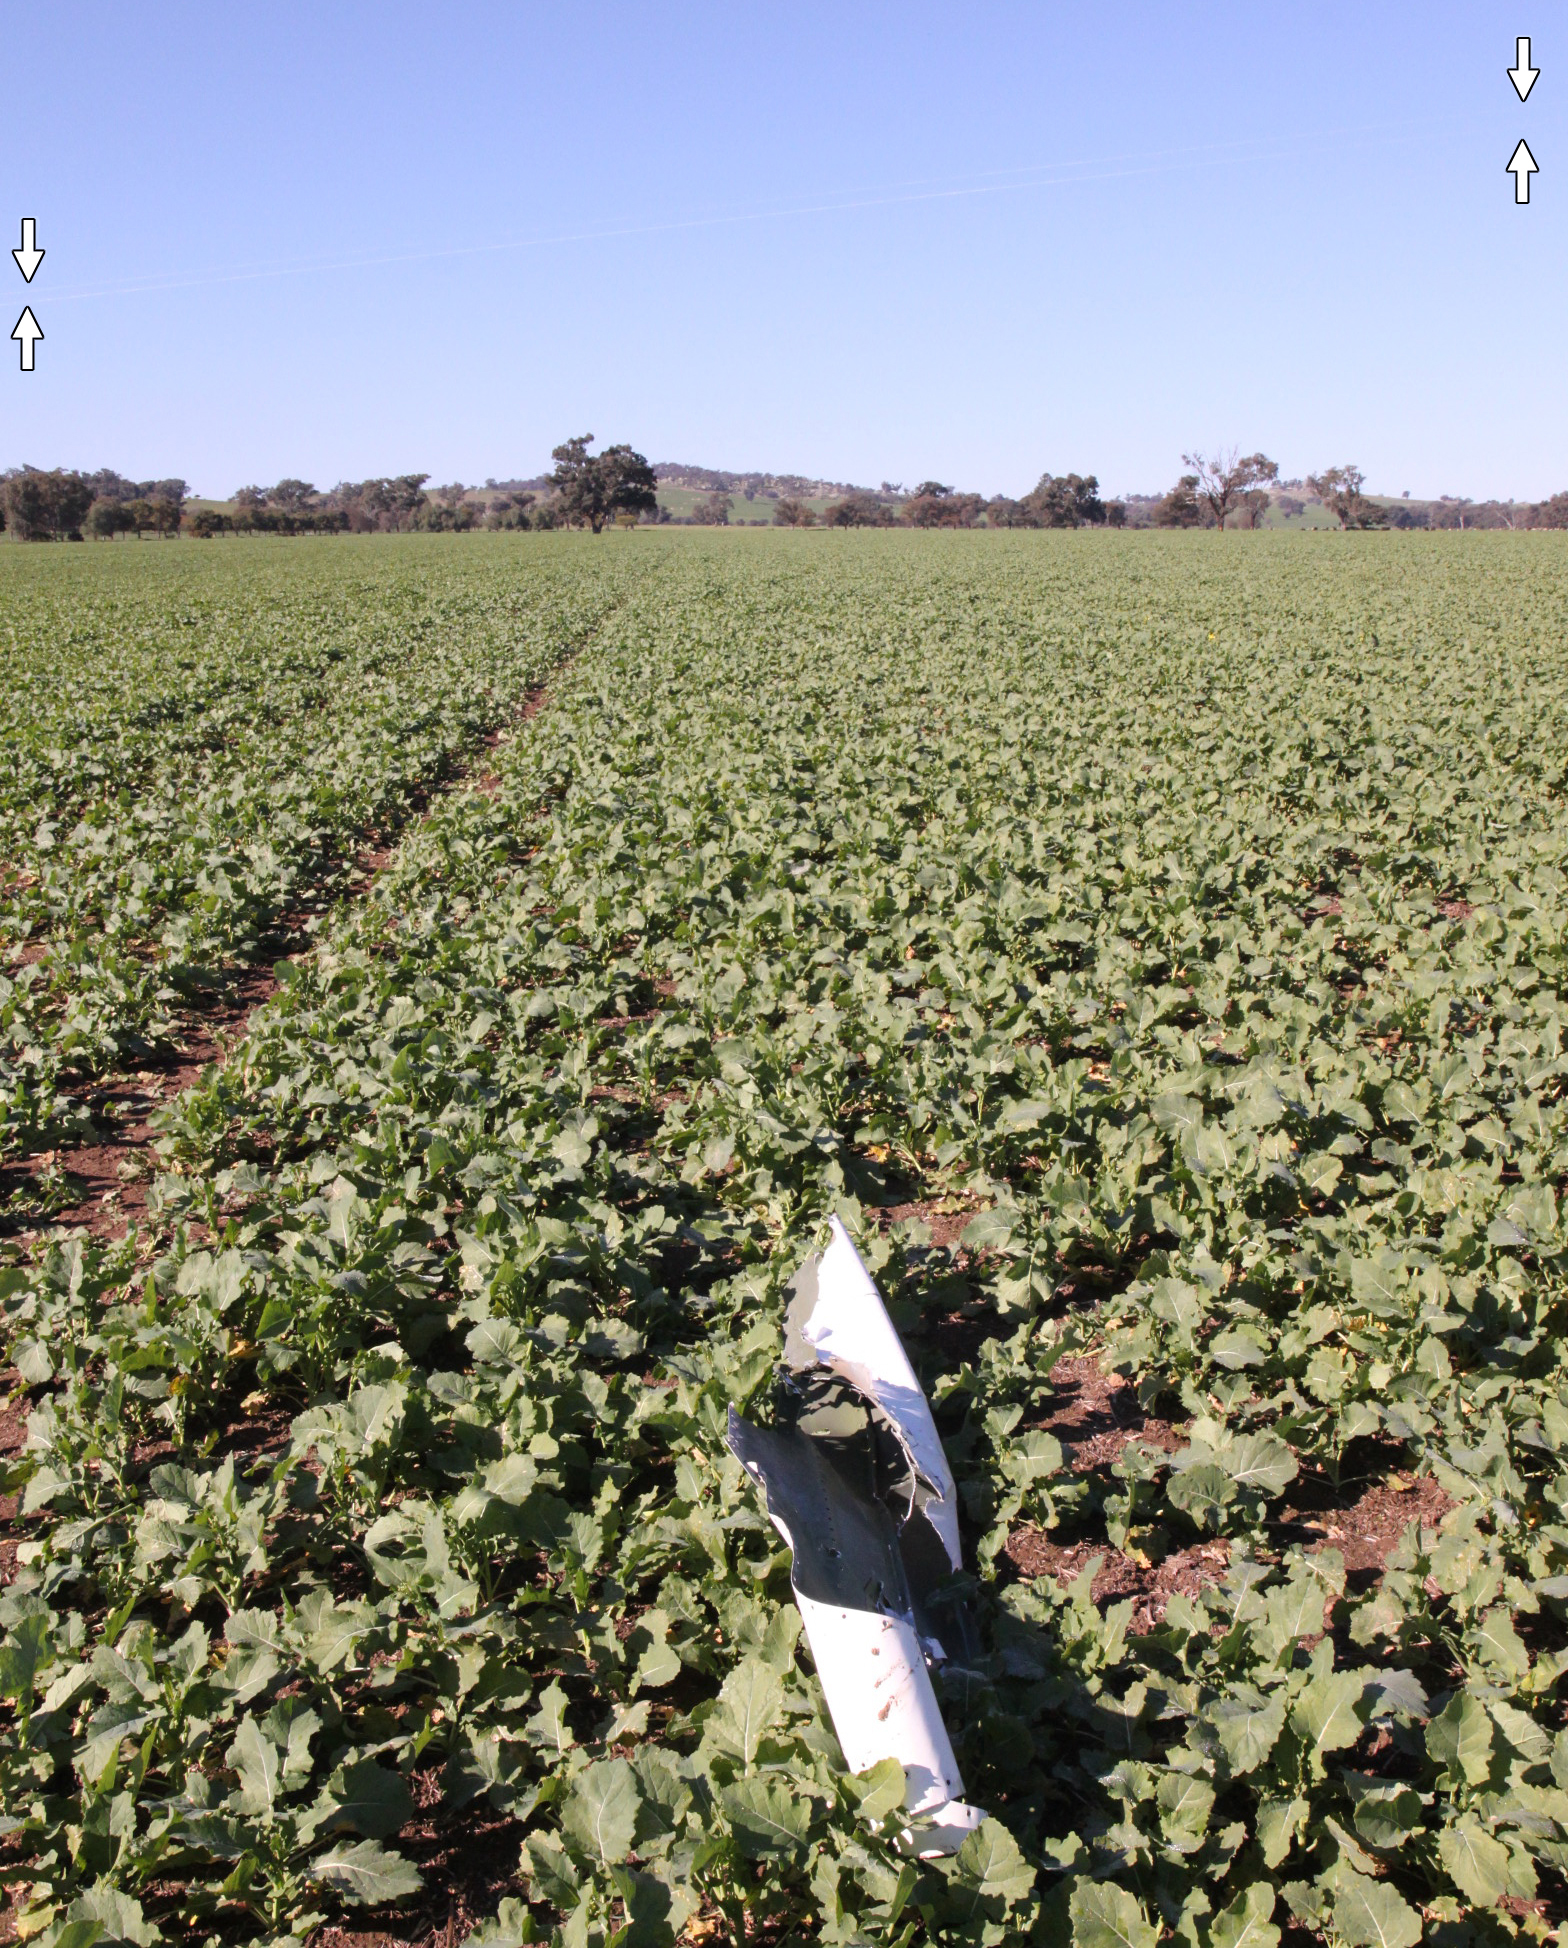
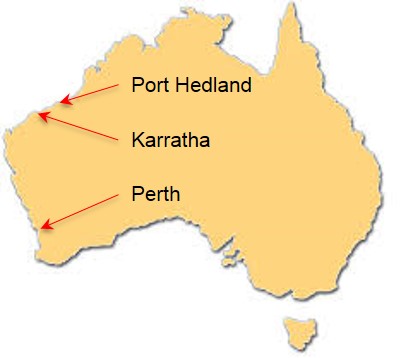
On 26 July 2014, the crew of a QantasLink Boeing 717 aircraft, registered VH-NXL (NXL), conducted a scheduled passenger flight from Karratha to Perth, Western Australia, where runways 21 and 24 were in use. At about 1200, the first officer of NXL contacted the aerodrome controller (ADC) who acknowledged the call. At about 1201, an airport safety officer contacted the ADC and advised that their vehicle was holding short of runway 24 for a runway inspection. The ADC cleared the vehicle to enter runway 24 and hold short of runway 21, then indicated on the console runway strip that runway 24 was occupied.
At that time, NXL was on final approach about 7.5 NM from runway 24 and the flight crew did not hear the vehicle being cleared onto the runway. The safety officer drove along the centreline of runway 24 towards the intersection with runway 21.
At about 1203, the ADC cleared an aircraft for take-off from runway 21. After observing that aircraft pass through the intersection of runway 24, the ADC picked up the flight progress strip for NXL, scanned the runway but did not see the vehicle on it, and moved the strip into the console runway bay. The ADC then cleared NXL to land on runway 24. At that time, NXL was on final at about 1,000 ft and 1.5 NM from the runway threshold. The safety vehicle was on runway 24 heading south-west. The safety officer heard NXL being cleared to land but not the assigned runway.
As NXL touched down on runway 24, the first officer saw the flashing lights of a vehicle ahead on the runway, immediately stated ‘go-around, car on the runway’ and the captain commenced a go-around. The safety vehicle was then stationary on the centreline of runway 24 about 1180 m from the threshold and facing away from the approaching aircraft. The safety officer did not see the aircraft until it passed about 150 ft over the safety vehicle.
With experience comes the ability to fuse conscious control with largely automated actions. The penalty for this can be absent-mindedness or a lack of attention to a specific task.
On 23 May 2014, a Qantas Airbus A380 aircraft, registered VH-OQK, was operating a scheduled passenger service from Los Angeles, USA to Melbourne, Australia. While overflying Hawaii, USA, the battery within a passenger’s personal air purifier (worn around their neck on a lanyard) began to overheat and produce smoke. The crew followed documented emergency procedures and immersed the device in water; effectively dissipating the heat from the battery and suppressing any further smoke evolution. The passenger received minor superficial burns which did not require first aid treatment.
A preliminary investigation conducted by the ATSB identified that the device contained a small non-rechargeable lithium battery; the size of which conformed with the limitations specified for carry-on items. The Bureau also found that the crew acted in an appropriate manner to manage the overheating battery and control the associated risks.
Given that the ATSB’s records show that this type of battery failure is quite uncommon and both the crew’s actions and documented procedures were effective in managing the small risks involved, there would be limited safety benefit in investigating the matter further, and as such, the ATSB investigation has been discontinued.
The ATSB continues to monitor and record incidents involving lithium batteries and reminds passengers to consult the dangerous goods brochure published by the Civil Aviation Safety Authority when bringing devices containing lithium batteries aboard aircraft.
At about 0800 on 26 July 2014, Genesee & Wyoming Australia (GWA) freight train 6DA2 derailed at the 1036.541 km mark near Marryat, South Australia.
The train was travelling at about 80 km/h when it derailed. The trailing locomotive, crew van and 17 wagons derailed, with the train separating into two portions that came to a stand about 108 m apart. The wagons (consisting of 35 platforms) and 340 m of track were significantly damaged.
There were no injuries sustained by the driving train crew or drivers resting in the derailed crew van.
What the ATSB found
The ATSB found the train had derailed on a section of 80 lb/yd rail, while travelling over a flash-butt welded joint that had fractured through a pre-existing defect in the rail foot. The defect most likely occurred during the flash-butt welding process, which subsequently led to crack propagation and brittle fracture that extended vertically through the rail web.
Metallurgical evidence indicated that the fracture had propagated slowly from the initiating defect and had likely been in existence for some time, remaining undetected during track inspections and the passage of trains for a period up to 30 years.
Due to the 80 lb/yd rail’s age, smaller section size and surface condition, all trains travelling those sections of track were speed restricted to 80km/h. While the rail through the area of the derailment had been subject to periodic visual and non-destructive inspections across its lifetime, it was evident that the inspection regime had not been effective in detecting and/or assessing some internal rail defects. Several of those defects had the potential to pose an immediate threat to the safety of rail services.
What's been done as a result
Following the derailment, the track manager (GWA) immediately slowed train speed over 80 lb/yd rail to 40 km/h for passenger trains and 50 km/h for freight trains. GWA then carried out a detailed continuous ultrasonic ‘cleansing test’ of the 80 lb/yd rail between Northgate and Alice Springs. To increase the sensitivity of the inspection, the ultrasonic intensity was increased by 6 dB and the test vehicle operating speed was slowed to between 10-12 km/h.
This inspection detected another broken rail at a flash-butt weld at the 975.244 km mark. This fracture had also initiated from the rail foot and required immediate plating and repair. Another 31 rail defects were found requiring various levels of response.
GWA advised that the continuous ultrasonic inspection frequency of 80 lb/yd rail has been increased to a minimum of four inspections per year and a programme to replace all 80 lb/yd rail is being evaluated.
Safety message
Railway owners and managers should ensure that their inspection and maintenance processes, for sections of rail that have a high incidence of defects, are an appropriate and effective management strategy for mitigating the risk of failure under the passage of a train.
The occurrence
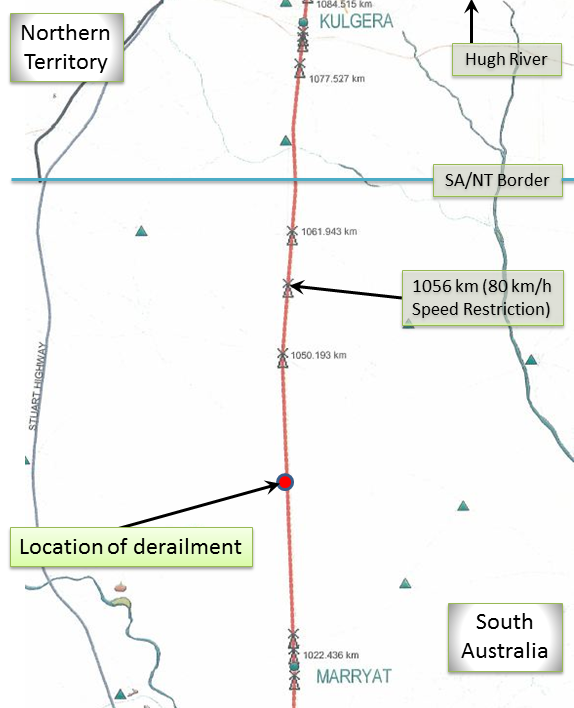
At about 0800[1] on 26 July 2014, Genesee & Wyoming Australia (GWA) freight train 6DA2 changed operating crew near Hugh River, Northern Territory. The train then continued its journey south before crossing the Northern Territory – South Australia border. At about the 1056 km mark[2] the train entered a section of track that had a permanent speed restriction of 80 km/h, due to a known history of more frequent defects being encountered during inspection.
Figure 1: Map of derailment location
Source: FreightLink (annotated by ATSB)
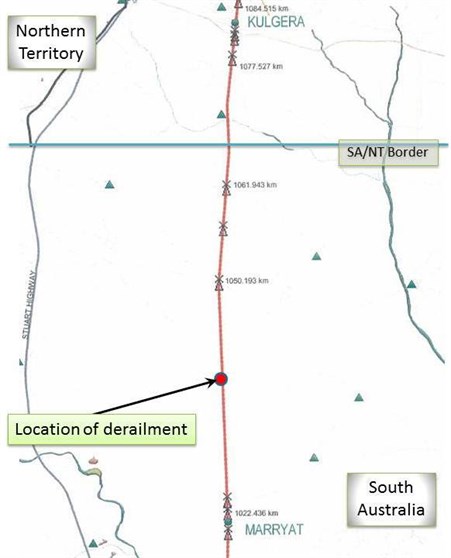
The crew reported that train had been handling well when the driver reduced the speed with throttle and dynamic brake applications to enter the 80 km/h section (Figure 1). At about the 1036.541 km mark, the driver had just acknowledged the vigilance indication and was verifying the train’s speed when the crew heard two ‘large bangs’ and felt the lead locomotive jar. The crew, aware that the ‘bangs’ may have been the locomotive bogies passing over a break in the rail, looked in the rear view mirrors and could see large volumes of dust rising from derailed wagons and displaced containers about 200 m behind the driver’s cab. At this time, the locomotives started shuddering; after which the driver made an emergency brake application and moved the throttle back to idle. The lead locomotive stopped about 360 m from the point of derailment.
Events after the derailment
Neither of the drivers was injured as a result of the derailment. The second driver alighted from the locomotive to check on the crew resting in the crew van, confirming that they were also uninjured. When walking back to the crew van, the second driver observed that the wheelsets of the leading bogie on the trailing locomotive and the wheelsets of the trailing bogie on the crew van had also derailed.
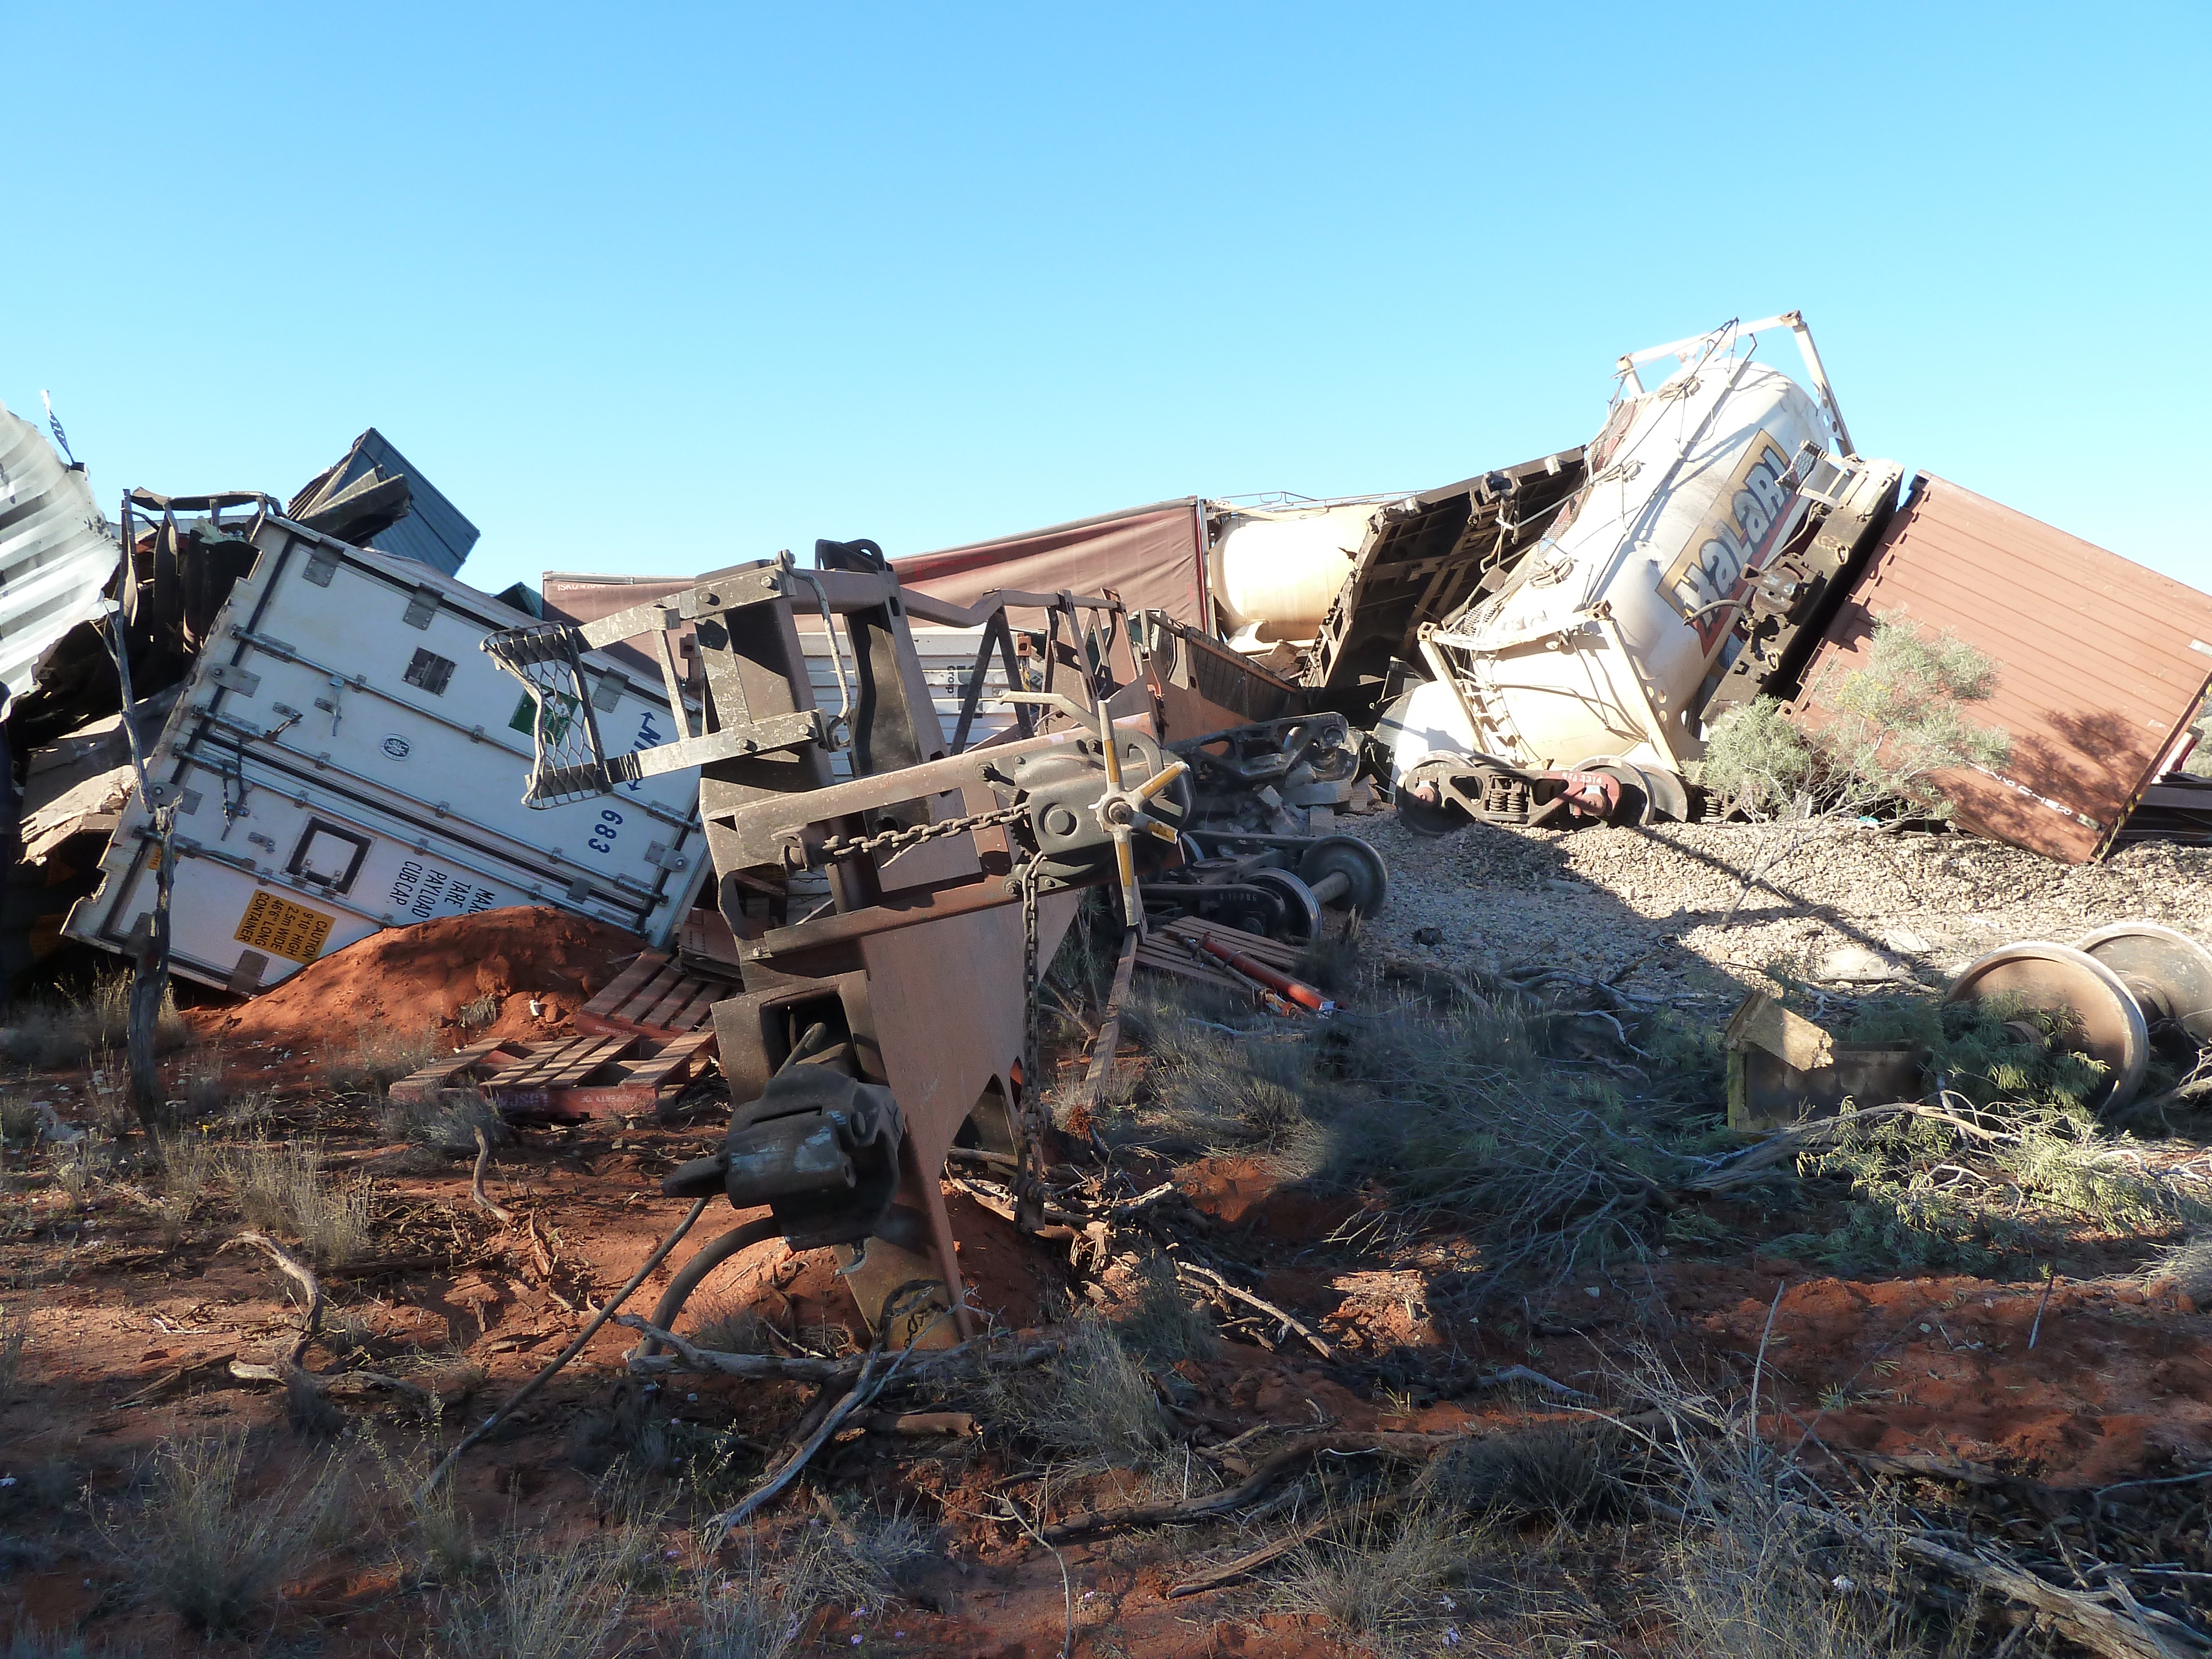
Further inspection of the train found that it had separated into two sections, with the locomotives, locomotive refuelling wagon, crew van and one loaded container flat wagon remaining coupled. There was a gap of about 108 m between the front section of train and the first of the derailed wagons. Seventeen rail vehicles consisting of 35 platforms, freight and containers were scattered either laterally or vertically for about 250 m along the rail corridor (Figure 2). The rear 930 m of the train, extending north beyond the point of derailment, remained on-rail.
The rail vehicles and about 340 m of track infrastructure had sustained significant damage.
Figure 2: Derailed wagon and wreckage about 100m from the point of derailment
The derailment occurred near Marryat (1036.541 km) on the Tarcoola to Darwin railway, about 28 km south of the Northern Territory - South Australia border (Figure 1).
Train and train crew information
Train 6DA2 was a freight service operated by GWA between Darwin and Adelaide. The train consisted of two locomotives (GWU 006 leading and ALF 23 trailing), hauling an in-line fuel wagon, a crew van and 42 freight wagons (including 14 multi-platform wagons). The train was 1543.3 m long and had a trailing mass of 2540.9 t.
At about 0920 on 25 July with a crew of four drivers, train 6DA2 departed from the Berrimah Freight Terminal, Northern Territory. The drivers worked the train in pairs, operating in rotating relay shifts. The drivers operating the train at the time of derailment had about 2.5 and 7 years rail industry experience respectively.
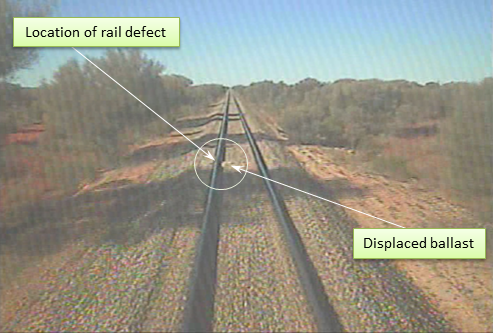
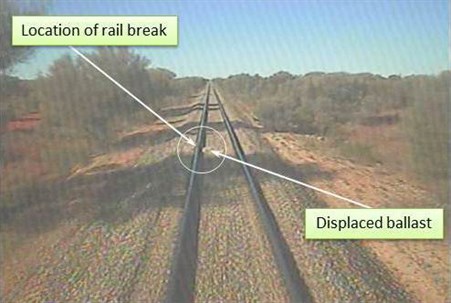
Preliminary examination of on-board recorded data found no evidence of anomalies with the train handling or mechanical condition before the derailment. A review of video and audio recordings extracted from leading locomotive GWU 006 supported the drivers’ report of a ‘large bang’ when they travelled over what they thought was a broken rail (Figure 3).
Figure 3: Location of rail defect & minor ballast displacement near 1036.541 km mark
Source: Genesee & Wyoming – Locomotive GWU 006 video camera
Environmental conditions
The Bureau of Meteorology weather stations nearest the derailment were located at Kulgera (47 km NNW) and Ernabella (120 km E). Daily weather measurements of temperature, humidity, wind and rain at Kulgera were taken twice per day at 0900 and 1500. At Ernabella measurements were more regular and reported at half hourly intervals.
Temperatures recorded at Kulgera and Ernabella on 26 July at 0900 (near the time of the derailment) were 10.4 C and 10.3 C respectively. At Ernabella, a low of 0.9 C was recorded at 0600, with temperatures at 0300 and 0800 recorded as 2.4 C and 2.9 C respectively. It is likely that temperatures at Kulgera would have been similar at these times.
No rainfall was recorded and winds were light; generally from a northerly direction.
Track information
The track infrastructure was owned and maintained by GWA, with the movement of rail traffic controlled from GWA’s Transport Control Centre located at Dry Creek in South Australia.
The standard gauge (1435 mm) track at the derailment location consisted of 80 lb/yd rail fastened to concrete sleepers by resilient clips. The track formation comprised sand/clay based soil, topped with a capping layer and overlaid with ballast to a nominal design depth of 250 mm. The track bed supported prestressed concrete sleepers spaced at 667 mm centres.
Approaching the derailment site from Kulgera, the track was tangent[3] and the terrain slightly undulating. The derailment occurred within a 68 km section of track where the maximum speed was restricted to 80 km/h, due to the age, smaller section size and surface condition of the 80 lb/yd rail.
Rail examination
The ATSB examined the track leading into the derailment site and determined the most likely contributor was a break in the east rail near the 1036.541 km mark. It was evident that the rail had fractured at a point where two lengths of rail had been flash-butt welded[4]. An inspection of the mating ends from two broken rail sections strewn near the point of derailment identified variable oxidisation levels across the fracture surfaces and a localised feature that was characteristic of an internal material defect.
The oxidisation that extended across the fracture through the rail foot and web was noticeably heavier and more prominent than that across the rail head fracture surfaces. This was consistent with the fracture developing in a progressive manner - originating in the rail foot and propagating vertically through the rail web.
Evidence of iron oxide bleed on the top surface of the foot suggested that the fracture had propagated slowly and had been in existence for some period of time – potentially remaining undetected during track inspections and the passage of previous trains.
The rail head at the fracture point showed light battering from train wheels that had traversed the break, before the rail breakup extended into multiple other sections - each about 700 mm long.
Analysis of broken rail sections
The ATSB quarantined sections of the broken rail for the purposes of laboratory metallurgical examination and analysis. The Monash University Institute of Railway Technology (IRT) carried out an analysis of four rail sections removed from the derailment site and, for comparison purposes, one section of 80 lb/yd rail from a stockpile at Kulgera, Northern Territory.
The analysis included:
examination and characterisation of the fracture surfaces
assessment of the defect initiation and growth behaviour, including contributing factors
assessment of the rail material for compliance against relevant manufacturing specifications and standards;
identification of the root cause(s) of the rail failure
assessment of a flash-butt weld in a rail section removed from the Kulgera stockpile.
The 80 lb/yd rail that failed at the derailment site was manufactured for the Commonwealth of Australia in 1916, most likely at the BHP, Newcastle steel mills. The track section had been constructed between 1975 and 1980 from a combination of used (reclaimed) rail and unused (stored) rail. The joint was flash-butt welded by the Commonwealth Railways Flash-butt Welding Workshop at Port Augusta, South Australia. The flash-butt welding process was verified through daily sample tensile failure tests and random ultrasonic examination of production welds in the workshop and in the field following track laying.
The IRT examination found that:
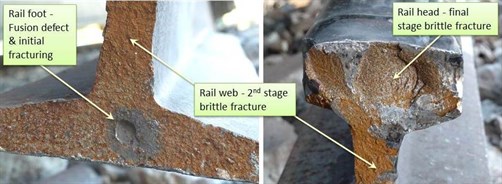
The fractured flash-butt weld contained a fusion defect at the bond line in the rail foot. Differences in the surface condition over the remaining regions of the fracture indicated that failure of the weld occurred progressively, commencing with some initial cracking of the region surrounding the weld defect (possibly immediately following the welding process, and while the weld was cooling to ambient temperature).
A second stage of cracking occurred over the remainder of the foot and most of the web at some unknown time prior to the date of the derailment. The final stage of cracking occurred over the remaining uncracked region in the centre of the head. The second and subsequent stages of failure involved brittle fracture.
All subsequent rail failures, i.e. in parent rail material, occurred by brittle fracture as a result of the conditions created by or during the derailment.
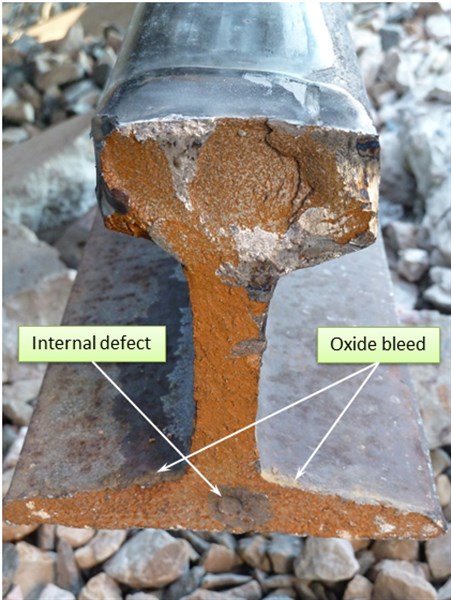
Figure 4 illustrates the fusion defect through failed flash-butt weld region. The defect was present below the web of the rail foot and presented as a depression measuring 8 mm wide by 10 mm high. A surrounding darker region measuring 18 mm in diameter was consistent with pre-existing cracking and subsequent crack surface degradation.
Figure 4: Flash-butt weld fusion defect and brittle fractures
Source: ATSB
Metallurgical analysis (by IRT) of the weld heat affected zone suggested that the defect most likely formed as a fusion-line flaw when the joint was flash-butt welded (between 1975 and 1980). Analysis also suggested that the quality of this weld would not meet the specifications of the current Australian Standard, AS 1085.20 - Railway track material - Welding of steel rail. The presence of the fusion defect ultimately led to the failure the flash-butt weld at the bond line. The fracture surface immediately surrounding the weld defect was ‘extensively degraded’ and most likely developed in the immediate post-weld cooling period.
Second-stage cracking was by brittle fracture over the remainder of the foot and most of the web (Figure 4), however the crack growth rate and interval before the derailment of train 6DA2 could not be determined. The IRT reported that the ambient temperature variations[5], in particular low overnight minimum temperatures, ‘would result in increased longitudinal stresses in continuously welded rail; in turn increasing the risk of rail failure’. A small amount of rain was recorded twice in early July and the levels of humidity would have contributed to the corrosion of the recently formed fracture surfaces.
To assess the quality of the flash-butt welded joints, a random sample of 80 lb/yd rail containing a welded joint was selected as an exemplar from a stockpile at Kulgera. The IRT examination subsequently found a 10 mm defect in the upper weld area of that joint – further raising concerns about the quality of the flash-butt joints in the 80 lb/yd rail. The findings also suggested that before stockpiled rail is used in mainline track, additional detailed manual ultrasonic inspections should be carried out to verify the quality of flash-butt welded joints.
Infrastructure inspections
GWA’s procedures for inspection of track and associated infrastructure are documented in their track maintenance procedure IN-PRC-20 – Inspections, which defines requirements for both scheduled and unscheduled inspections.
The process for scheduled inspections consists of three inspection types:
Patrol inspections – usually performed while travelling in a road/rail vehicle or while travelling in the cab of a locomotive. Patrol inspections look for obvious abnormal conditions, changes in condition, or evidence of deterioration rates that may indicate unacceptable risk to operations.
General inspections – usually performed in response to previously identified defects or unusual rail conditions.
Detailed inspections – examine specific aspects of the infrastructure condition or behaviour and may involve visual inspection, measurements, testing and assessment.
Unscheduled inspections are usually in response to an event (temperature extremes, earth slips, floods, earthquakes) or following reports of a suspected unsafe condition from drivers, other workers or members of the public.
The derailment near Marryat occurred within a section of track laid with 80 lb/yd rail. GWA and former corridor managers[6] had applied an 80 km/h permanent speed restriction to reduce the impact loading on the rail. GWA conducted patrol inspections at a frequency consistent with procedure IN-PRC-20 – Inspections. In the weeks leading up to the derailment on 26 July 2014, scheduled patrol inspections had not reported any track defects near the point of derailment (PoD).
The last track inspection from a locomotive cab before the derailment was on 3 June 2014, where the only defects reported were two track signage issues. Other inspections of this type carried out on 23 July 2013, 20 December 2013 and 25 March 2014 identified various items including rough riding, mud-hole, ballasting and some dip welds[7]. No defects indicating or suggesting rail or track deficiencies were reported through locomotive cabin inspections in the vicinity of the PoD.
GWA records showed that track at the1036.541 km mark had been tamped[8] in September 2013 with a detailed track geometry inspection carried out shortly after (October 2013). About four months later, in February 2014, another detailed track geometry inspection was carried out. No track defects were recorded at or near the PoD.
Ultrasonic inspection
In the context of this investigation, it was evident that a weld fusion defect was present in the foot of the rail, which subsequently led to crack propagation and brittle fracture. Such defects within the rail cannot usually be detected through visual inspection (patrol and locomotive cab inspections) unless the defect subsequently causes a secondary defect such as a broken rail or dip weld. Consequently, detailed ultrasonic inspections are conducted periodically to detect internal rail defects.
Ultrasonic rail testing involves passing sound waves into the rail and monitoring the echo returned by the sound waves reflecting off internal and external surfaces (reflectors). Defects within the rail create reflectors which may return unique echo patterns depending on their type, location and size. Examination of the echo patterns allows an operator to deduce the existence, type and size of suspected rail defects.
A series of ultrasonic probes on the ultrasonic test vehicle are located near the surfaces of both rails, while the electronics are mounted inside the vehicle. A computer monitor is provided in the vehicle cabin to allow the operator to monitor and assess information transmitted from the ultrasonic test equipment.
Ultrasonic probes of differing sound beam angles scan each rail, where:
A 0-degree probe scans the central part of the railhead, the whole of the rail web and the central part of the rail foot perpendicular to the rail.
Forward and reverse 37-degree probes scan the central part of the railhead, the whole of the web and the central part of the rail foot.
Forward and reverse 70-degree probes scan the railhead and part of the upper web.
Portable hand operated ultrasonic equipment is used for manually verifying:
suspected defects recorded by the continuous ultrasonic inspection process
suspected defects found by visual inspection
known defects requiring re-inspection and reassessment
the integrity of new flash-butt and aluminothermic rail welds.
GWA procedure IN-PRC-20 specified that vehicle-mounted continuous ultrasonic testing of rail should be carried out at a minimum of 12-monthly intervals. In November 2013 (about 8 months before the derailment of train 6DA2), continuous ultrasonic testing was carried out by Speno Rail Maintenance Australia Pty Ltd (Speno), between Northgate, South Australia and Alice Springs, Northern Territory. That inspection found four vertical split head[9] defects over 82.6 km of 80 lb/yd rail. These defects ranged from 200 mm to 600 mm long and were removed. The inspection did not reveal any reportable weld fracture defects near the PoD.
Response to track defects
GWA procedure IN-PRC-010 - Maintenance Standards for Maintenance Procedures defines the standards and tolerances to be adopted when performing maintenance to ensure the condition of infrastructure remains within limits that are compatible with operating requirements. Defects in the foot of welds are managed in accordance with the size limitations specified in Table 1.
Table 1: Defects detected in the foot of existing welds
Defect Size
Response time
Action
<15 mm and full height of rail foot
30 days
Monitor. Removal is optional
15–35 mm width(if on edge use 10–35 mm)
1 day
Speed restrict and reassess every day, or remove
>35 mm width
Prior to the passage of the next train
Speed restrict and reassess every day, or remove
Broken Weld
Prior to the passage of the next train
Pilot, plate or remove (E1)
Transverse and vertical flaws in the rail foot are difficult to identify due to the narrow web area when using 37 and 70 degree probes. A 90 degree probe (longitudinal to the rail) is ideal for the detection of flaws in the rail foot, however use of this probe is not practical for continuous ultrasonic testing of in-situ rail.
Post-derailment re-examination of the November 2013 ultrasonic test results found an anomaly in the rail foot of a flash-butt weld near the 1036.541 km mark. The anomaly had not activated a defect exceedance alarm and was not noted by the test operator. Subsequent manual assessment of the anomaly suggested the existence of a defect measuring between 9 and18 mm in diameter. Speno advised that a defect of 9.0 mm (or greater) would normally produce a defect alarm, thereby prompting a manual ultrasonic test of the suspected defect. In this case an alarm had not been generated, suggesting that the automatic system assessed the defect as falling below the defined alarm limit.
Following the derailment of 6DA2, GWA implemented immediate risk mitigation strategies by limiting the speed of freight trains to 50 km/h and passenger trains to 40 km/h. These speed restrictions remained in place until all 80 lb/yd flash-butt and aluminothermic welds had been assessed as free of defects. Additionally, track patrol inspections on the 80 lb/yd sections were increased to six times per week, and included an inspection ahead of all passenger train services. Detailed ultrasonic testing frequency was increased from annual to 3-monthly tests for rail south of Alice Springs and 6-monthly north of Alice Springs.
Rail defect growth rate
Factors that influence the growth rate of defects in rail include:
quality and age of the rail
residual stresses
on-site temperature differentials
track curvature
axle load
dynamic train forces due to speed
cumulative train tonnage over the track.
Of these, the influence of cumulative train tonnage on track integrity is well documented in technical studies/papers and had been factored into GWA’s inspection intervals for continuous ultrasonic inspection. The track infrastructure manager can readily monitor cumulative train tonnage and the history of track defects. Inspection strategies can be adjusted to mitigate the risk of track failure based on this information.
In determining whether there is justification in increasing the frequency of inspection, GWA procedure IN-PRC-10, Construction, Monitoring & Maintenance Standards for Maintenance Procedures, does not address factors such as rail quality/age, on-site temperature and issues such as wagon impact loading. Research indicates that defect growth from initiation to 10 percent of its final (critical) size is relatively slow, but then accelerates quite rapidly through to failure. As a rail defect grows, the chance of detecting it increases, however the internal stress levels also increase - raising the risk of a rail failure. Increasing the frequency of continuous ultrasonic inspection may thus assist in capturing a greater number of defects earlier in their growth phase - before they reach critical size and result in a catastrophic failure.
GWA were aware of the increased risk of defects within the sections of track laid with 80 lb/yd rail and had responded to this by increasing the number of patrol inspections (defined in IN-PRC-020). These inspections increased from one to two or more per week. Inspection effort was also intensified, particularly during winter and spring, where low temperatures increases rail tensile forces that can result in rail breaks. The last continuous ultrasonic inspection before the derailment was carried out in November 2013, about 8 months before the derailment on 26 July 2014. No weld cracks or internal defects were found at this time.
On 26 July 2014, GWA freight train 6DA2 derailed at the 1036.541 km mark, near Marryat, South Australia. An examination of the rail at that location determined the most likely contributor to the derailment was a fracture extending through a flash-butt welded joint within the east rail. The fracture had commenced from an internal defect in the rail foot and had propagated vertically towards the rail head.
Detection of rail defects
Following the derailment of train 6DA2, a detailed continuous ultrasonic ‘cleansing test’ of the 80 lb/yd rail between Northgate and Alice Springs commenced on 3 August 2014. To increase the sensitivity of the inspection process, the ultrasonic intensity was raised by 6 dB and the test vehicle operating speed was slowed to 10-12 km/h.
This inspection revealed 31 potential defects, compared to only nine such defects found during the inspection in November 2013. Of these defects, 15 were below the limits requiring any action and 12 required monitoring for deterioration into the future. All defects were within the head of the rail except for two which were in the rail web. There were 13 potential defects detected in flash-butt welds and four in aluminothermic welds. The four higher-priority defects (two in flash-butt welds) were subsequently repaired, including another broken rail at the 975.244 km mark, which had also fractured through a flash-butt weld at a defect in the foot area. In accordance with GWA’s procedures, the broken rail was repaired before the passage of the next train.
Two of the defects detected in the ‘cleansing test’ had also been detected in November 2013, but at that time both were classified as small, low priority and logged for monitoring. The more detailed ultrasonic inspection (August 2014) subsequently rediscovered these defects and assessed them as requiring more frequent monitoring and reassessment until the defects were removed. Having found these higher-priority defects, including a defect similar to that which precipitated the derailment, GWA immediately implemented a 20 km/h temporary speed restriction (TSR) for traffic on all 80 lb/yd rail until all ultrasonic testing was completed.
It was evident that the ultrasonic ‘cleansing test’ of 3 August 2014 was more effective than the inspection carried out in November 2013 for the detection of all classes of defects. Given the extended timeframes over which typical rail foot defects develop, it was likely that growth of the flaws identified at 1036.541 km (the PoD) and 975.244 km was well advanced at the time of the November 2013 inspection. On this basis therefore, it was evident that the ultrasonic testing conducted in November 2013, as part of GWA’s scheduled maintenance processes, had been inefficient at detecting and/or appropriately assessing some internal rail defects in the 80 lb/yd rail between Northgate and Alice Springs.
Special locations
On the Tarcoola to Darwin railway there was a total of 82.6 km of 80 lb/yd rail laid in two locations[10] – including through the derailment site near Marryat. Due to the rail age, smaller section size and surface condition, GWA advised that they managed these sections as special locations, where the 80 km/h permanent speed restriction has been maintained for more than 10 years.
The RISSB[11]Code of Practice for the Defined Interstate Network Volume 4 – Track, Civil and Electrical Infrastructure - Part 1: Infrastructure Management (CoP), describes the term ‘special location’ and states:
Common management practice used by railway managers is to identify certain locations of the infrastructure that exhibit a history of proneness to an event (environmental or other conditions) that may cause the location to have a higher risk of failure. In this Code these locations are called “special locations” and the event(s) that cause each “special location” to be at a higher risk are called the “defined event(s)”. The conditions at “special locations” cannot in general be adequately ascertained through normal scheduled inspections and require additional actions to be taken when the defined event occurs.
Infrastructure affected by defined events described in the Code may be managed as special locations and includes, but is not limited to, infrastructure prone to flooding, earthworks instability and track lateral instability.
Typically, infrastructure locations with a higher rate of deterioration or recurring anomalies are identified and classified as special locations. Where special locations have been identified, the recording and management of risks to train operations should be carried out to manage those risks.
GWA procedure IN-PRC-020 specifies that all defects found through patrol, general and detailed inspections are documented and recorded in the Rail Maintenance Management System (RMMS).
In accordance with IN-PRC-020, GWA’s treatment of track sections affected by previously defined events and identified as a higher risk can be assessed and managed as special locations.
For special locations, GWA track inspectors are required to:
‘look for obvious abnormal conditions that may impair the capability of the infrastructure during defined events’ and,
‘use a list of specific locations requiring particular attention during inspections’.
During the investigation, GWA advised that the organisation relied on ‘the local knowledge of track inspectors and other track and infrastructure staff to identify locations which may affect network integrity under certain conditions e.g. during periods of high ambient temperatures’.
Contrary to the requirements for special locations, GWA was unable to provide records identifying locations where additional (special) measures had been implemented to manage track areas known to have an increased likelihood of failure. Where this historical information is not recorded, there is limited opportunity to gauge the effectiveness of infrastructure management regimes or the risk levels associated with continued operations.
Reliance on local knowledge of staff, and not maintaining specific records documenting known areas of elevated risk may have reduced the effectiveness of GWA’s inspection and maintenance task. Consequently, there was an increased likelihood of an infrastructure failure and a direct impact on railway safety
From the evidence available, the following findings are made with respect to the derailment of train 6DA2 near Marryat, South Australia on 26 July 2014.These findings should not be read as apportioning blame or liability to any particular organisation or individual.
Safety issues, or system problems, are highlighted in bold to emphasise their importance. A safety issue is an event or condition that increases safety risk and (a) can reasonably be regarded as having the potential to adversely affect the safety of future operations, and (b) is a characteristic of an organisation or a system, rather than a characteristic of a specific individual, or characteristic of an operating environment at a specific point in time.
Contributing factors
A rail fracture originating from the foot of a defective flash-butt welded joint initiated the derailment of train 6DA2 near Marryat, SA on 26 July 2014.
The scheduled ultrasonic tests conducted in November 2013 on the 80 lb/yd rail between Northgate and Alice Springs had been ineffective in detecting and quantifying the significant defects present at 1036.541 km and 975.244 km locations. [Safety issue]
Other factors that increased risk
Contrary to the requirements of procedure IN-PRC-020, GWA had not established a list of specific locations known to have an increased likelihood of failure, such that particular attention may be applied in those locations during inspections. [Safety issue]
Other findings
There were no identified mechanical defects or deficiencies with the locomotives and trailing vehicles.
Train handling and speed were not considered factors in the derailment.
Although visual patrol inspections were carried out regularly, the nature of the developing defect was such that it was unlikely that more frequent inspections of this type would have discovered the defect or the fractured rail before the passage of train 6DA2 and its subsequent derailment.
Safety issues and actions
The safety issues identified during this investigation are listed in the Findings and Safety issues and actions sections of this report. The Australian Transport Safety Bureau (ATSB) expects that all safety issues identified by the investigation should be addressed by the relevant organisation(s). In addressing those issues, the ATSB prefers to encourage relevant organisation(s) to proactively initiate safety action, rather than to issue formal safety recommendations or safety advisory notices.
All of the directly involved parties were provided with a draft report and invited to provide submissions. As part of that process, each organisation was asked to communicate what safety actions, if any, they had carried out or were planning to carry out in relation to each safety issue relevant to their organisation.
The initial public version of these safety issues and actions are repeated separately on the ATSB website to facilitate monitoring by interested parties. Where relevant the safety issues and actions will be updated on the ATSB website as information comes to hand.
Detection of rail defects
The scheduled ultrasonic tests conducted in November 2013 on the 80 lb/yd rail between Northgate and Alice Springs had been ineffective in detecting and quantifying the significant defects present at 1036.541 km and 975.244 km locations.
Contrary to the requirements of procedure IN-PRC-020, GWA had not established a list of specific locations known to have an increased likelihood of failure, such that particular attention may be applied in those locations during inspections.
Under Part 4, Division 2 (Investigation Reports), Section 26 of the Transport Safety Investigation Act 2003 (the Act), the Australian Transport Safety Bureau (ATSB) may provide a draft report, on a confidential basis, to any person whom the ATSB considers appropriate. Section 26 (1) (a) of the Act allows a person receiving a draft report to make submissions to the ATSB about the draft report.
A draft of this report was provided to Genesee and Wyoming Australia, the drivers and resting crew of train 6DA2, and the Office of the National Rail Safety Regulator.
Submissions were received from all parties. These were reviewed and where considered appropriate, the text of the report was amended accordingly.
Purpose of safety investigations
The objective of a safety investigation is to enhance transport safety. This is done through:
identifying safety issues and facilitating safety action to address those issues
providing information about occurrences and their associated safety factors to facilitate learning within the transport industry.
It is not a function of the ATSB to apportion blame or provide a means for determining liability. At the same time, an investigation report must include factual material of sufficient weight to support the analysis and findings. At all times the ATSB endeavours to balance the use of material that could imply adverse comment with the need to properly explain what happened, and why, in a fair and unbiased manner. The ATSB does not investigate for the purpose of taking administrative, regulatory or criminal action.
Terminology
An explanation of terminology used in ATSB investigation reports is available here. This includes terms such as occurrence, contributing factor, other factor that increased risk, and safety issue.
Publishing information
Released in accordance with section 25 of the Transport Safety Investigation Act 2003
Ownership of intellectual property rights in this publication
Unless otherwise noted, copyright (and any other intellectual property rights, if any) in this report publication is owned by the Commonwealth of Australia.
Creative Commons licence
With the exception of the Coat of Arms, ATSB logo, and photos and graphics in which a third party holds copyright, this publication is licensed under a Creative Commons Attribution 3.0 Australia licence.
Creative Commons Attribution 3.0 Australia Licence is a standard form licence agreement that allows you to copy, distribute, transmit and adapt this publication provided that you attribute the work.
The ATSB’s preference is that you attribute this publication (and any material sourced from it) using the following wording: Source: Australian Transport Safety Bureau
Copyright in material obtained from other agencies, private individuals or organisations, belongs to those agencies, individuals or organisations. Where you wish to use their material, you will need to contact them directly.
Preliminary report
Report release date: 23/09/2014
This preliminary report details factual information established in the investigation’s early evidence collection phase and has been prepared to provide timely information to the industry and public. Preliminary reports contain no analysis or findings, which will be detailed in the investigation’s final report. The information contained in this preliminary report is released in accordance with section 25 of the Transport Safety Investigation Act 2003.
The occurrence
At about 0800[1] on 26 July 2014, the crew of Genesee & Wyoming Australia (GWA) freight train 6DA2 carried out a crew change near Hugh River, Northern Territory. The train then continued its journey south before crossing the South Australia – Northern Territory border. At about the 1056 km mark[2] the train entered a section of track that had a permanent speed restriction of 80 km/h.
Figure 1: Map of derailment location
Source: FreightLink (annotated by ATSB)
The crew reported that train had been handling well when the driver reduced the speed with throttle and dynamic brake applications to enter the 80 km/h section (Figure 1). At about the 1036.530 km mark, the driver had just acknowledged the vigilance indication and was verifying the train’s speed when a ‘large bang’ was heard and the crew felt the lead locomotive jar. The crew commented that the ‘bang’ may have been their passage across a broken rail. The crew looked in the rear view mirrors and could see large volumes of dust rising from derailed wagons about 200 m behind the driver’s cab. At this time, the locomotives started shuddering and the driver made an emergency brake application and moved the throttle back to idle. The lead locomotive stopped about 360 m from the point of derailment.
Events after the derailment
The second driver alighted from the locomotive to check that the crew resting in the crew van were uninjured. When walking back to the crew van, the second driver observed that the wheelsets of the leading bogie on the trailing locomotive and the wheelsets of the trailing bogie on the crew van had also derailed.
Further inspection of the train found that it had separated into two portions, with the locomotives, locomotive refuelling wagon, crew van and one loaded container flat wagon remaining coupled. There was a gap of about 108 m between the front portion of train and the first of the derailed wagons. Various wagon types, freight and containers were scattered either laterally or vertically, for about 250 m along the rail corridor. The rear 930 m of the train, extending north beyond the point of derailment, remained on rail.
The train crew was uninjured during the event, however a number of rail vehicles, containers, freight goods and track infrastructure had sustained significant damage.
Context
The location
The derailment occurred near Marryat (1036.530 km) on the Tarcoola to Darwin railway, about 28 km south of the Northern Territory - South Australia border (Figure 1).
Train and train crew information
Train 6DA2 was a freight service operated by GWA between Darwin and Adelaide. The train consisted of two locomotives (GWU 006 leading and ALF 23 trailing), hauling an in-line fuel wagon, a crew van and 42 freight wagons (including 14 multi-platform wagons). The train was 1543.3 m long and had a trailing mass of 2540.9 t.
Train 6DA2 departed from the Berrimah Freight Terminal, Northern Territory at about 0920 on 25 July with a crew of four drivers. The drivers worked the train in pairs, operating in rotating relay shifts. The drivers operating the train at the time of derailment had about 2.5 and 7 years rail industry experience respectively.
Preliminary examination of the train and locomotive data indicated that there were no anomalies with the train handling or mechanical condition before the derailment. A review of video and audio recordings extracted from leading locomotive GWU 006 supported the drivers report of a ‘large bang’ when they travelled over what they thought was a broken rail (Figure 2).
Figure 2: Location of rail defect & minor ballast displacement near 1036.530 km mark
Source: Genesee & Wyoming – Locomotive GWU 006 video camera
Environmental conditions
The Bureau of Meteorology weather stations nearest the derailment were located at Kulgera (47 km NNW) and Ernabella (120 km E). On the morning of 26 July, overnight minimum temperatures at these stations were 10.4 °C and 9.4 °C respectively. No rainfall was recorded and winds were light, generally from a northerly direction. On this basis, it was considered unlikely that environmental conditions had contributed to the derailment.
Track information
The track infrastructure is owned and maintained by GWA, with the movement of rail traffic controlled from the GWA’s Transport Control Centre located at Dry Creek in South Australia.
The standard gauge (1435 mm) track at the derailment location consisted of 80 lb/yd rail fastened to concrete sleepers by resilient clips. The track formation comprised sand/clay based soil, topped with a capping layer and overlaid with ballast to a nominal design depth of 250 mm. The track bed supported prestressed concrete sleepers spaced at 667 mm centres.
Approaching the derailment site from Kulgera, the track was tangent[3] and the terrain slightly undulating. The derailment occurred within a 68 km section of track where the maximum track speed was 80 km/h.
Rail examination
The ATSB’s examination of the track leading into the derailment site determined the most likely contributor to the derailment was a break in the east rail near the 1036.530 km mark. An inspection of the mating ends from two broken rail sections strewn near the point of derailment identified variable oxidisation levels across the fracture surfaces and a localised feature that was characteristic of an internal material defect (Figure 3).
Figure 3: Broken rail fracture surface
Source: ATSB
The oxidisation that extended across the rail foot and through the web was noticeably greater than on the fracture surfaces through the rail head. This was consistent with the rail break originating in the rail foot and propagating vertically through the rail web.
Evidence of iron oxide bleed on the top surface of the foot suggested that the fracture had propagated slowly and been in existence for some period – potentially remaining undetected during track inspections and the passage of previous trains.
The rail head at the point of initial fracture showed light battering from train wheels that had traversed the break, before the rail breakup extended into multiple other sections - each about 700 mm long.
The ATSB quarantined four pieces of the broken rail for the purposes of laboratory metallurgical examination and analysis, including:
Magnetic particle testing to identify and characterise any surface features of relevance to the failure
Ultrasonic testing to assess internal quality (steel cleanliness) to the relevant standards
Residual stress measurements on the failed rail section/s (including a like-sample section of rail taken from store stock)
Examination and characterisation of the fracture surfaces
Chemical analysis and mechanical testing to assess material properties.
Ongoing investigation activities
The ATSB’s investigation is continuing and will focus on:
The inspection and maintenance practices for rail and track infrastructure between North Gate, South Australia and Alice Springs, Northern Territory
The findings from laboratory tests of the quarantined and sample rail sections
A review of rail and track defects reported by train operators and track inspection staff before the derailment of 6DA2.
Purpose of safety investigations
The objective of a safety investigation is to enhance transport safety. This is done through:
identifying safety issues and facilitating safety action to address those issues
providing information about occurrences and their associated safety factors to facilitate learning within the transport industry.
It is not a function of the ATSB to apportion blame or provide a means for determining liability. At the same time, an investigation report must include factual material of sufficient weight to support the analysis and findings. At all times the ATSB endeavours to balance the use of material that could imply adverse comment with the need to properly explain what happened, and why, in a fair and unbiased manner. The ATSB does not investigate for the purpose of taking administrative, regulatory or criminal action.
Terminology
An explanation of terminology used in ATSB investigation reports is available here. This includes terms such as occurrence, contributing factor, other factor that increased risk, and safety issue.
Publishing information
Released in accordance with section 25 of the Transport Safety Investigation Act 2003
Ownership of intellectual property rights in this publication
Unless otherwise noted, copyright (and any other intellectual property rights, if any) in this report publication is owned by the Commonwealth of Australia.
Creative Commons licence
With the exception of the Coat of Arms, ATSB logo, and photos and graphics in which a third party holds copyright, this publication is licensed under a Creative Commons Attribution 3.0 Australia licence.
Creative Commons Attribution 3.0 Australia Licence is a standard form licence agreement that allows you to copy, distribute, transmit and adapt this publication provided that you attribute the work.
The ATSB’s preference is that you attribute this publication (and any material sourced from it) using the following wording: Source: Australian Transport Safety Bureau
Copyright in material obtained from other agencies, private individuals or organisations, belongs to those agencies, individuals or organisations. Where you wish to use their material, you will need to contact them directly.
[1] The 24-hour clock is used in this report and is referenced from Central Standard Time (CST), UTC + 9.5 hours.
[2] Distance in kilometres from the reference point located at Coonamia, South Australia.
On the morning of 18 July 2014, a Boeing 777 operated by Emirates Airlines, registered A6-ECO, was on descent into Melbourne, Victoria via an ARBEY 4U Standard Arrival Route (STAR)[1] for the Area Navigation U (RNAV-U) Required Navigation Performance (RNP) runway 16 approach. There was some cloud and showers in the area at the time, with the wind from the south-west.
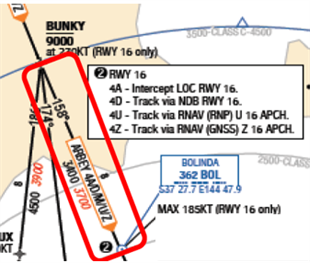
The ARBEY 4U STAR required that the aircraft track from ARBEY to BUNKY, then to the Bolinda (BOL) non-directional (radio) beacon (NDB).[2] The arrival procedure included speed and altitude restrictions at BUNKY, and a speed restriction at BOL, but there was no altitude restriction at BOL depicted on the STAR chart. Even though there was no altitude restriction depicted at BOL, the STAR chart depicted a minimum en route altitude (MEA) of 3,400 ft and a minimum terrain clearance altitude (MTCA) of 3,700 ft, between BUNKY and BOL (Figure 1).[3]
Figure 1: Excerpt from the ARBEY 4 STAR chart used by the operator depicting MEA (3400) and MTCA (3700)
Source: Aircraft operator – image cropped by the ATSB
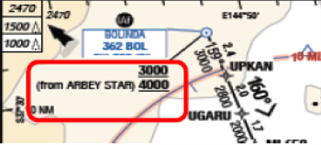
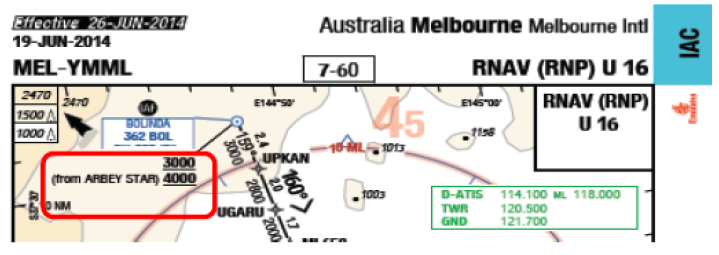
The ARBEY 4U STAR linked to the RNAV-U (RNP) runway 16 approach at BOL, which was identified as the initial approach fix for the RNAV-U (RNP) runway 16 approach. While no altitude was specified at BOL on the STAR chart, the RNAV-U (RNP) runway 16 approach chart depicted two altitudes at BOL (Figure 2). These were:
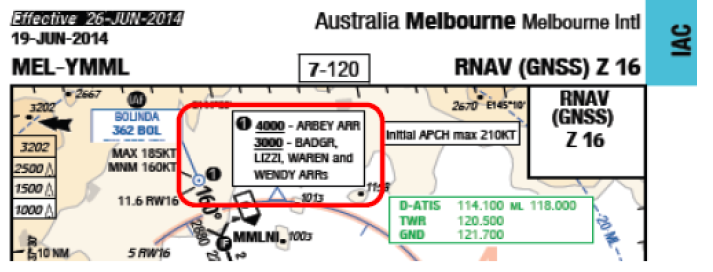
an ‘at or above’ 4,000 ft altitude restriction at BOL when joining the approach from the ARBEY STAR
an ‘at or above’ 3,000 ft altitude restriction at BOL applicable when the approach was linked with STAR procedures other than the ARBEY STAR.
Figure 2: Excerpt from the RNAV-U (RNP) runway 16 approach chart used by the operator depicting two altitudes at BOL
Source: Aircraft operator – image cropped by the ATSB
As the aircraft approached BUNKY, air traffic control (ATC) cleared the crew to descend to 4,000 ft, and to conduct the RNAV-U (RNP) runway 16 approach. ATC radar data shows that the aircraft overflew BUNKY at 5,000 ft, then continued descent, passing through 4,000 ft about 5 NM prior to BOL. During the approach setup, the Flight Management Computer (FMC)[4] indicated an altitude constraint for BOL of ‘at or above 3,000 ft’. The crew then selected this to an ‘at 3,000 ft’ constraint, which programmed the aircraft to overfly BOL at a ‘hard altitude’ of 3,000 ft.
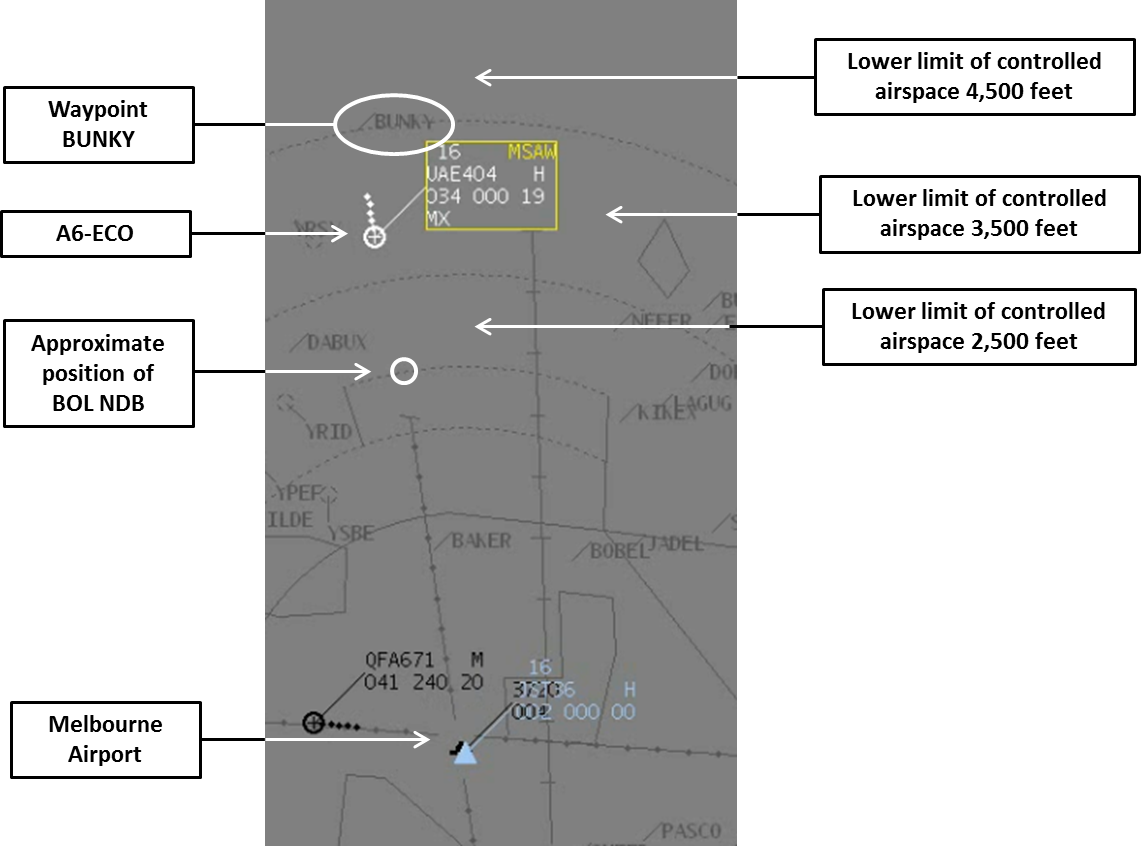
Descent then continued, and ATC received a Minimum Safe Altitude Warning (MSAW)[5] alert, as the aircraft descended through 3,400 ft about 4 NM prior to BOL (Figure 3). ATC questioned the crew about their altitude, and advised them that the relevant radar lowest safe altitude was 3,200 ft. Moments later, the aircraft passed over BOL at about 3,000 ft and maintained that altitude until intercepting the vertical profile of the RNAV-U (RNP) runway 16 approach. ATC then transferred the crew to the next frequency, and the crew confirmed they had the correct QNH setting.[6] The approach continued for an uneventful landing.
A subsequent review of the ATC radar data showed that the aircraft left controlled airspace as it descended through 3,500 ft. The aircraft was briefly outside controlled airspace until it reached the 15 NM airspace boundary step, where the lower limit of controlled airspace became 2,500 ft. There was no report of conflict with other traffic outside of controlled airspace. Throughout the incident, the crew maintained visual contact with the terrain, and could see the airport environment from some distance out. No aircraft ground proximity warning system alerts were triggered during the incident.
Figure 3: ATC radar image at the time the MSAW alert activated
Source: Airservices Australia (modified by the ATSB)
Review of the factors identified in the investigation
The operator’s investigation found that descent below the 4,000 ft altitude restriction at BOL occurred because the crew selected the ‘hard altitude’ of 3,000 ft for BOL. The potential for deviation below the 4,000 ft minimum altitude restriction at BOL was increased by factors related to aeronautical charts and the FMC navigation database. Some of these factors are discussed in the following paragraphs.
The ATSB obtained comments and responses from involved parties including:
the United Arab Emirates General Civil Aviation Authority on behalf of Emirates Airlines
Airservices Australia
the Civil Aviation Safety Authority (CASA).
The RNP approach had been designed by GE Naverus (Naverus), based on information in the Airservices Australia Aeronautical Information Package (AIP). The charts and FMC data used by Emirates were supplied by LIDO. LIDO developed the charts and database based on information in the Airservices AIP.
Procedure design – level depiction on the ARBEY STAR
No minimum altitude was specified at BOL on the ARBEY FOUR STAR.
Operator comments
Within the STAR, BOL had a coded speed restriction of a maximum 185 kt for approaches to runway 16, but did not specify a minimum crossing altitude. This allowed arrivals from other directions to cross BOL at a minimum altitude of 3,000 ft, instead of 4,000 ft as required via ARBEY. This conditional altitude restriction was specified in the approach charts only and not on the STAR chart. This procedure design did not protect the MEA of 3,400 ft on the arrival segment from position BUNKY to position BOL by a 'hard procedural altitude'. BOL is located at a distance of 11.6 NM from runway 16 and a crossing altitude of 4,000 ft would permit a constant approach angle crossing BOL on a 3.0° vertical descent path. Based on this, a lower crossing altitude (3,000 ft) for other arrival directions does not seem necessary.
The operator suggested that Airservices Australia consider procedural amendments to specify a minimum crossing altitude over BOL (of 4,000 ft or above) for all approaches and within the STAR design. This would protect against descents below MEA (and outside controlled airspace) within the arrival segment from BUNKY to BOL. It would also satisfy the requirement of Airservices Australia to be able to specify higher crossing altitudes (above 4,000 ft) for traffic separation. If Airservices Australia, as the State AIP, changed the procedure design, the various chart providers would then amend their corresponding FMC/FMS databases as well as the STAR and instrument approach charts.
CASA comments
CASA suggested a possible solution would be to include the altitude restriction in the STAR chart. This would then make the altitude obvious on the text and plan view, and the altitude restriction would be coded in the FMS. They also found that the overall complexity of the STAR chart did not aid pilots’ awareness.
Airservices response
In controlled airspace, the approach procedures are designed to keep aircraft 500 ft above the control area steps. The 4,000 ft minimum altitude was designed to keep aircraft in controlled airspace prior to BOL, rather than for terrain clearance.
Airservices further commented that a minimum altitude of 4,000 ft was not depicted on the STAR chart at BOL, as BOL was also applicable to the runway 27 arrival. This allows ATC to assign a higher altitude at that point for a runway 27 arrival due to potential runway 34 departures. No altitudes are depicted because two (or more) levels would be required to cater for the different runways. Only one level is permitted to be depicted against a waypoint (for a STAR) to avoid potential confusion as per Section 1-1-22 of Airservices 'Departure, Arrival and Air Route Management Design Rules' manual (ATS-MAN-0010).
Altitude requirements are not always specified on a STAR chart, and ATC is generally responsible for deciding whether altitudes are to be included or not. This occurs in the procedure design phase. When they are not included on the chart, ATC assigns individual altitudes to aircraft in order to facilitate vertical separation between them and assure terrain clearance.
RNAV-(U) RNP runway 16 approach chart design
Approaches with multiple altitudes at a common fix
Airservices withdrew the RNAV-U (RNP) runway 16 approach early in 2015. Its withdrawal was not related to this incident. The ATSB reviewed all Australian approach charts published in the AIP Departure and Approach Procedures (DAP) current at the time of writing. The approach charts with a discrepancy between the STAR minimum segment altitude and the approach start altitude were Melbourne approach charts ILS – X, Y and Z runway 16, RNAV Z (GNSS) runways 16 and 27. No other Australian approach charts existed with that condition.
Chart depiction of the altitude restriction at BOL – operator comments
The operator reported that the absence of altitude restriction information on the STAR chart reduced the level of protection against deviation below the BOL minimum altitude restriction. The 4,000 ft altitude restriction at BOL when tracking from ARBEY STAR was physically depicted below the 3,000 ft altitude restriction applicable to other STAR procedures (see Figure 4a). This may also have influenced the crew’s interpretation of the FMC altitude.
The following two figures show a comparison of two presentation options for multiple arrival altitudes. These altitudes are boxed in red.
Figure 4a: RNAV (RNP) approach chart used by the crew
Source: GCAA for chart provider (LIDO) modified by the ATSB
Figure 4b: RNAV (GNSS) Z approach chart
Source: GCAA for chart provider (LIDO) modified by the ATSB
Chart provider comments
The chart provider (LIDO) commented that presentation of information on a chart is normally at the discretion of the chart editor and based on:
the amount of information which needs to be charted
the amount of information already on the chart
the space available for the information, based on standard font sizes.
If the information can be charted clearly using a leader line, this is used (see Figure 4a). As soon as the information exceeds two lines, the preference is usually for the information framed together in a box with a ball note[7] at the point in question (see Figure 4b).
The chart provider advised that on the RNAV (RNP) chart the higher value (4000) should have been depicted above the lower value (3000). They reiterated that the approach chart (Figure 4a) used in this incident is no longer valid.
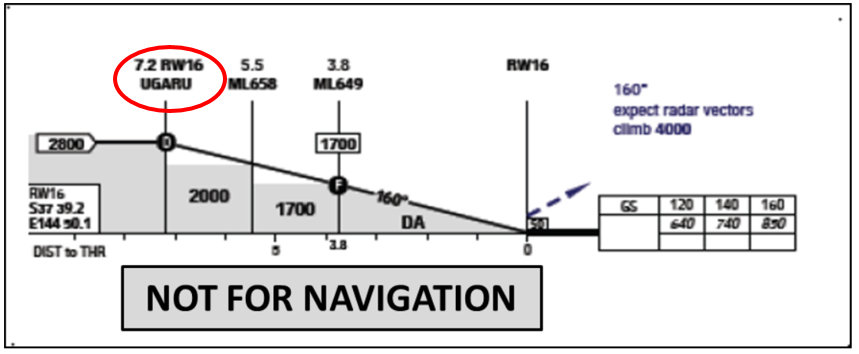
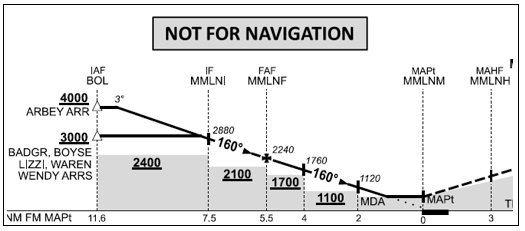
The approach chart provided a vertical profile view of the approach, but the view began immediately prior to intermediate fix (IF), waypoint UGARU, which is 4.4 NM beyond BOL (Figure 5a). As such, there was no profile view information on the approach chart for the approach from the initial approach fix (IAF) BOL, to UGARU. Had this information been present in a vertical profile, it may have alerted the crew to the different altitude requirements at BOL, associated with the different STAR procedures.
Figure 5a: Excerpt from the RNAV-U (RNP) runway 16 approach chart used by the operator showing vertical profile information
Source: Aircraft operator
Vertical profile view – operator comments
The operator noted that the profile view of Naverus charts was inconsistent with similar Airservices Australia charts. For example, the RNAV-Z (GNSS) runway 16 approach chart, which was designed by Airservices Australia, provided the important hazard information of the different minimum crossing altitudes over BOL in the profile view (Figure 5b). However, the RNAV-U (RNP) runway 16 approach chart, which was designed by Naverus, depicted these altitudes in the plan view only. The operator considered that extension of the profile view, as published on similar Airservices Australia charts, would assist flight crews to select the correct altitude for the IAF.
Figure 5b: Excerpt from the Airservices RNAV-Z (GNSS) runway 16 approach chart for comparison
Source: Airservices Australia
The operator suggested that the profile view of the Naverus charts should be amended to conform to that of the Airservices Australia charts.
Airservices response
Airservices advised that the standard for the approach profile view was to commence at the final approach fix (FAF), and not to include the initial approach fix (IAF). Airservices opted to trial the inclusion of the IAF, in this case BOL, in the profile view of other similar charts. While its inclusion made the approach altitude clearer, Airservices stated that it was not likely to be adopted as the convention, either generally by Airservices or internationally. Naverus charts conform to the ICAO standard, and therefore the profile view did not commence at the IAF.
FMC navigation data
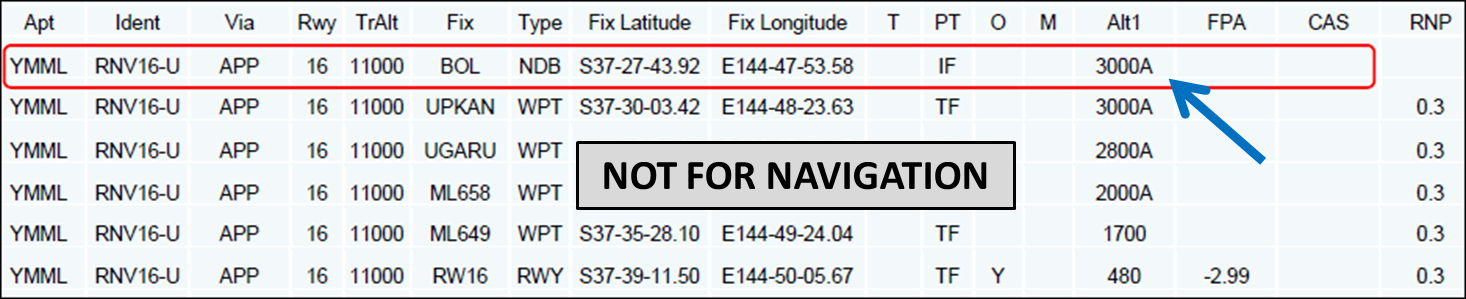
Consistent with the STAR chart, the ARBEY 4U STAR FMC navigation data did not include an altitude restriction at BOL (Figure 6). FMC navigation data for the RNAV-U (RNP) runway 16 approach included an altitude restriction at BOL, but that altitude restriction was ‘3000A’ (meaning ‘at or above’ 3,000 ft) (Figure 7). The 3,000 ft restriction was applicable to a number of STARs that linked with the RNAV-U (RNP) runway 16 approach. But it was not applicable to the ARBEY STAR which had a 4,000 ft restriction.
Figure 6: ARBEY 4U STAR FMC navigation data
Source: Aircraft operator modified by the ATSB
Figure 7: RNAV-U (RNP) runway 16 approach FMC navigation data
Source: Aircraft operator modified by the ATSB
Compliance with the published procedure on this occasion required the crew to modify the FMC vertical profile at BOL by increasing the ‘at or above’ altitude restriction from 3,000 ft to 4,000 ft. Any requirement to modify the vertical profile brings about the potential to introduce errors, the consequences of which may be more significant when the FMC default altitude needs to be increased. If an error is introduced when the FMC vertical profile is modified, vertical path indications displayed to the crew during the approach may be misleading.
FCOM procedure
At the time of the incident, the FCOM stated that crews could change an FMC IAF ‘at or above’ altitude constraint, to an ‘at’ altitude constraint, using the same altitude. Technically therefore, the crew were unable to change the coded 3000A to the correct 4000A. This ambiguity within the FCOM procedure was raised with the aircraft manufacturer via the fleet technical pilots. At the time of publication, a response from the manufacturer was still pending.
FMC approach altitude
As depicted in Figure 6, there was no altitude on the STAR coded in the FMC, so when the crew selected approach mode, the 3000A appeared as the relevant altitude restriction for BOL. Only one altitude can be selected by the FMC. The ATSB was unable to clarify what coding logic was applied to determine which altitude is selected when two are provided.
The aircraft operator commented that they did not raise this issue with the FMC database provider, as the database coding reflects the AIP procedure design. The aircraft operator considered the conditional altitude over the waypoint BOL to be a procedure design weakness and raised that with Airservices Australia accordingly. The approach is no longer valid, but the operator intends to closely monitor for this issue in any new approaches.
Safety action
Whether or not the ATSB identifies safety issues in the course of an investigation, relevant organisations may proactively initiate safety action in order to reduce their safety risk. The ATSB has been advised of the following proactive safety action in response to this occurrence.
Aircraft operator
Crew awareness of restrictions on STAR
Soon after the occurrence, the aircraft operator published a company Notice to Airmen (NOTAM) for crew awareness. The NOTAM pointed out that approaches into Melbourne may include altitude restrictions that depend on the particular STAR being flown. The NOTAM also pointed out that some altitude restrictions may be depicted on the approach chart plan view only, and not necessarily on the relevant STAR chart, or the approach chart profile view. The NOTAM advised crews to exercise caution when reviewing STAR and approach procedures to ensure that all applicable altitude restrictions were observed.
Flight crew operations manual
The operator intends to reconsider Flight Crew Operations Manual guidance dealing with the benefits of changing initial approach fix ‘at or above’ altitude restrictions to hard altitudes, and discuss the depiction of altitude restrictions on the relevant charts with the chart provider.
Flight management computer coding
The operator has identified the FMC coding issue as a threat in their Hazard Identification and Risk Assessment statements. All new destinations and also, within the review cycle, existing destinations, will be checked against this threat and corrective action will be taken if applicable.
Airservices and CASA
CASA and Airservices intend to discuss the coding of the FMC at the next international instrument procedures panel, where an ‘integration’ subgroup includes FMC coding specialists. The aim of the discussion is to ensure the charts are used in the cockpit the way they are intended.
Safety message
For operators, this incident highlights the need for careful attention to FMC navigation data management, particularly any procedures that relate to crew modification of navigation data. Operators should remain mindful that any manipulation of FMC navigation data by flight crew has the potential to introduce errors. Additionally, operators are encouraged to work closely with aeronautical information service providers to ensure that aeronautical charts (and any other operational information) are presented in a manner that minimises ambiguity and reduces the potential for misinterpretation.
For flight crew, this incident highlights the need for careful attention to approach procedure documentation and FMC navigation data management.
For producers and providers of aeronautical information products, a guiding principle specified in Procedures for Air Navigation Services, Aircraft Operations is to keep all charts as simple as possible. This may assist in reducing flight crew workload and the risk of error, and coding issues when entering data into flight management systems.
Decisions regarding whether to conduct an investigation, and the scope of an investigation, are based on many factors, including the level of safety benefit likely to be obtained from an investigation. For this occurrence, a limited-scope, fact-gathering investigation was conducted in order to produce a short summary report, and allow for greater industry awareness of potential safety issues and possible safety actions.
Publishing information
Released in accordance with section 25 of the Transport Safety Investigation Act 2003
Ownership of intellectual property rights in this publication
Unless otherwise noted, copyright (and any other intellectual property rights, if any) in this report publication is owned by the Commonwealth of Australia.
Creative Commons licence
With the exception of the Coat of Arms, ATSB logo, and photos and graphics in which a third party holds copyright, this publication is licensed under a Creative Commons Attribution 3.0 Australia licence.
Creative Commons Attribution 3.0 Australia Licence is a standard form licence agreement that allows you to copy, distribute, transmit and adapt this publication provided that you attribute the work.
The ATSB’s preference is that you attribute this publication (and any material sourced from it) using the following wording: Source: Australian Transport Safety Bureau
Copyright in material obtained from other agencies, private individuals or organisations, belongs to those agencies, individuals or organisations. Where you wish to use their material, you will need to contact them directly.
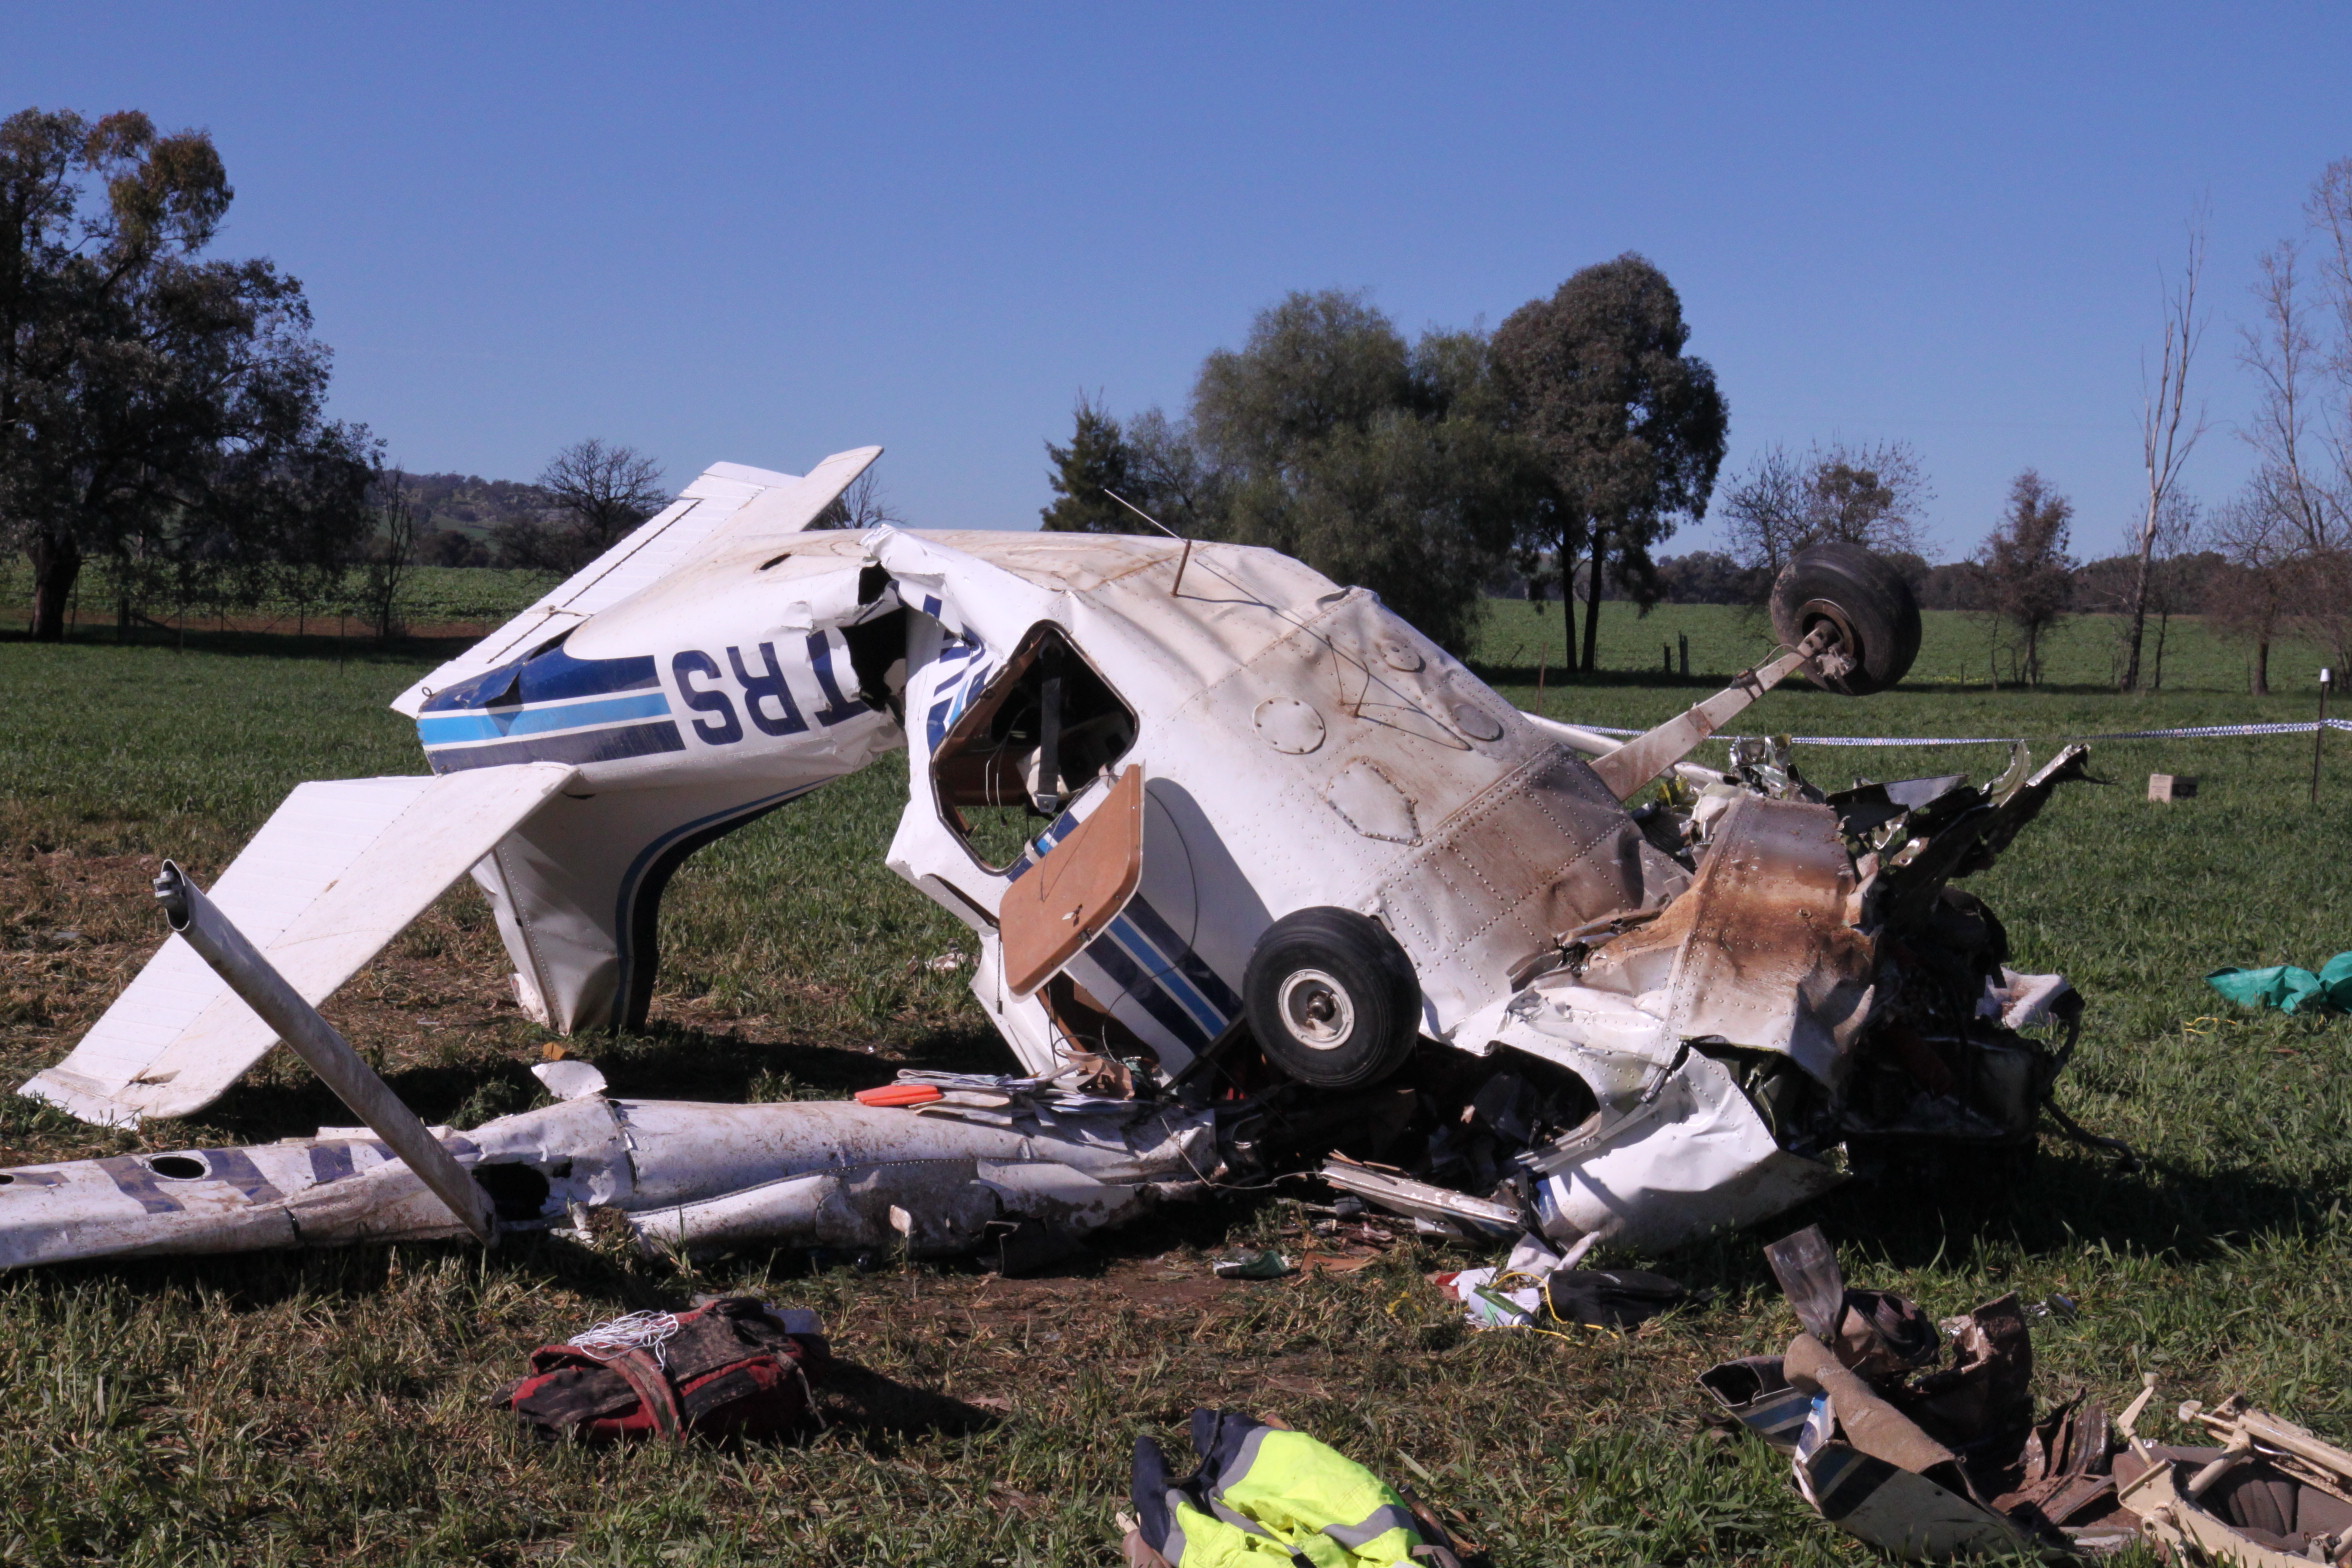
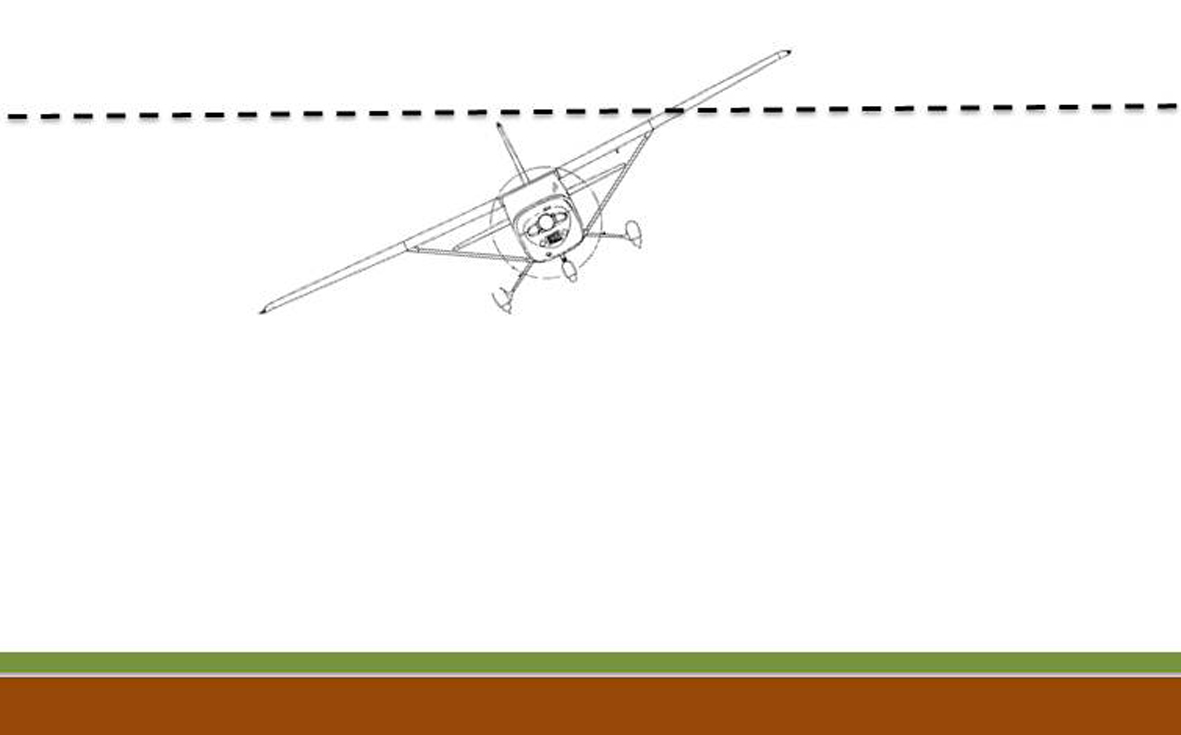
On 20 July 2014, the pilot of a Cessna 182L aircraft, registered VH-TRS, was conducting a private flight in the local area surrounding the rural township of Burrumbuttock, NSW. The aircraft was observed by witnesses to be travelling at low altitude in a westerly direction toward the township. As the aircraft was flown above a paddock on the outskirts of the town, the aircraft struck wires from a high voltage powerline. The aircraft subsequently rolled inverted and impacted terrain. The wreckage came to rest a short distance from the Farmers Inn. The pilot was fatally injured, and the aircraft was destroyed.
What the ATSB found
The ATSB found no evidence of any engine or airframe defect that may have contributed to the accident. The pilot did not hold any approval to conduct low flying and had not received training in the identification of hazards or in the operating techniques for flight close to the ground. There was no operational reason identified for the pilot to have been flying at such a low altitude on the day of the accident. The evidence also indicated that the pilot had a history of unauthorized low flying.
The pilot was reported to be in good health with no issues that might have affected his ability to fly an aircraft. Despite this, the postmortem medical examination revealed a pre-existing medical condition that could have resulted in pilot incapacitation. While it is possible that the pilot may have had a medical incapacitation event immediately prior to the accident, the aircraft was being operated in a manner consistent with previous flights undertaken by the pilot and at a level that provided little margin for error should such an event have been experienced.
Safety message
This accident highlights the importance to pilots of not flying below the regulated thresholds of 1,000 ft AGL for flight overpopulated areas and 500 ft for flight over non-populated areas. Pilots who fly below this height without appropriate training and an operational reason to do so are exposing themselves and any passengers that may be on board to an increased risk of striking hazards, such as electrical power lines, many of which are difficult to see from the cockpit of an aircraft in flight.
Accident site VH-TRS
Source: ATSB
The occurrence
At about 1700 Eastern Standard Time[1] on 20 July 2014, a Cessna 182L aircraft, registered VH-TRS, departed from the pilot’s own airstrip for a private flight under visual flight rules[2]. The pilot was appropriately qualified and endorsed on the type of aircraft. Family members and friends of the pilot reported that he regularly flew on weekends around the Burrumbuttock area. His pilot logbook indicated that the flights were generally short in duration of less than one hour.
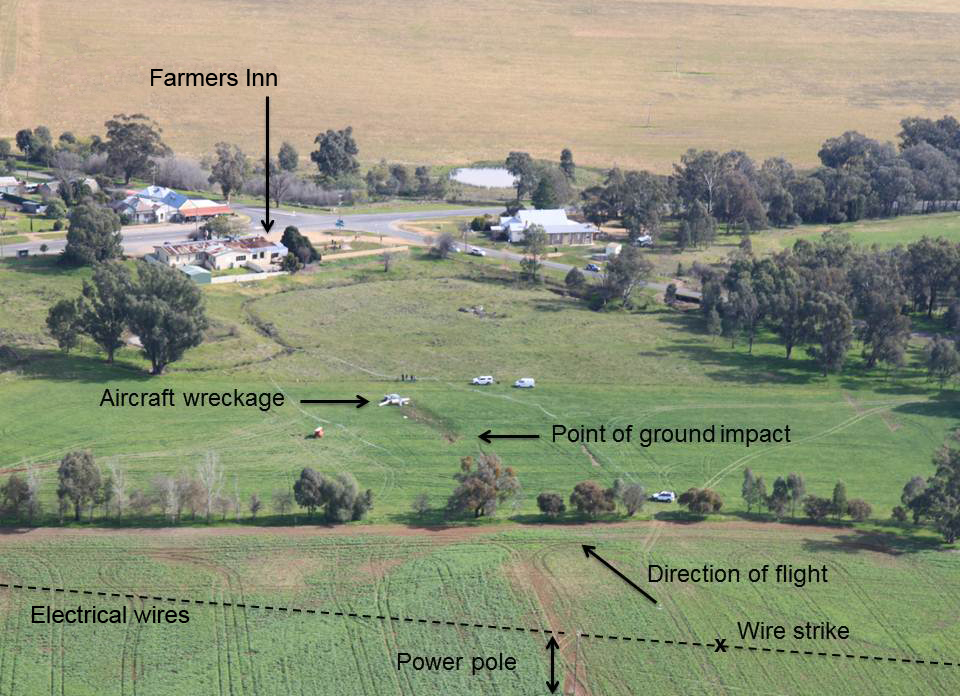
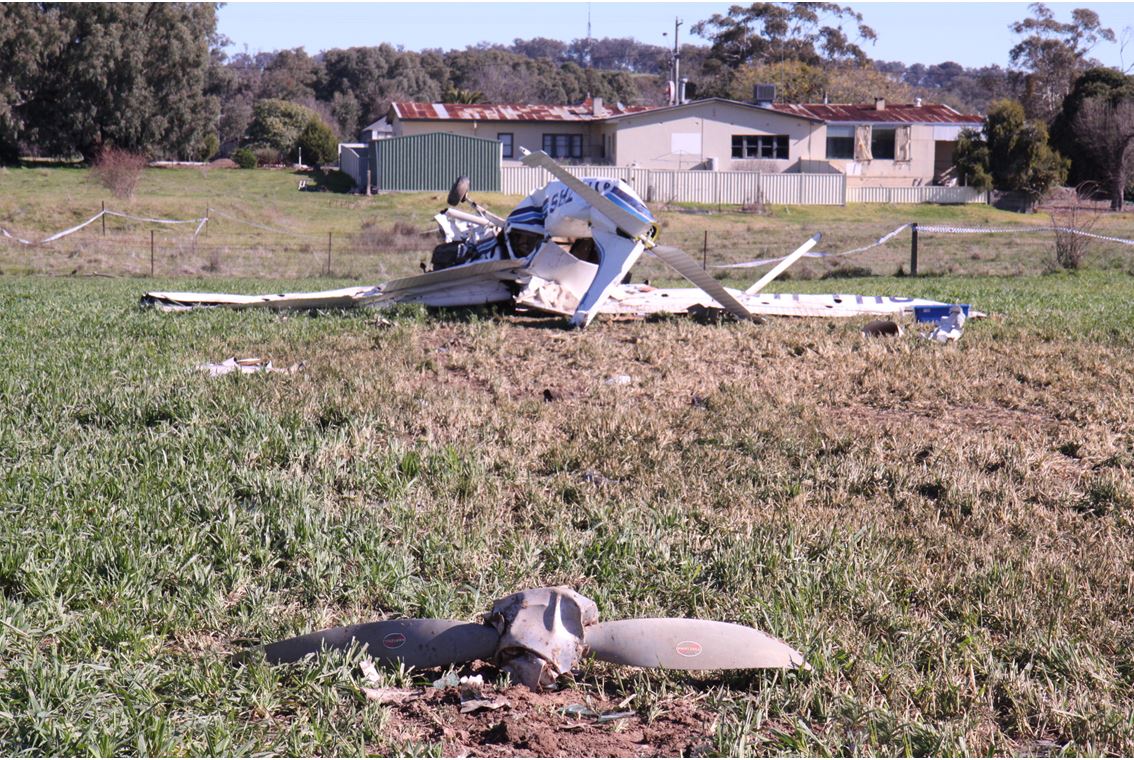
About 30 minutes into the flight the aircraft was observed to be flying at a low altitude above the ground in a westerly direction toward Burrumbuttock. At 1733, the aircraft struck two energised electrical wires from a powerline in a paddock that bordered the town. The aircraft continued on for a short distance before it impacted terrain in a steep nose-down inverted attitude, stopping short of the Burrumbuttock ‘Farmers Inn’ hotel (Figure 1).
Patrons within the inn were alerted to the accident and immediately exited the establishment to investigate. A number of people ran to the wreckage to render assistance to the pilot. Despite the presence of leaking fuel, one of the patrons crawled into the aircraft where it was confirmed the pilot had sustained fatal injuries.
Figure 1: The accident site at Burrumbuttock
Source: ATSB
Witness descriptions
There were a number of witnesses identified during the investigation that had either spoken with the pilot early on the day of the accident, who saw the aircraft flying later that afternoon, or who had seen the accident.
Those who saw or heard the aircraft on the day of the accident reported nothing abnormal in its operation. It was noted that it was not unusual to see the aircraft flying quite late in the day around the local area. Two witnesses reported seeing the aircraft flying quite low as it approached the town.
Immediately prior to the accident, the aircraft was observed approaching the town at low altitude. The aircraft appeared to lose height as it banked left, in the direction of the Farmers. It struck the powerlines shortly afterwards. The aircraft subsequently became unstable and impacted terrain a short distance from the hotel.
The pilot had lived and worked in the Burrumbuttock region for around 20 years. He had obtained a private pilot aeroplane license in January 1999 and subsequently gained experience in a range of single- and twin-engine aircraft. Toward the end of 1999, the pilot had attained an Aerobatics and Spinning endorsement and in 2005 had also qualified to fly at night under visual meteorological conditions.[3][4]
The pilot’s logbook showed that he had last undergone and successfully completed a biennial flight review in April 2014. He did not hold a low-level flying endorsement and there was no record of him undergoing low-level flying training. He had accumulated a total of 1,033.6 flying hours, approximately half of which was spent at the controls of the accident aircraft.
The pilot regularly flew the aircraft around the local area and was known to fly over the Farmers Inn, within the Burrumbuttock township, on occasion during weekend flights. A witness to one of these previous flights recalled that the aircraft had passed over the inn, tracking in a westerly direction and that he thought the pilot had maintained a safe altitude.
The pilot occasionally flew with a family friend, also an experienced aviator and one who regarded the accident pilot as someone who flew well and in control. Most of the accident pilot’s flying was around regional New South Wales and Victoria.
Medical and pathological information
The pilot’s last aviation medical assessment was in October 2010, at which time there was no identified medical condition and/or medication which may have affected his ability to operate an aircraft. Family and friends of the pilot reported that he was fit and well rested in the period leading up to the accident.
A post-mortem examination was conducted and the autopsy report stated that the injuries sustained to the pilot were consistent with that of a high energy aircraft accident. Toxicological screening did not reveal the presence of any drugs or toxins.
The autopsy report also stated that narrowing and damage of a major coronary artery to the pilot’s heart was identified. There was an area of plaque haemorrhage and fibrin deposition within the artery that is typically seen as an immediate precursor to a heart attack. The report summarised that, due to abnormalities in the blood vessel, it was possible that the pilot became incapacitated prior to the crash.
Aircraft information
The aircraft was manufactured in the United States in 1968 by the Cessna Aircraft Corporation as a model 182L. The aircraft was a four-seat, single-engine, high-wing configuration with a conventional tricycle undercarriage. The engine fitted was a Teledyne-Continental Motors six-cylinder reciprocating piston variety with a McCauley two-blade, constant speed propeller. The aircraft was certified for visual flight rules (VFR) and VFR Night; where flying during the day or night was permitted under visual meteorological conditions.
The engine fitted to the aircraft had last been overhauled in October 2000. The engine logbooks indicated that it had last been serviced in September 2013, 1,065.5 total hours of engine operation since that last overhaul. All servicing requirements were up to date and the next scheduled service was due on 13 September 2014.
Examination of the daily inspection and service sheet records for the aircraft showed the last complete entry was logged the day before the accident flight at 7,930.8 hours. An incomplete entry on 20 July 2014 indicated that the daily certification inspection had been completed by the pilot. There were no reported problems with the aircraft from family members and persons who were familiar with the aircraft.
Wreckage and impact information
Accident site
A survey of the accident site showed that the aircraft travelled along the flight path for 195 m after contacting the powerlines, before impacting terrain in an inverted, nose-down attitude of approximately 500 - 600. Upon impact with the terrain, the aircraft then slid forward an additional 30 m. These characteristics, in particular, the extended distance travelled from the location of the wire strike, indicated that the aircraft had been travelling with significant forward speed at the time.
Debris along the flight path in advance of the powerline included items from the left wing, comprising a segment of leading-edge skin, plastic pieces from the landing lights and a guide pulley from the aileron controls.
Aircraft structure
The aircraft structure had sustained severe damage from ground impact forces (Figure 2). Both wings were compressed and the tail section had buckled midway along its length. Upon contact with the ground, the nose and front section of the aircraft took the majority of the impact loads, breaking the engine mounts and compromising the survivable cockpit space. The pilot’s seatbelt assembly was locked and secure.
A significant quantity of fuel had leaked from the damaged wing fuel tanks. The front spar from the left wing displayed saw marks and tearing that was consistent with striking the powerline. The marks commenced at the strut-to-spar connection and their general orientation indicated that the aircraft was probably right-wing low at the time of the wire strike (Figure 3).
All of the primary structures and controls were accounted at the accident site. With the exception of the left aileron cable, flight control continuity was established and no pre-impact defects were identified. The left-wing aileron cable had fractured in overstress coincident with the strut-to-front spar connection (Figure 4).
A small sample of fuel was recovered from the fuel sump drain. The colour and smell of the fuel was consistent with aviation gasoline. Testing on-site showed that water was not present in the fuel sample.
Figure 2: The aircraft impacted terrain near the Farmers Inn hotel. The aircraft was inverted at impact and the propeller separated from the engine
Source: ATSB
Figure 3: Illustration showing the likely aircraft orientation at the time of striking the powerline
Source: Illustration by Cessna Aircraft Corporation (modified by ATSB)
Figure 4: The aircraft’s left wing leading edge structure including the aileron guide pulley and cable, was damaged from contact with the powerline
Source: Illustration by Cessna Aircraft Corporation (modified by ATSB); photographs ATSB
Engine and propeller
Analysis of propeller damage can provide evidence of the operational state of an aircraft’s engine at the time of any collision with terrain. In this instance, the engine was severely disrupted during the accident sequence and the propeller had separated from the crankshaft and was embedded in soil a few metres forward of the initial point of ground impact. Both blades from the propeller exhibited chordwise scoring and a degree of bending and twist that was consistent with being operated under significant torque at the time of the accident (Figure 5).
Figure 5: Propeller slash marks (arrowed)
Source: ATSB
Recorded data and instrument examination
Garmin GPS
A severely damaged Garmin AERA 500 GPS navigation unit was recovered from within the wreckage at the accident site. The ATSB applied forensic techniques to remove and then interrogate the internal memory module from the GPS.
Data from the previous 4 months of flying, including the accident flight, was able to be recovered. Parameters recorded by the GPS were: latitude, longitude, altitude and time. Analysis of the data revealed the following:
The pilot had routinely conducted low-level flying in the local area throughout the previous 4 months, as well as on the day of the accident flight.
The pilot had flown over the Burrumbuttock ‘Farmers Inn’ on many occasions. On 6 July 2014, 2 weeks prior to the accident, the aircraft was flown over the Inn at approximately 150 ft above ground level. The aircraft then continued to descend over the powerline (struck by the aircraft in this accident) and manoeuvre at very low altitude.
The accident flight data (Figure 6) captured a number of low-altitude and aerobatic manoeuvres, including an extremely low-level pass into a quarry, located north-east of Burrumbuttock. Previous flight data showed that the pilot had conducted that manoeuvre previously.
The final recorded GPS track point for the accident flight was written at 1731, approximately 2 minutes prior to the accident. The aircraft altitude at that time was approximately 420 ft above ground level. The ATSB was unable to determine why the GPS ceased recording data at that point.
Figure 6: Accident flight path noting that the final 2 minutes of data was unable to be recovered
Image Source: Google Earth TM, edited by ATSB
Cockpit instruments
Laboratory examination of the cockpit instruments that were recovered from the aircraft wreckage was conducted at the ATSB’s facilities in Canberra. This type of examination may reveal fine details on an instrument face, or its internal mechanism, that may assist an accident investigation gain further information about the aircraft at the time of the accident. In this instance, no additional evidence was able to be derived.
Weather and environment
The Bureau of Metrology forecast at the time of the accident were for overcast conditions, with a light north-westerly wind of up to 3 kt (6 km/h). Witnesses reported weather conditions, including wind strength that were consistent with the forecast.
Sunset on 20 July 2014 for Burrumbuttock was calculated to have occurred at 1720 and last light[5] was at 1748. The accident occurred at 1733. The position of the sun at the time of the impact with the powerline was calculated to be below the level of the horizon.[6] Under overcast conditions and with the sun having set, the pilot’s ability to observe the fine detail of the electrical wires was likely to have been significantly diminished.
Minimum height requirements
Regulation 157 of the Civil Aviation Regulations 1988 outlines the requirements for conducting low flying. It states:
(1) The pilot in command of an aircraft must not fly the aircraft over:
(a) any city, town or populous area at a height lower than 1,000 feet; or
(b) any other area at a height lower than 500 feet.
The above requirements did not apply if weather conditions made it essential for the pilot to fly at a lower altitude. The regulation also did not apply if the aircraft was engaged in approved low flying operations, the aircraft was taking off or landing, or was engaged in the dropping of articles as part of a search and rescue operation. There was no evidence in the pilot’s documentation to indicate that the pilot was issued with a low-flying approval or permission from CASA. There was similarly no evidence to indicate that the pilot was engaged in any approved low-flying operations.
Powerlines
The powerline struck by the aircraft was not required to be marked in accordance with Australian Standard AS 3891.1 - 2008 Air navigation - Cables and their supporting structures - Marking and safety requirements. The electrical supply organisation reported that the section of powerline impacted by the aircraft consisted of a series of wooden poles, each supporting dual, three-strand, interwoven steel wire conductors (Figure 7). Installation drawings for the section of powerline showed that the poles had been erected and the electrical wires strung in 1994. The powerline was energised at the time of the accident and supplied electricity to a number of households in the immediate area. Each pole in the series was separated by distance of about 300 m.
The aircraft’s impact with the powerline dislodged both electrical wire conductors from their insulated tie-off points atop the cross-arm of one of the poles. One of the wires was severed from the impact and a large current fault was recorded at 1733:08 by the company’s electrical system. On-site measurements showed the point of impact to be 30 m to the nearest wooden pole and the wire height at the point of impact was estimated to be 9.5 m above the ground.
Emergency landing
It was known by some members of the local community that an emergency landing strip had existed in a relatively flat farm paddock that bordered the eastern edge of the Burrumbuttock town. The land owner of the paddock reported that the most recent aircraft to have landed on that strip was at least 20 years prior and that any remnants of the strip were probably concealed by crop.
An aerial survey flight was conducted during the on-site phase of the investigation which showed that the paddock was being used for cropping and pasture. No identifying markers or features could be observed that might otherwise indicate the location of such a strip in that paddock and the circumstances of the accident do not indicate that the pilot was seeking to conduct a forced landing.
Figure 7: The powerline (electrical wires arrowed) looking back along the flight path. A piece of the leading edge skin from the left wing is also shown
Source: ATSB
Wire strikes – an avoidable accident
The ATSB has investigated numerous accidents involving wire strikes from previous years. The investigations generally found that the pilot was involved in low flying for no identified operational reason and, in many of the occurrences, was more than likely aware of the presence of wires.
Between 1999 and 2008, there were 147 fatal accidents reported to the ATSB involving aerial work, flying training, private, business, sport and recreational flying in Australia. Of those fatal accidents, at least six were associated with unauthorised and unnecessary low flying; that is, flying lower than 1,000 ft (for a populous area) or 500 ft (for any other area) above ground.
In March 2013, the ATSB published an education series based on avoidable accidents. The first of the avoidable accident series was focused on accidents involving unnecessary and unauthorised low flying:
Recognising the risks and hazards of low-level flying, CASA requires pilots to receive special training and endorsements before they can legally conduct low-level flying. In the accidents examined, many of the pilots did not have low-level training or an endorsement to do so, and none had a legitimate reason to be flying below the minimum limits. For most private pilots, there is generally no reason to fly at low levels, except during take-off and landing, conducting a forced or precautionary landing, or to avoid adverse weather conditions.
While flying at low-level, the aircraft struck powerlines and lost control, resulting in the impact with terrain. The ATSB determined that the aircraft was capable of normal operation up until the wire strike. Upon striking the wires, the left wing aileron cable was severed, rendering the aircraft uncontrollable for the pilot. The aircraft subsequently rolled left and impact terrain at high speed. There was no pre-existing engine or airframe defects that would have contributed to the accident.
The witness descriptions and flight path of the aircraft indicated that the pilot had deliberately intended to overfly the Farmers Inn hotel. The considerable distance at which the aircraft travelled following the wire strike, as well as its configuration as found at the accident site, was not consistent with the pilot attempting to make an emergency landing. No operational reason could be identified for the pilot to fly at a height less than the minimum prescribed levels.
Analysis of the recorded GPS data indicated that the pilot had regularly flown at, and conducted hazardous low-level flying manoeuvres in the months preceding the accident. The pilot resided just outside the Burrumbuttock township and made regular flights over the town. It was therefore probable that he was aware of the presence and location of the powerline and the hazard that it posed. Powerline poles often provide good visual cues to enable a pilot to see the electrical wires. However, when the span between the poles is large this important visual cue is diminished or unavailable.
Additionally, at the time of the accident, the sun had set below the level of the horizon and the sky was overcast, thereby further reducing the ambient light. Under these conditions the pilot’s ability to detect the electrical wires was likely to have been significantly diminished.
Identifying the powerlines
Identifying powerlines and other similar obstructions from an aircraft in low-level flight is not a simple task. If the powerlines are in an area that is known to be a hazard for aircraft operations then they are required to be marked to enhance visibility. In this case, the powerlines were not required to be marked and, therefore, there was no enhancement to indicate their presence or assist in locating them. Factors such as windscreen visibility and environmental conditions can compound the problem of detection.
Wire strike accident investigations have often revealed that the pilot was aware of the presence and location of a powerline, but have nevertheless flown into it. The investigations have shown that even in the event that a subject pilot is able to detect the wires immediately prior to contact, the operating speed of the aircraft would severely limit the opportunity to react.
The effects of a wirestrike at low level are obvious; significant damage to the aircraft, usually leading to a loss of control and, because of the lower margin for recovery, subsequent impact with the ground or water. Pilots must keep in mind that not only do powerlines exist at low levels and in remote areas, they are also not easy to identify. Even against a clear blue sky, wires are difficult to spot for a number of reasons. Wires can oxidise to a blue/grey tinge and may blend into the background, or the wire may be obscured by terrain. Wires are very difficult to detect from the air and can be encountered in the most unexpected places in rural areas. Even if a pilot has spotted a powerline, the ability to judge its distance from the aircraft can be distorted by optical illusions or a lack of nearby visual reference points.
Low-level flying also presents fewer opportunities to recover from a loss of control compared to flight at higher altitudes. It takes time to react and to regain control of an aircraft should something go wrong.
Incapacitation
The postmortem medical examination revealed a pre-existing medical condition that could have led to the pilot being incapacitated during the flight in the moments leading up to the accident. Some coronary damage in the form of plaque haemorrhage and fibrin deposition to the pilot’s heart was found during the examination. Those changes are typically seen as an immediate precursor to a coronary artery thrombosis with the potential for a ‘heart attack’ and subsequent incapacitation. It was also possible that the arterial damage observed during the post-mortem examination had been induced by the impact forces experienced by the pilot.
While this pathological evidence cannot be discounted, the possibility of an incapacitating event is tempered by the facts surrounding the accident. The recorded data supports the numerous witness statements that the aircraft was being flown in a controlled manner and had been conducting low-level manoeuvring prior to the accident. Such operation of the aircraft was consistent with both witness accounts regarding previous flights and the recorded data from the GPS from previous flights.
Findings
From the evidence available, the following findings are made with respect to accident involving a Cessna 182L aircraft, registered VH-TRS, while being flown around Burrumbuttock, New South Wales on 20 July 2014. These findings should not be read as apportioning blame or liability to any particular organisation or individual.
Contributing factors
While the pilot was operating at low level, the aircraft contacted electrical powerlines and collided with terrain.
Other factors that increased risk
The pilot did not hold any approval to conduct low flying and had not received training in the identification of hazards or in the operating techniques for flight close to the ground.
Other findings
There was no evidence of any defect with the aircraft that might have contributed to the accident.
While it is possible that the pilot may have had a medical incapacitation event immediately prior to the accident, the aircraft was being operated in a manner consistent with previous flights undertaken by the pilot and at a level that provided little margin for error should such an event have been experienced.
The powerline was not fitted with visual warning markers, nor was there a requirement for such markers in accordance with the Australian Standard.
Sources and submissions
Sources of information
The sources of information during the investigation included:
witnesses to the accident
the next-of-kin
the aircraft’s maintenance provider
Civil Aviation Safety Authority (CASA)
Bureau of Meteorology
New South Wales Police Service
Submissions
Under Part 4, Division 2 (Investigation Reports), Section 26 of the Transport Safety Investigation Act 2003 (the Act), the Australian Transport Safety Bureau (ATSB) may provide a draft report, on a confidential basis, to any person whom the ATSB considers appropriate. Section 26 (1) (a) of the Act allows a person receiving a draft report to make submissions to the ATSB about the draft report.
A draft of this report was provided to the family of the pilot, the New South Wales Police Service and CASA.
Submissions were received from the family of the pilot and CASA. The submissions were reviewed and where considered appropriate, the text of the report was amended accordingly.
Purpose of safety investigations
The objective of a safety investigation is to enhance transport safety. This is done through:
identifying safety issues and facilitating safety action to address those issues
providing information about occurrences and their associated safety factors to facilitate learning within the transport industry.
It is not a function of the ATSB to apportion blame or provide a means for determining liability. At the same time, an investigation report must include factual material of sufficient weight to support the analysis and findings. At all times the ATSB endeavours to balance the use of material that could imply adverse comment with the need to properly explain what happened, and why, in a fair and unbiased manner. The ATSB does not investigate for the purpose of taking administrative, regulatory or criminal action.
Terminology
An explanation of terminology used in ATSB investigation reports is available here. This includes terms such as occurrence, contributing factor, other factor that increased risk, and safety issue.
Publishing information
Released in accordance with section 25 of the Transport Safety Investigation Act 2003
Ownership of intellectual property rights in this publication
Unless otherwise noted, copyright (and any other intellectual property rights, if any) in this report publication is owned by the Commonwealth of Australia.
Creative Commons licence
With the exception of the Coat of Arms, ATSB logo, and photos and graphics in which a third party holds copyright, this publication is licensed under a Creative Commons Attribution 3.0 Australia licence.
Creative Commons Attribution 3.0 Australia Licence is a standard form licence agreement that allows you to copy, distribute, transmit and adapt this publication provided that you attribute the work.
The ATSB’s preference is that you attribute this publication (and any material sourced from it) using the following wording: Source: Australian Transport Safety Bureau
Copyright in material obtained from other agencies, private individuals or organisations, belongs to those agencies, individuals or organisations. Where you wish to use their material, you will need to contact them directly.
At about 1447 on 13 July, a fire started in the engine room of the bulk carrier Marigold, while it was loading a cargo of iron ore in Port Hedland, Western Australia (WA).
Firefighting by the ship’s crew included activating the Halon gas fixed fire suppression system for the engine room. However, a full release of Halon gas did not occur, nor was the engine room effectively sealed. Consequently, the fire continued for about 12 hours until it burnt itself out.
What the ATSB found
The ATSB determined that the fire began on Marigold’s number one generator after a fuel oil pipe fitting on it failed. The resulting spray of fuel oil likely contacted a hot surface on the generator and ignited.
The deployment of the ship’s Halon gas fixed fire suppression system was ineffective, as a full release of Halon gas did not occur and the engine room was not effectively sealed. Failures within the Halon system and multiple failures of the ventilation closing mechanisms were indicative of a lack of effective planned maintenance on board.
The port’s emergency response plan was initiated, but there were misunderstandings between the agencies involved as to the roles of the others during the initial stages of the incident and response. Their emergency plans did not refer to trigger points for transfer of control or include detailed instructions of how to hand over control during an incident.
What's been done as a result
The ATSB has been advised that as a result of this fire and another recent shipboard fire in Fremantle, WA, the State Emergency Management Plan for a Marine Transport Emergency (WESTPLAN MTE) has been revised. The WESTPLAN MTE now covers formal incident controller delegations.
Further, the WA Department of Fire and Emergency Services (DFES), the State’s hazard management agency, has initiated new ‘level 1’ and ‘level 2’ marine firefighting training programs.
The operator of the ship’s berth, BHP Billiton, will now provide international shore connections at its berths to improve water supply to a ship’s fire line in emergencies. Additionally, BHP Billiton has aligned its standardised response checklists with those of DFES. The emergency response plan for shipboard fires will be consistent with these checklists.
Marigold’s managers have taken action to address safety issues with regard to the maintenance and operation of the fixed fire suppression systems and ventilation closing mechanisms.
The ATSB has issued one recommendation to the ship’s managers to further address the safety issue with regard to the operational status of fixed fire suppression systems. It has also issued five recommendations to DFES to address issues related to the shore response to shipboard fires.
Safety message
Response to a large fire on board a ship in port will involve the ship’s crew and shore fire crews. The initial response and fire containment by the ship’s crew requires a thorough knowledge and understanding of firefighting procedures and systems, knowledge which needs to be effectively maintained. Where multiple shore response agencies are involved, their emergency procedures need to be consistent with each other, such that individual and team roles and responsibilities are well understood and ensure that agencies can coordinate an effective response.
The occurrence
At 0145[1] on 13 July 2014, the 309 m long bulk carrier Marigold (Figure 1) berthed at Finucane Island B berth at Port Hedland, Western Australia. The ship berthed port side alongside to the wharf, with the only access from the starboard side being via the ship’s accommodation ladder. The loading of iron ore cargo started at 0600 with completion of cargo operations expected the next day.
Figure 1: Marigold port side to Finucane Island berth B
Source: Port Hedland Pilots
The chief mate, assisted by the third mate, monitored cargo loading operations from the ship’s ballast control room (BCR) throughout the morning. As cargo loading progressed, the chief mate de-ballasted the seawater ballast tanks. The ship’s number one and number two diesel generators provided electrical power for the ballast pumps and various other shipboard services.
Shortly after 1200, the third mate handed over the cargo watch to the second mate. At about 1300, Marigold’s engineers and engine room ratings met in the engine control room (ECR). The chief engineer assigned them work, which included routine checks in preparation for the ship’s departure from port. To progress the work, they split into three separate work teams (Figure 2).
Figure 2: Plan showing crewmembers locations in the engine room when the fire started
Source: Marigold (annotations by ATSB)
At 1420, the chief mate needed to use a third ballast pump. The chief engineer started a third generator, number three, to meet power requirements.
Fire detection and initial response
At about 1447, the ship’s fire detection system activated on the bridge and in the BCR and ECR. Soon after, the ship’s fire alarms began sounding throughout the ship and the accommodation fire doors closed automatically. The chief engineer, who was in the ECR with the second engineer and oiler 2, checked the fire detection panel, which indicated detectors had activated in the engine room. He went to investigate and saw smoke and flames coming from the generator flat (engine room deck 3).
Figure 3: Aerial view showing Marigold at Port Hedland
Source: Google earth (annotated by ATSB)
He attempted to extinguish the fire using a portable fire extinguisher but could not get sufficiently close because of the smoke. He returned to the ECR and phoned the duty seaman on the bridge, confirming there was a fire in the engine room.
Meanwhile, after the chief mate checked the fire detection panel, he stopped the ballast pumps and left the BCR to investigate the fire alarms. He tried to descend the internal stairs from the boat deck to the upper deck and enter the engine room. However, thick black smoke was building up quickly, so he left the accommodation and proceeded out onto the boat deck.
At the same time, the second mate went to the ship’s bridge, where the master joined him. The duty seaman relayed the information he had received from the chief engineer, confirming a fire in the engine room.
At about 1448, the master sounded the general emergency signal, while the second mate instructed the wharf supervisors to stop cargo operations.
The second mate then announced over the ship’s public address system that there was a fire in the engine room and directed all crewmembers to their muster stations.
Meanwhile, audible fire alarms alerted the first engineer, who was on the engine room bottom plates. He instructed his team to leave the engine room using the lift. He could now smell smoke and decided to locate the seat of the fire.
About the same time, on deck 3, the third engineer and oiler 1, also alerted by the audible fire alarms and the smoke, began making their way out of the engine room. The third engineer found his way to the ECR but the oiler became disoriented in the smoke and took an alternative route to exit the engine room.
Call for shore-side assistance
At 1450, the master reported the fire to the Port Hedland shipping control tower (SCT) and asked for immediate assistance. He also contacted the ship’s local agent and requested firefighting teams to assist.
In the SCT, the duty vessel traffic services officer (VTSO) began coordinating an emergency response. He requested the Western Australian Department of Fire and Emergency Services (DFES), BHP Billiton emergency services, Port Hedland pilots, harbour tugs and the local police to respond to the emergency.
By this time, the third mate had joined the master on the bridge. Meanwhile in the engine room, the first engineer had reached deck 3, but could see little in the dense smoke. He ascended a nearby ladder and managed to locate the ECR windows. He banged on the windows to attract attention, until the men inside pulled him in through the ECR door.
At about 1453, the chief, first, second and third engineers and oiler 2 left the ECR through the aft fire door into the steering gear room. By now, the disoriented oiler 1 had ascended several ladders searching for an exit from the engine room.
At about 1456, several crewmembers gathered fire hoses from the fire control room (FCR) and started preparing them on the upper deck for boundary cooling.[2] Shortly after, oiler 1 came out through an exit between the funnel housing and accommodation block on the upper deck, where he was met by crewmembers.
By now, the chief, first, second and third engineers and oiler 2 had ascended the exit ladder from the steering gear room, out on to the upper deck, aft of the funnel housing.
Meanwhile, three harbour pilots reported into the SCT. Upon sighting smoke issuing from Marigold’sengine room and accommodation, two pilots left the SCT and proceeded to the pilot boat for transfer to the ship.
At about 1457, following a head count, Marigold’s chief mate reported to the master that all crewmembers were present.
Shortly after,the master told the chief mate to close all fire and smoke dampers[3] and shut down the generators. He relayed the instructions to the mustered crewmembers, and several of them started closing the dampers. The chief engineer then operated the fuel oil quick-closing valves[4] (QCV) from the FCR on the upper deck.
At 1501, all three diesel generators shut down and electrical power was lost. Shortly afterwards, the emergency generator started and restored power to the emergency switchboard.
At about this time, DFES’ Pilbara superintendent dispatched the acting area officer (AO) from Karratha to Port Hedland, (about 245 km away).
Meanwhile, the crewmembers continued to close the dampers, and about 30 minutes after the first fire alarm, the chief mate reported to the master that all engine room dampers and QCVs were closed. He then took another head count and confirmed all crewmembers were accounted for.
Control attempts
At 1517, the master told the chief mate to activate the engine room Halon gas fixed fire suppression system (Halon system). The chief mate and chief engineer entered the FCR and activated the system.
At about 1520, six BHP Billiton emergency services officers (ESOs) and two South Hedland Volunteer Fire and Emergency Services (VFSR) firefighters arrived at the Finucane Island north gate (Figure 3) in support vehicles and fire appliances. Once on the wharf, they started preparing fire hoses and firefighting equipment.
Meanwhile, the two harbour pilots boarded Marigold from a pilot boat. The master briefed the pilots on the bridge about the situation, where one of them remained to assist with ship-shore communications.
The other pilot went down to the upper deck to provide on-scene updates and assist the crewmembers. Upon his arrival, the chief engineer briefed the pilot about the situation and informed him that he had activated the Halon system. The chief engineer opened the Halon room door to show the pilot, but the room was full of gas and prevented entry, so he closed the door.
Nearby, the crewmembers had mustered forward of the accommodation and two of the crewmembers appeared to be suffering from smoke inhalation. Seeing them, the pilot requested his colleague on the bridge to ask the SCT to send medical assistance.
At 1525, one harbour tug (Figure 4) started boundary cooling and another tug started pushing the ship onto the wharf. Consequently, the master informed the chief engineer to stop the emergency generator and close its dampers to prevent water spray from entering its air intakes.
Figure 4: Harbour tug boundary cooling the engine room
Source: Port Hedland Pilots
At about this time, the BHP Billiton emergency services supervisor (ESS) arrived at Finucane Island north gate. The senior ESO and senior VFRS firefighter briefed him and he then assumed the role of the shore response on-scene incident controller (IC). There was no access to the ship from the wharf because the shore gangway at that berth was not operational at that time. Hence, the pilot on the upper deck briefed the IC regarding the on board situation via VHF radio.
At 1535, the South Hedland VFRS senior firefighter advised the AO that there was a fire in the ship’s engine room and the crew had released Halon into it. Although the crew had closed all engine room dampers there was still a lot of smoke coming from them. Subsequently, the senior firefighter informed the IC that the AO from Karratha was expected at the scene at 1730.
The IC sent an ESO to board the ship via a workboat to attend to the smoke-affected first engineer and oiler. Meanwhile, the ship’s crewmembers assisted other ESOs (who were on the wharf setting up fire hoses) with the transfer of a fire hose up and on to the ship’s upper deck. Shortly after, the duty Port Hedland volunteer fire services (VFS) firefighter arrived on the wharf with additional equipment.
At about 1550, the ESO completed preparations for the medical evacuation of both smoke-affected crewmembers. The Port Hedland pilot transfer helicopter evacuated the injured crewmembers from the ship and transferred them to the local hospital for treatment.
At 1610, four ESOs boarded Marigold via a launch, using the ship’s aft accommodation ladder. A third harbour pilot, from a nearby ship also boarded to assist with communications. Once on board, the ESOs and two pilots set up a staging area near the accommodation block on the upper deck and planned an engine room entry.
Meanwhile the AO had contacted the DFES regional command and discussed the situation. They decided that as the ship’s crewmembers had discharged the Halon gas into the engine room, it was to remain closed for 72 hours, boundary cooling was to be maintained, and temperatures monitored. Additionally, DFES specialised ‘vessel entry’ firefighters were mobilised to leave Perth (about 1,650 km from Port Hedland) on a flight the next day. The AO phoned the IC and gave him this information.
At 1648, the IC tasked two ESOs to take bulkhead temperature readings around the engine room, but not to enter it. Wearing breathing apparatus (BA) and carrying a charged fire hose, they descended into the steering gear room and started taking temperature readings. As they moved around the steering gear room, they passed through two open fire doors and entered the ECR, where they recorded temperatures of up to 100 °C. They did not investigate the engine room any further.
Shortly after, the IC withdrew the ESOs from the ECR and the ship’s master decided to disembark non-essential crewmembers using a launch to transport them ashore.
At about 1730, the AO arrived at the berth and the IC updated him on the situation. Shortly after, the ESOs reported smoke and a possible secondary fire in the engine room. The tugs maintained boundary cooling.
At about 1758, the pilots advised Marigold’s master that the ship’s mooring lines would need to be tended with the rising tide. Without electrical power, crewmembers would need to manually handle the lines, so the master arranged for them to return to the ship.
At 1820, the ESOs reported that temperatures had stabilised, however, smoke emissions from the engine room soon increased again.
At 2004, the AO took over as IC from the ESS. Subsequently, the ESS assigned the IC an ESO (also a South Hedland VFRS fire fighter) as the on-scene BHP Billiton liaison officer. Shortly after, both the AO and ESO boarded Marigold and began an assessment.
At 2116, the ESOs reported increasing temperatures again and heavy smoke from the engine room. The IC called the SCT and asked that 20 m3 of CO2 be delivered to the ship for use in the engine room to suppress the fire. Consequently, the Port Hedland harbour master liaised with the BHP Billiton emergency services shore management to organise the CO2.
At 2233, Marigold’s master and chief engineer, accompanied by the IC and two pilots, inspected the Halon room. They found that one of the two banks of Halon bottles had partially released while the other bank had not discharged at all. They also found that only one of the two Halon gas distribution valves to the engine room had opened. The chief engineer tried manually releasing the remaining Halon bottles into the engine room, but he was unsuccessful.
Shortly after midnight, the IC and a pilot entered the steering gear room wearing BA. They found both fire doors leading into the ECR open and closed them to better seal the engine room. Boundary cooling continued throughout the night and temperatures remained steady.
Transition to recovery
At 1330 on the following day, 14 July, the specialised DFES ‘vessel entry’ firefighters boarded Marigold. They confirmed that the fire had burnt out and, hence, the previously arranged CO2 was not required. The AO then handed the IC responsibility to a senior ‘vessel entry’ fire fighter.
At 1912, the ‘vessel entry’ firefighters inspected the engine room and found significant damage to number 1 generator and all electrical systems and wiring. Additionally, most of the switchboards in the generator flat and ECR were damaged beyond repair, making the other two generators inoperable.
Marigold’s accommodation block had considerable smoke damage throughout, rendering the crew accommodation uninhabitable.
Later that evening, DFES firefighters re-assessed the situation and informed the ship’s master that they considered it safe to start the emergency generator.
Figure 5: Marigold departing Port Hedland under tow
Source: Port Hedland Pilots
At 2000 on 15 July, DFES officers completed atmosphere testing in the accommodation and engine room. They determined that persons entering those spaces needed to wear respiratory equipment.
At 1045 on 16 July, DFES’s IC handed over charge to the Port Hedland harbour master. It was then decided to move the ship to an anchorage.
On 17 July, the harbour master arranged for two shore generators to be placed on the ship to power its steering gear, mooring winches, and temporary lighting.
At 1330 on 19 July, Marigold was shiftedto an anchorage with eight tugs in attendance while awaiting towage to a suitable port for repairs.
On 23 July, Marigold was towed from the anchorage, bound for Singapore for repairs (Figure 5).
At the time of the fire, Marigold was registered in Panama, classed with the Korean Register of Shipping (KR) and managed by Korea Leading Company of Ship Management (KLCSM), South Korea. Including the master, the ship had a crew of 23 Korean and Burmese nationals.
The master had 30 years of seagoing experience, including 12 years as master on large bulk carriers. He had joined Marigold about 2 months before the incident.
The chief engineer had 40 years of seagoing experience, including 26 years as chief engineer on large bulk carriers. He had sailed as chief engineer on board Marigold about 8 years previously and re-joined the ship about 2 months before the incident.
The chief mate had 25 years of seagoing experience, including 10 years as chief mate and held a chief mate’s certificate of competency. He had sailed on a sister ship to Marigold for 8 months and joined Marigold 2 months before the incident.
Diesel generators
Marigold was equipped with three SsangYong MAN B&W medium speed, turbocharged, six cylinder diesel engine-driven generators. The generators were located at the aft end of the engine room, on deck 3, directly below the ECR. They each provided 650 kW of electrical power.
Figure 6: Diesel generator fuel oil supply system
Source: SsangYong instruction manual, annotated by the ATSB
At the engine, a low-pressure gear pump circulated fuel through a fuel filter to the main fuel oil injection pumps. Two pressure gauges (marked ‘A’ and ‘D’ in Figure 6) indicated the fuel oil pressure before the fuel pump and fuel oil pressure before the engine.
Halon system
A Halon 1301 fixed fire suppression system (Figure 7) protected Marigold’s engine room. Halon 1301 (Halon), the common name for bromotrifluoromethane, is a colourless, odourless gas with low toxicity and a density about five times that of air. Halon does not extinguish fires through oxygen starvation, but inhibits the chemical process in which a substance reacts rapidly with oxygen and gives off heat. It has excellent fire extinguishing properties and is a clean agent because it leaves no residue, but it has a high ozone depleting potential.
The Halon was stored under pressure (42 bar[5]), as a liquid, in two banks of 130 L[6] bottles in the Halon room, located on the port side of the upper deck (Figure 2).
Release of Halon from the bottles and operation of the distribution valves utilised a carbon dioxide (CO2) pilot system. The pilot CO2 bottles were located in identical control boxes in the Halon room and the fire control room (FCR).
When an operator opened the door of a control box, a switch activated audible and visual alarms in the engine room and stopped the ventilation supply and exhaust fans. Next, the operator opens the pilot CO2 bottle valve and CO2 flows to pneumatic actuators, which open the main distribution valves prior to the release of Halon. As the main valve spindle rotates, a pilot valve fitted to the spindle also opens, allowing the CO2 to flow to, and activate the Halon bottle release valves. The bottles simultaneously discharge the Halon, as a gas, into a common manifold system, discharging into the engine room via the distribution valves and pipework.
Figure 7: Marigold’s Halon fire suppression system
Source: ATSB
The Halon system operating instructions displayed in the Halon room and FCR stated:
Once the fire was extinguished, no one is to enter the engine room, until it was certain that there is no danger of re-ignition.
In 1987, the Montreal Protocol prohibited the use of ozone depleting gasses. These measures were adopted in SOLAS,[7] which then prohibited:
full-scale tests of Halon fire-extinguishing systems (from January 1992)
installation of Halon fire-extinguishing systems on board ships (from 1 October 1994).
However, SOLAS did not specify any phasing-out requirement for Halon fixed fire extinguishing systems on existing ships. Some flag administrations provided instructions for decommissioning and replacement requirements for existing halon system. However, Marigold’s flag State at the time of the fire (Panama) had no such requirements.
Firefighting equipment (FFE) maintenance
A merchant marine circular[8] issued by Panama details the minimum recommended levels of maintenance and inspection requirements for FFE. This circular and the manufacturer’s guidance formed the basis of Marigold’s FFE maintenance procedures.
Testing and inspection
Testing and inspection of FFE was conducted at scheduled weekly, monthly, quarterly, annual, biennial, five-year and ten-year intervals. Trained personnel (either ship’s crewmembers or service technicians) carried out the equipment testing and maintenance. Marigold’s planned maintenance system (PMS) assigned the chief mate responsibility for the inspection and maintenance, and the chief engineer responsibility for controlling the equipment.
The PMS included testing of the following:
fixed gas fire-extinguishing system
fire doors
ventilation systems (several types of mushroom ventilators were fitted and were closed by either rotating the ventilator head down with a hand wheel or by turning a fire damper handle connected to the damper flap inside the ventilator trunking)
fire dampers (closure of the main engine room dampers required a wire connected via pulleys to the dampers blades to be pulled)
remote closure of engine room hatch (a hand chain block suspended from the funnel housing bulkhead was used to lift and open the engine room hatch).
On board emergency response
Chapter III, Regulation 8 of SOLAS, Muster list and emergency instructions, requires ships to have:
clear instructions for every person on board to be followed in the event of an emergency
muster lists exhibited in conspicuous places throughout the ship, including the navigating bridge, engine room and crewmembers’ accommodation spaces.
Marigold’s muster list specified details of the general emergency signal and public address system, and additionally, crewmembers’ duties when the emergency alarm sounded. Each crewmember was allocated an emergency duty based on rank and was assigned to the command teams or an on-scene team. The command teams mustered on the bridge and in the engine control room, with the master in overall command.
The on-scene team was comprised of two fire teams and an assistance party. The chief mate was the leader of fire team one and was in charge of the fixed fire-fighting system. Fire team ‘one’ was the primary firefighting team outside of the engine room. The first engineer was the leader of fire team ‘two’ and was in charge of isolating the electric power supply, mechanical ventilation and the emergency fire pump. Fire team ‘two’ was the primary firefighting team in the engine room. The second mate was the leader of the assistance party and in charge of first aid and medical treatment.
Additionally, Marigold’s safety management system (SMS) contained emergency response procedures (ERP).The ERP detailed the on board emergency response to be followed by crewmembers for engine room fires, including the use of fixed gas suppression systems.
Training and familiarisation
Marigold’s SMS also required each crewmember to complete an on board familiarisation. Upon joining the ship, each crewmember had to be familiar with their emergency duties before the voyage began. Additionally, within 2 weeks, they had to complete on board training in the use of all firefighting equipment (FFE). The training covered fire party duties, location of the muster station and an overview of the engine room fixed firefighting system.
Further, the company specified that the ship’s crewmembers conduct monthly fire drills, in accordance with SOLAS requirements. The ERP listed 15 fire scenarios and required crewmembers to use a different scenario for each drill. Among others, the scenarios included simulated fires in the accommodation and engine room.
Fire boundary and isolation
Thermal and structural boundaries divided Marigold’s spaces into vertical and horizontal zones. SOLAS classified these spaces according to their fire risk. Consequently, fire integrity standards applied to the boundaries, which formed the divisions between the adjacent spaces. The space classification determines the materials used to construct the solid divisions and openings therein.
The objectives of the fire boundaries defined by SOLAS were to:
prevent the occurrence of fire and explosion
reduce the risk to life caused by fire
reduce the risk of damage caused by fire to the ship, its cargo and the environment
contain, control and suppress fire and explosion in the compartment of origin
provide adequate and readily accessible means of escape for passengers and crewmembers.
Port Hedland
Port Hedland (Figure 8) is Australia’s largest bulk cargo port. It is located on the north-west coast of Western Australia and services the mineral rich Pilbara region. The port has 16 berths, including 12 privately owned iron ore berths, and a single shipping channel.
The port’s major export commodity is iron ore. In the financial year ending 30 June 2014, more than 372 million tonnes of iron ore was exported on over 2,500 ships.
Pilbara Ports Authority (PPA) is responsible for the safety and efficiency of shipping in the port and its waters, for which it has overall responsibility for planning and development.
Figure 8: Port Hedland
Source: ATSB
Shore response to a shipboard fire
In Western Australia, the management of a marine transport emergency within port boundaries involves multiple agencies with overlapping responsibilities. The agencies include the Department of Transport, Western Australia (DoT), the port authority, the marine export facility owner, DFES and the ship’s master. The DFES recommends that a unified command structure[9] be used by agencies responding to an incident.
The WESTPLAN MTE[10] states that the port authority and the marine export facility owner perform the immediate response activities for a marine transport emergency (MTE)[11] within port boundaries. These organisations provide the IC[12] and act as the controlling agency.[13]
Additionally, DoT is the hazard management agency (HMA)[14] for any MTE that occurs in all waters within the State. However, DFES assumes responsibility for incidents involving fire and any rescue that results from it.
The DFES only provides the IC if the incident requires a multi-agency response, or if requested by a port authority or the marine export facility owner. In instances of an incident requiring a multi-agency response, the IC is a suitably trained and qualified DFES officer. A comprehensive handover is required between the immediate response IC and the relieving DFES IC.
Port marine safety plans
All port authorities and private companies operating ports[15] in Western Australia under the Port Authorities Act 1999 are required to prepare, maintain and implement a ‘marine safety plan’. These plans identify arrangements for managing MTE situations within port waters.
Hazard management structure/arrangements
When an MTE involving a ship fire is declared, the DFES has overall responsibility for control and coordination through the appointed IC. The IC will be a suitably trained and qualified officer from DFES, the port authority, or the maritime export facility owner.
PPA
The PPA maintains an emergency response plan (ERP). The objective of the ERP is to provide the DoT or DFES (as the HMA), with assistance, coordination and marine expertise to manage the incident. The plan provides guidance for the initial response and recommended remedial action to an emergency within the port limits.
There are three levels of response to incidents within PPA’s jurisdiction:
‘level 1’ - can be resolved through the use of local or initial response resources only
‘level 2’ - requires deployment of resources beyond the initial response
‘level 3’ - requires multi-agency responses for effective management of the situation.
When a ship berthed in Port Hedland requires emergency assistance, the ship’s master is required to contact the SCT.
The duty vessel services traffic officer (VTSO) in the SCT then notifies a number of pre-identified parties, including:
Port Hedland harbour master
Port Hedland safety & security officer
duty pilot
DFES (on ‘000’).
Additionally, PPA’s ERP provides the following guidance for a fire on board a berthed ship:
The VTSO will also advise the local tug operators, pilot helicopter crew, and medical services an emergency exists and that they are required to standby for further instructions.
The Harbour Master will attend the SCT to co-ordinate the emergency response and the Duty Pilot will assist. Additionally, another senior marine pilot will proceed to the ship to assist the response coordination and provide updates to the SCT.
The Harbour Master will deploy suitably equipped tugs to assist with firefighting. The local VFRS officer will be on board a tug directing firefighting operations.
Throughout, the ship’s master maintains responsibility for fighting fires on ships alongside berths, until the arrival of a Senior Fire Officer. The Senior Fire Officer will then assume overall direction of all available firefighting equipment, including the direction of the tug firefighting resources.
Marine export facility owner
The maritime export facility owner, BHP Billiton, also maintains an ERP. Under an agreement with the HMA, the BHP Billiton security and emergency management (SEM) teams will assist with shipboard emergencies at BHP berths.
The SEM supervisor (ESS) is the designated on-scene IC and is in command of the overall operations at the incident scene, including:
developing and coordinating a strategic plan to combat the crisis or emergency
ensuring that there are adequate resources available
ensuring that operations are carried out safely and in line with procedures and protocols
liaising with other emergency agencies.
Under the IC’s direction, ESOs are responsible for the following:
leading the first response team (FRT) actioning the strategic plan
assessing medical response needs, and administering first aid/medical treatment
ensuring emergency resources are ready and available.
DFES
The DFES response to an MTE is determined by the location of the incident and capabilities of the first arriving response unit. In regional ports (Figure 9) such as Port Hedland, the port authority is the first response agency (FRA) and DFES’ volunteers provide fire services for marine fires. There is a heavy reliance on FRA’s across most of WA.
The VFRS firefighters are stationed in South Hedland and a VFS firefighter is stationed in Port Hedland (both with designated marine fire roles). All VFS and VFRS firefighters are trained in marine fire assessment and containment (MFAC)[16] techniques. The ship firefighting cache[17] in Port Hedland is used to support land-based marine fire responses. The DFES operations command unit in Karratha provides for the Pilbara region. Specialised ‘vessel entry’ firefighters or marine fire assessment and suppression capability (MFASC)[18] brigades can also be deployed to regional ports. However, MFASC brigades are based in metropolitan areas (such as Perth) and comprise professional career firefighters. The brigades are provided the training and equipment to fight shipboard fires in port or at sea.
Figure 9: Regional first response agencies
Source: WESTPLAN MTE
DFES’ Marine Fire Emergency Response Guide (MFERG)
The MFERG provides the first arriving DFES IC guidance to establish firefighting strategies and recording incident information. The guide contains the following information:
decision model for vessel fire attack
ship fire response check list
temperature monitoring for ship fires
temperature monitoring maps for ship fires
draft mark recordings for vessel trim and list.
Before committing any resources to firefighting or other duties, the IC is required to conduct a dynamic risk assessment and decide an attack strategy, using offensive or defensive tactics.
DFES’ marine firefighting training
When DFES is asked to attend a shipboard fire, it is likely that the fire has progressed beyond the normal capabilities of the ship’s crew. Therefore, DFES firefighters are trained in specific areas of fighting marine fires applicable to their designated roles:
marine fire assessment and suppression capability (MFASC)
The DFES Marine Firefighting Capability and Training manual referenced engine room fires. In all events, restriction of oxygen flow to the fire was required, and for serious fires, the use of fixed firefighting installations was to be considered. The manual stated:
The use of fixed installations is unlikely to be effective if its introduction is delayed for an excessive period of time, due to high temperatures building up in the engine room compartment.
After flooding an area with CO2, the area should be left closed for sufficient time to allow the burning materials to cool below their ignition temperature.
Additionally, prior to entry into the affected spaces, three successive significant temperature reductions across all boundaries were required. The last temperature reduction at the hottest boundary needed to be a reading below 50°C. Further, readings returning to ambient temperature were indicative of the fire being extinguished.
The manual also indicated that generally, if a fire involved cable insulation and lagging, a longer period would be required before the heat dissipated, as these materials may continue to smoulder for some time.
On 13 July, while Marigold was loading cargo in Port Hedland,a fire started in the ship’s engine room. The fire began on the ship’s number one generator after a fuel oil pipe fitting on it failed. The resulting spray of fuel oil likely contacted a hot surface and ignited.
The firefighting response included deploying the ship’s Halon fixed fire suppression system. However, a full release of Halon gas did not occur and the engine room was not effectively sealed. Consequently, the fire continued for about 12 hours until it burnt itself out.
Fuel oil pipe fitting failure
The generator’s fuel system pressure gauge piping originally consisted of continuous steel pipe connecting the fuel line to the pressure gauge. However, at some time in the past, a different type of pressure gauge had been fitted to the piping (fuel oil pressure before the engine). While the replacement gauge had a similar back mounting arrangement to the original, its connection fittings were incompatible with the original pipework, and it could not be directly connected to the piping. Therefore, the gauge had been connected to the original steel pipe using a section of copper pipe and a compression fitting (Figures 10 and 11).[20]
Figure 10: Comparison between generator pressure gauges and gauge pipework
Source: ATSB
Although the steel and copper pipes had the same nominal internal diameter, they had different outer diameters. Consequently, when the compression fitting was tightened, it is likely that the steel pipe was not adequately secured, and it separated from the fitting in the time leading up to the fire. The resulting spray of pressurised fuel oil produced a thin oil film that spread over a large area (Figure 11). It is likely that the oil film contacted a hot surface on the generator and ignited, resulting in a fire around its turbocharger.
Figure 11: Fuel oil spray from compression fitting
Source: ATSB
On board response
Evacuation via engine room lift
On 13 July, when alarms indicating the engine room fire sounded, the first engineer and three crewmembers were on the bottom plates - the lowest level of the engine room
The first engineer ordered his team to evacuate using the engine room lift. The lift accommodated only three persons, so the first engineer ascended the engine room ladder to make his exit (Figure 12).
Figure 12: Engine room lift and adjacent ladder
It is universally accepted practice not to use a lift in an emergency due to the unacceptably high risk of becoming trapped in the lift if the power fails. Safety placards on the lift doors also warned ‘Caution, lifts are not be used in the event of an emergency’. The crew took an unnecessary risk by using the lift.
Fire isolation and oxygen starvation
Containing a shipboard fire in the space where it starts requires the integrity of thermal and structural boundaries to be maintained. Further, limiting the fire growth potential in the space relies on preventing or restricting the air supply to it.
Openings in the structural boundaries in accommodation and machinery spaces are fitted with fire doors (those in the accommodation are usually self-closing). The doors are designed to provide a restriction to the passage of smoke and flame equivalent to that of the division in which they are fitted. Fire doors fitted in boundary bulkheads of machinery spaces shall be gastight and self-closing. Regulations require that self-closing doors are not fitted with hold-back hooks.[21] However, hold-back arrangements fitted with remote release devices of the fail-safe type may be utilised.
Structural boundary close down
All fire doors on board Marigold should normally have been in a closed position. However, ATSB investigators found the fire door leading to the engine room from the upper deck inside the accommodation had been tied open (Figure 13).
Figure 13: Fire door tied open
Source: ATSB
Closedown of the engine room ventilation
At about 1457, Marigold’s master ordered all engine room ventilation isolations closed. Over the next 20 minutes, crew went about closing mushroom ventilators, fire dampers and the engine room hatch.
However, a number of mushroom ventilators and dampers could not be fully closed. The closing mechanisms of these openings were difficult or impossible to operate – indicative of inadequate maintenance of this critical equipment over an extended period. Consequently, the engine room was not effectively isolated; smoke continued to billow from the openings, and air entering the engine room sustained the fire (Figure 14).
Figure 14: Smoke billowing from engine room ventilators
Source: PPA
The continuing flow of air to the fire was further exacerbated by an inability to close the engine room hatch. Heavy smoke prevented the crew from reaching the chain block used to hold the hatch open.
At 1517, although the engine room was not effectively isolated, the chief mate reported that it had been closed down. Hence, the master ordered Halon gas released into the engine room. While the Halon gas may have suppressed the fire had the engine room been sealed, its impact was limited due to the openings and fire doors that were not closed.
Loss of electrical power
In response to the fire, Marigold’s main generators were stopped. The emergency generator then started, providing power for emergency services, including a fire pump, lighting and essential services.
A short time later, a harbour tug started boundary cooling the ship’s engine room. The master was then advised that the ship’s fire pump was not required for boundary cooling. Consequently, he asked the chief engineer to stop the emergency generator and close its air intakes. From this time onwards, the ship had no electrical power and was unable to effectively support the firefighting.
Halon system
Main distribution valve failure
On the master’s orders, the chief mate and chief engineer entered the FCR and operated the Halon system to release gas. However, unbeknown to them at the time, a full release of the gas did not occur.
During their investigation on board the ship, ATSB investigators found only one of the two main distribution valves had opened. This meant that the pilot CO2 system had only activated the Halon gas bottles of ‘bank 2’ (Figure 15). Therefore, there was only a partial release of Halon gas into the engine room.
The ATSB identified a number of possible reasons for ‘bank 1’ main distribution valve not opening, including the:
pilot CO2 gas bottle had insufficient pressure
pilot CO2 gas bottle was not left open for sufficient time
pilot CO2 gas bottle was not fully opened/could not be fully opened
pilot CO2 gas piping was leaking and sufficient gas leaked out to cause the partial failure.
Halon gas bottle valve failures
The pilot CO2 gas flowing via the open distribution valve should have activated the release valves of all the Halon bottles. However, several bottle release valves failed to activate. Further, when the chief engineer manually activated every bottle on each bank, several release valves also failed to activate (Figure 15). Investigators later found that individual bottle pressure gauge readings across the two banks varied across a wide range (0 to 50 bar).
Figure 15: Halon bottle pressures after release
Source: ATSB
The ATSB investigation identified a number of possible reasons for the failure of the Halon gas bottles to discharge, which include:
inaccurate bottle pressure gauges
insufficient bottle charge (low pressure)
failure of bottle release valves to operate
holed (leaking) individual pilot CO2 flexible hoses.
System operation and awareness
Marigold’s SMS procedures required the crewmembers responsible for the Halon system to be familiar and competent in its operation.
At interview, both the chief engineer and chief mate stated that they understood the system, when activated, was designed to release only half of the Halon bottles. They indicated that the fixed fire suppression systems on ships they had previously sailed on had operated in this manner. However, Marigold’s Halon system was designed to release 100 percent of the gas bottles when activated.
At about 2200, with smoke emissions increasing, the pilots inspected the Halon room and found approximately half the Halon bottles had been activated. However, one distribution remained in the closed position. They informed the IC and Marigold’s master and a further inspection of the Halon system was undertaken. It was concluded that the system had not functioned as intended. The master then ordered that the remaining bottles be manually discharged.
In following the master’s instruction, the chief engineer started removing the bottle head release pins and discharging each bottle into the main manifold. However, as the main distribution valve from bank ‘1’ had failed to open and was still closed, the manual release of Halon gas over-pressurised the manifold and relief lines. These lines were in a heavily corroded, poor condition and the over-pressure condition caused the failure of the lines’ pressure relief system, allowing Halon gas to disperse into the atmosphere (Figure 16).
The investigation also identified that the main distribution valves were designed so that they could be manually opened whether or not the line was pressurised.
Therefore, a secondary method of operating the system was available. However, none of the ship’s crew was aware of or understood this back up method. Had they been thoroughly familiar with the system and its operation, they would have become aware of its partial failure, been able to take action to mitigate against it, and modified their firefighting and control strategies.
Figure 16: Halon manifold relief pipe work
Source: ATSB
Maintenance
The ship’s planned maintenance system (PMS) listed the FFE requiring testing and inspection at regular intervals. Additionally, the PMS incorporated the flag State’s guidelines[22] for maintenance and inspection of the FFE.
The testing and inspection routines for the fixed fire-extinguishing system (Halon system) were scheduled at weekly, monthly, annually, biennial, 5-yearly and 10-yearly intervals. Therefore, the failed components identified by investigators should have been tested and inspected numerous times as per the PMS-scheduled routines. Had such regular planned maintenance been carried out, the system would probably have been operational at the time of the fire.
The PMS required frequent checks of all components – from the bottle pressures and pressure gauges, to the condition of the system pipework and operation of valves. However, no shipboard maintenance records could be located and, according to the crew, these had been destroyed in the fire. However, the ATSB investigators identified service agents’ maintenance stickers in the Halon room. The stickers indicated that the system, including the bottles, had been checked 4 months before the fire. However, other stickers indicated that the maintenance of the pilot CO2 bottle in the FCR was 2 years overdue and inspection of the pilot CO2 bottle in the Halon room was 9 years overdue.
While it is unknown if the crewmembers had completed the required tests and inspections on the FFE, the multiple system failures and condition of some system components suggested that regular and effective maintenance attention had not been carried out.
Shore response
The Department of Fire and Emergency Services (DFES) is the hazard management agency (HMA) for any marine transport emergency (MTE) involving a fire that occurs in WA waters. As the HMA, it has overall responsibility for the control and coordination of the response, which is exercised through the incident controller (IC). The IC is in command of the overall operations at the incident scene.
In Port Hedland’s port limits, PPA is the controlling agency for an MTE, and its role is to assist the HMA with marine expertise and response coordination. The role of BHP Billiton, the maritime export facility owner, is to initially provide the IC.
Incident controller
After Marigold’s master reported the fire to Port Hedland’s SCT, the duty VTSO initiated the emergency call out procedure as per the PPA’s ERP.
In response, BHP Billiton mobilised its duty response team. The senior ESO arrived on the scene first and assumed the role of IC. Therefore, BHP Billiton was the lead combat agency at this time (in accordance with the ERP). Shortly after, two South Hedland VFRS firefighters arrived at the berth, and the senior firefighter relieved the ESO as IC. Subsequently, when the ESS arrived at the berth, he received a handover from the senior firefighter before assuming the IC role.
At that time, the DFES acting area officer (AO) was travelling from Karratha to Port Hedland. He contacted the SCT and advised that as IC, he was directing that no one enter the ship’s engine room. Shortly after, a VFRS firefighter took a phone call from the AO, which he transferred to the IC at the scene. The AO then issued instructions to seal the engine room and monitor temperatures.
When the AO arrived on the scene some time later, the IC briefed him. However, the AO did not take control of the incident.
At about 1800, the ESOs reported that the fire appeared to be smouldering and temperatures were reducing. The ESS, ESOs and others then expected to make an entry into the engine room. However, the AO advised the ESS (still in the IC role) and PPA that he would not allow entry to the engine room until three consecutive measured temperature reductions were recorded.
It was not until 2004 on 13 July that the AO took over as IC from the ESS.
Recounting their experiences after the emergency, the representatives of each agency noted that command and control arrangements had been confused in the initial hours. Significant matters pointed out included the following:
PPA assumed that the DFES AO was the IC after he issued instructions to seal the engine room and monitor temperatures while still en route to Port Hedland.
BHP Billiton’s ESS briefed the AO when he arrived at the scene. However, instead of assuming the IC role, he indicated that DFES could take control of the incident at any point in time. Yet the AO continued issuing orders while the ESS was still in the IC role.
DFES felt that in the initial stages there appeared to be two ICs (from PPA and BHP Billiton).
At 2004, when the AO officially assumed the IC role, he did not receive a formal handover from the ESS.
PPA did not declare an ‘incident level’ for the emergency, as required by its ERP.
Despite the inter-agency agreements, arrangements and emergency plans, it was evident that there were misunderstandings with respect to the role of each agency in the early stages of the incident. Their emergency plans did not define trigger points for the transfer of control or include adequate instructions on formal hand over of responsibilities during incident response. Further, there were inconsistencies between individual emergency plans with respect to a multi-agency response, and command and control arrangements.
First responders checklist
The DFES provided its first response fire services in regional ports with a ‘ship firefighting cache’. The cache contained the marine fire emergency response guide (MFERG), which included the ‘Ship fire response checklist’. The checklist provided guidance for establishing firefighting strategies and recording incident information.
In Port Hedland, the ship firefighting cache was located at the local fire station. However, the designated multi-agency first responders (BHP Billiton and South Hedland VFRS) did not have a copy of the MFERG.
The ship firefighting cache was stowed with the VFS firefighter’s machinery and equipment. The large size of the cache resulted in the VFS firefighter having difficulties loading it into the Port Hedland fire appliance, which delayed his arrival at the berth. Further, once he had arrived with the cache, no one used the MFERG.
The ESS used BHP Billiton’s ‘Tactical response plan for shipboard fires’. The content of the checklist/s in this plan was different to that of the MFERG checklist. Therefore, each party would have been unfamiliar with the others’ process, particularly if used to handover the IC role.
It would have been prudent for all agencies to be completely familiar with the MFERG checklist. Each agency would then have been able to work with the same guidance to manage the MTE.
On 13 July, the ‘Ship fire response checklist’ could have been started by the first IC and then accurately maintained by each successive IC. This would have assisted in removing ambiguities and confusion throughout the emergency response and enabled appropriate IC handovers.
International shore connection
The DFES directive for land-based marine firefighting required a connection to the international shore coupling[23] to be established as soon as possible. Connection of the land-based fire hose to a ship’s fire hydrant allows a water supply to its fire main. Each ship firefighting cache required an international shore connection.
Further, SOLAS regulations[24] require all ships of 500 gross tons and over to have an international shore connection on board. Therefore, a connection should always be available.
When the first responders arrived at the berth, ESO’s ran fire hoses from a shore fire hydrant. A South Hedland VFRS firefighter noted that an international shore connection was not connected to the shipboard end of a fire hose. However, ESO’s and firefighters continued connecting lengths of hose, which were then passed up onto the ship. The hose was connected to a ‘Y’ branch that fed two hoses, one of which the ESO’s used to enter the steering gear room. The insufficient length of the hose limited their access and movement.
Most regional areas in WA, including Port Hedland, have low mains water pressure. Therefore, had the shore responders utilised an international shore connection, a relay pump system could have been provided using the fire engines in attendance. The shore hoses would then have pressurised the ships fire main and hydrants (and hoses) in locations near the fire could have been utilised. This would have increased the firefighting capacity and the options for a defensive or offensive strategy.
Firefighting tugs
The PPA ERP provides the following guidance for tug deployment to fight a shipboard fire at a berth:
The Harbour Master will deploy firefighting tugs to assist with firefighting and to protect vessels or other interests in the port. The local VFSR officer will be on board a tug directing fire-fighting operations, while the operational control of the tug remains with the tug master.
However, a VFRS officer was not available on 13 July, as both South Hedland VFRS firefighters were assisting the IC on the berth. Meanwhile, the Port Hedland VFS was transporting the ship firefighting cache to the berth. Consequently, when the harbour master mobilised firefighting tugs, there was no DFES firefighter on board a tug to direct firefighting operations.
Firefighting capabilities in Port Hedland
At the time of the fire, the DFES firefighting capability in Port Hedland consisted of volunteer firefighters: one on duty in Port Hedland (VFS) and two in South Hedland (VFRS). Professional firefighters were stationed in Karratha, about 245 km away, and specialised firefighters (ship entry) in Perth, about 1,650 km away.
In the initial stages of the incident response, only the three volunteer firefighters attended the scene. It is evident that this number of available firefighters in the port could not effectively respond in accordance with agreed emergency plans.
Further, the AO declined the ESO’s suggestion to make an entry into the engine room on the basis that that he required three consecutive temperature reductions before allowing entry. However, had this condition been met and entry was possible, the DFES had no MFASC (ship entry) firefighters on scene to make such entry. It was not until about 24 hours after the fire had started that the Perth-based MFASC brigade arrived on the scene.
The lack of professional firefighters in the area restricted firefighting strategies for tackling shipboard fires in Port Hedland. While MFASC firefighters are trained and equipped to enter confined spaces and suppress fires, volunteer firefighters are trained to contain the fire until additional expertise is available. MFASC firefighters are required for offensive attacks, such as may be required if the ships fixed fire suppression system has been exhausted, or to rescue personnel. Without any MFASC firefighters immediately available, the initial strategy by the first responders would be defensive - regardless of the situation or the need for rescue.
Access control
The DFES procedures required the ship’s engine room and the accommodation atmosphere to be tested to determine the level of post-fire toxins and to provide advice regarding PPE requirements.
The tests measured levels of oxygen (O2), hydrogen sulphide (H2S), carbon monoxide (CO), flammable gases (LEL) and volatile organic compounds (VOC).
The photo ionisation detector (PID) required to test VOCs was normally stored in Karratha. However, at the time of the incident, the Karratha-based professional firefighters were not aware that the PID was in Perth for routine maintenance. This delayed the testing, as an operational PID needed to be air freighted from Perth.
At 2035 on 15 July, DFES officers completed the testing. The O2, H2S, CO and LEL levels were at normal and safe levels. However, the VOCs throughout the ship were above the permissible exposure limits.
Consequently, DFES provided the harbour master with the following advice:
residential decks not suitable for long term exposure (greater than 4 hours)
respiratory masks to be worn
disposable overalls to be worn
gloves to be worn
maintain a hygiene station with soap and water
continue mechanical ventilation.
However, during the time from when the fire started and the atmospheric tests were completed, numerous personnel accessed the ship and spaces within it. These personnel had not been provided with any guidance about hazardous areas or PPE requirements. Further, most crewmembers had slept on board overnight – many of them inside the affected accommodation.
The delay in atmospheric testing meant that anyone who was on board during the 53 hours after the fire started had been potentially exposed to unmitigated, hazardous conditions.
From the evidence available, the following findings are made with respect to the engine room fire on board Marigold while the ship was loading cargo in Port Hedland, Western Australia on 13 July 2014. These findings should not be read as apportioning blame or liability to any particular organisation or individual.
Safety issues, or system problems, are highlighted in bold to emphasise their importance. A safety issue is an event or condition that increases safety risk and (a) can reasonably be regarded as having the potential to adversely affect the safety of future operations, and (b) is a characteristic of an organisation or a system, rather than a characteristic of a specific individual, or characteristic of an operating environment at a specific point in time
Contributing factors
At about 1447 on 13 July 2014, a fire started on Marigold’s number 1 diesel generator after a fuel oil pressure gauge compression fitting failed. Pressurised fuel oil escaping from the fitting then ignited after it came in contact with a sufficiently hot surface on the generator.
The compression fitting that failed had been used to connect a replacement pressure gauge that had a different pipe connection fitting size to the original pressure gauge.
A number of Marigold’s engine room fire doors were held open by wire and/or rope. The open doors allowed the smoke to spread across the engine room and into the accommodation spaces. [Safety issue]
The maintenance of the opening/closing arrangements for Marigold’s engine room fire dampers, ventilators and other openings was inadequate. A number of these could not be closed, resulting in the inability to seal the engine room to contain and suppress the fire. [Safety Issue]
Marigold’s Halon gas fixed fire suppression system for the engine room was not fully operational. The multiple failures of the system at the time of the fire were not consistent with proper maintenance and testing. [Safety Issue]
Marigold’s shipboard procedures for crew induction, familiarisation, fire drills and safety training were not effectively implemented. As a result, the ship’s senior officers were not sufficiently familiar with the Halon system’s operation. They did not identify its partial failure and did not activate the override function. [Safety Issue]
Other factors that increased risk
Port Hedland’s emergency response teams did not use the ship’s international shore fire connection. As a result, Marigold’s fire main was not pressurised with water from ashore. [Safety Issue]
The emergency response plans for a ship fire in Port Hedland did not clearly define transfer of control procedures for successive incident controllers from different organisations or contain standard checklists for their use. [Safety Issue]
The large size and weight of the ship firefighting cache made it difficult for the duty Port Hedland volunteer firefighter to transport it to the wharf. [Safety Issue]
Shutting down Marigold’s emergency generator cut power to the ship’s fire pump and systems and reduced the available firefighting resources and capacity.
Contrary to the ship’s procedures and accepted safe practice, some crew members used the lift to evacuate the engine room after the fire started.
Suitable atmospheric testing equipment was not available in Port Hedland to ensure safe entry to fire-affected spaces on board Marigold. Access to these areas was not controlled until 53 hours after the fire. [Safety Issue]
The limited professional firefighting capability in Port Hedland restricted the ability to launch an effective response to the fire on board Marigold. [Safety Issue]
Safety issues and actions
The safety issues identified during this investigation are listed in the Findings and Safety issues and actions sections of this report. The Australian Transport Safety Bureau (ATSB) expects that all safety issues identified by the investigation should be addressed by the relevant organisation(s). In addressing those issues, the ATSB prefers to encourage relevant organisation(s) to proactively initiate safety action, rather than to issue formal safety recommendations or safety advisory notices.
All of the directly involved parties were provided with a draft report and invited to provide submissions. As part of that process, each organisation was asked to communicate what safety actions, if any, they had carried out or were planning to carry out in relation to each safety issue relevant to their organisation.
The initial public version of these safety issues and actions are repeated separately on the ATSB website to facilitate monitoring by interested parties. Where relevant the safety issues and actions will be updated on the ATSB website as information comes to hand.
Fire doors
A number of Marigold’s engine room fire doors were held open by wire and/or rope. The open doors allowed the smoke to spread across the engine room and into the accommodation spaces.
The maintenance of the opening/closing arrangements for Marigold’s engine room fire dampers, ventilators and other openings was inadequate. A number of these could not be closed, resulting in the inability to seal the engine room to contain and suppress the fire.
Marigold’s Halon gas fixed fire suppression system for the engine room was not fully operational. The multiple failures of the system at the time of the fire were not consistent with proper maintenance and testing.
Marigold’s shipboard procedures for crew induction, familiarisation, fire drills and safety training were not effectively implemented. As a result, the ship’s senior officers were not sufficiently familiar with the Halon system’s operation. They did not identify its partial failure and did not activate the override function.
Port Hedland’s emergency response teams did not use the ship’s international shore fire connection. As a result, Marigold’s fire main was not pressurised with water from ashore.
The emergency response plans for a ship fire in Port Hedland did not clearly define transfer of control procedures for successive incident controllers from different organisations or contain standard checklists for their use.
Suitable atmospheric testing equipment was not available in Port Hedland to ensure safe entry to fire-affected spaces on board Marigold. Access to these areas was not controlled until 53 hours after the fire.
The large size and weight of the ship firefighting cache made it difficult for the duty Port Hedland volunteer firefighter to transport it to the wharf.
The sources of information during the investigation included:
Marigold’s master and directly involved crewmembers
Port Hedland’s harbour master and shipping superintendent
Port Hedland Pilots
BHB Billiton marine manager and emergency services supervisors
The Korean Register of Shipping.
References
Government of Western Australia, Department of Transport, Western Australia, Port Authorities Act 1999 (WA), WADOT, Perth. Available from
Government of Western Australia, Department of Fire and Emergency Services, 2013, Marine Fire Emergency Response Guide, WADFES, Perth.
Government of Western Australia, Department of Fire and Emergency Services, 2013, Directive 3.18 Land Based Marine Firefighting, WADFES, Perth.
Government of Western Australia, Department of Fire and Emergency Services, 2014, Marine Firefighting – Learners Manual, WADFES, Perth.
Government of Western Australia, Department of Transport, Western Australia, 2011, State Emergency Management Plan for Marine Transport Emergency (WESTPLAN – MTE), WADOT, Perth. Available fro:
Government of Western Australia, Department of Fire and Emergency Services, 2013, State emergency management plan for fire (WESTPLAN – Fire), WADFES, Perth. Available from
International Maritime Organisation, 2015, The International Convention for the Safety of Life at Sea(SOLAS) 1974, as amended, IMO, London.
Port Hedland Port Authority, Emergency Response Procedure, Pilbara Port Authority. Available from
BHP Billiton Iron Ore, 2014, Security & Emergency Management, Emergency Management Plan, Part 1 Version 2.0, BHP Billiton.
BHP Billiton Iron Ore, 2014, Health & Safety, Crisis and Emergency Management Version 2.0, BHP Billiton.
Submissions
Under Part 4, Division 2 (Investigation Reports), Section 26 of the Transport Safety Investigation Act 2003 (the Act), the Australian Transport Safety Bureau (ATSB) may provide a draft report, on a confidential basis, to any person whom the ATSB considers appropriate. Section 26 (1) (a) of the Act allows a person receiving a draft report to make submissions to the ATSB about the draft report.
A draft of this report was provided to:
Marigold’s master and directly involved crewmembers
the Korea Leading Company of Ship Management
Port Hedland’s harbour master and shipping superintendent
Port Hedland Pilots
BHB Billiton marine manager and emergency services supervisors
Department Fire and Emergency Services (DFES) Superintendent
Australian Maritime Safety Authority.
Submissions were received from:
the Korea Leading Company of Ship Management
Port Hedland’s harbour master and shipping superintendent
BHB Billiton marine manager
Australian Maritime Safety Authority.
The submissions were reviewed and where considered appropriate, the text of the report was amended accordingly.
Purpose of safety investigations
The objective of a safety investigation is to enhance transport safety. This is done through:
identifying safety issues and facilitating safety action to address those issues
providing information about occurrences and their associated safety factors to facilitate learning within the transport industry.
It is not a function of the ATSB to apportion blame or provide a means for determining liability. At the same time, an investigation report must include factual material of sufficient weight to support the analysis and findings. At all times the ATSB endeavours to balance the use of material that could imply adverse comment with the need to properly explain what happened, and why, in a fair and unbiased manner. The ATSB does not investigate for the purpose of taking administrative, regulatory or criminal action.
Terminology
An explanation of terminology used in ATSB investigation reports is available here. This includes terms such as occurrence, contributing factor, other factor that increased risk, and safety issue.
Publishing information
Released in accordance with section 25 of the Transport Safety Investigation Act 2003
Ownership of intellectual property rights in this publication
Unless otherwise noted, copyright (and any other intellectual property rights, if any) in this report publication is owned by the Commonwealth of Australia.
Creative Commons licence
With the exception of the Coat of Arms, ATSB logo, and photos and graphics in which a third party holds copyright, this publication is licensed under a Creative Commons Attribution 3.0 Australia licence.
Creative Commons Attribution 3.0 Australia Licence is a standard form licence agreement that allows you to copy, distribute, transmit and adapt this publication provided that you attribute the work.
The ATSB’s preference is that you attribute this publication (and any material sourced from it) using the following wording: Source: Australian Transport Safety Bureau
Copyright in material obtained from other agencies, private individuals or organisations, belongs to those agencies, individuals or organisations. Where you wish to use their material, you will need to contact them directly.
Preliminary report
Report release date: 23/10/2014
The information contained in this Preliminary report is released in accordance with section 25 of the Transport Safety Investigation Act 2003 and is derived from the ongoing investigation of the occurrence. Readers are cautioned that new evidence will become available as the investigation progresses that will enhance the ATSB's understanding of the accident as outlined in this Preliminary report. As such, no analysis or findings are included in this report.
What happened
On 13 July, a fire started in the engine room of bulk carrier, Marigold while it was berthed at Port Hedland, Western Australia. The evidence indicates that a fuel oil pipe coupling on number one diesel generator had failed. Pressurised fuel oil and mist from the coupling ignited and resulted in a fire around the generator turbocharger.
Attempted firefighting measures included deploying the ship’s Halon gas fixed fire suppression system for the engine room. However, a full release of Halon gas did not occur and the engine room was not properly closed. Consequently, the fire continued for about 12 hours until it burnt itself out.
The investigation is ongoing and will focus on determining:
confirming the cause of the fire
reason/s for the partial failure of the Halon system
maintenance of the ship’s firefighting equipment and appliances
ship’s emergency response, including preparedness
shore emergency response, including coordination and capability.
On 13 July 2014, the pilot of a Cessna 172 aircraft, registered VH-EEC, conducted a private flight from The Lily to Narrikup aeroplane landing areas (ALA), Western Australia, with two passengers on board.
At about 1320 Western Standard Time, the pilot broadcast an inbound call when about 10 NM north-east of Narrikup at about 6,500 ft above mean sea level (AMSL). The pilot elected to conduct an approach to runway 06 and overflew the runway at about 1,900 ft AMSL. He observed the windsock which did not indicate any significant crosswind. The aircraft then descended to circuit height and joined on the crosswind leg for runway 06.
When established on final for runway 06, the pilot reported that he had selected two stages of flap and had the aircraft stabilised at about 65 kt. When about 50 ft above ground level, the pilot reported that the aircraft encountered a wind gust which carried the aircraft about 30 m to the right. The pilot moved the aileron controls into wind and applied full power to commence a go-around; however, the aircraft’s right wing collided with trees on the right side of the landing area. The pilot reported that the right wing may have stalled as he applied full right aileron. The aircraft fell to the ground resulting in substantial damage.
This incident highlights the importance of being ready to conduct an early go-around when a pilot is not completely satisfied that a safe landing can be made.
On 12 July 2014, a pilot was undergoing training for mustering approval by a supervising pilot in a Robinson R22 helicopter, registered VH-ZZM. After completing about 7 hours of mustering, the helicopter was returning to a homestead near Dingo, Queensland, when about 1,000 ft above ground level (AGL) the supervising pilot instructed the pilot to conduct a practice autorotation turning through 180°, which the pilot completed, increasing power when at about 5 ft AGL.
During the subsequent climb, when at about 450 ft AGL, the supervising pilot took control of the helicopter and initiated a second autorotation. The supervising pilot initially observed the airspeed at about 65 kt, the rotor rpm in the green arc and the autorotation ‘looking good’, and assumed at this stage that he had handed control of the helicopter to the other pilot. At about 100 ft AGL, the pilot detected the rotor rpm decaying and a rapid rate of descent, but still assumed that the supervising pilot had control of the helicopter. When at about 20-40 ft AGL, the supervising pilot observed the vertical speed increasing and the rotor rpm decreasing and rapidly lowered the collective and increased the throttle. Just prior to the helicopter contacting the ground, the supervising pilot flared then levelled the helicopter and raised the collective.
The helicopter landed hard, bounced once and rotated through about 180° before coming to rest. The pilot sustained serious injuries and the supervising pilot minor injuries. The helicopter was substantially damaged.
This incident highlights the importance of good communication between a flight instructor and their student and the use of handover/takeover techniques to clarify who has control of the aircraft at any time.
At about 0419 on 6 July 2014, in clear visibility, the container ship Kota Wajar collided with the yacht Blazing Keel in Moreton Bay. The ship was southbound in the shipping channel while the yacht was crossing the channel in a southwest direction.
The yacht suffered extensive collision damage but its watertight integrity was maintained. The two persons on board were not injured and the yacht safely returned to its marina.
What the ATSB found
The ATSB found that no one on board either Kota Wajar or Blazing Keel saw or otherwise detected the other vessel before the collision. Neither vessel had maintained a proper lookout in accordance with the international regulations for preventing collisions at sea (COLREGS).
The investigation found that Kota Wajar’s safety management system (SMS) procedures requiring a dedicated lookout were not effectively implemented and a lookout was not posted. In addition, radar was not appropriately used. The high workload of the ship’s bridge team and local conditions, such as background lights ashore, were factors in not detecting the yacht.
The investigation identified that the visual lookout kept by Blazing Keel’s crew was ineffective. Furthermore, the yacht’s night passage was undertaken without radar (which had been inoperational for 18 months) and its diving trip was not properly planned or executed.
It was also found that Brisbane Marine Pilots’ standard passage plan and master-pilot exchange does not ensure that the ship’s bridge team is provided adequate information with respect to local traffic and areas where attention should be paid to small craft.
What's been done as a result
Kota Wajar’s managers, Pacific International Lines, Singapore advised the ATSB that action to better implement SMS procedures with regard to posting a lookout was being taken. Monitoring and verification of compliance with the procedures would be enhanced through unannounced audits, including the retrieval and playback of voyage data recordings. In addition, records of bridge activities, including attendance logs, would be reviewed in detail during routine audits.
Brisbane Marine Pilots (BMP) advised the ATSB that its standard passage plan has been amended to clarify responsibility for maintaining a good lookout by sight and radar. Bridge team engagement and communicating small craft interaction will be emphasised through the master-pilot-bridge team exchange and monitored through BMP’s check pilot system. The pilotage company has also decided to review and amend its pre-arrival information for masters, to emphasise the small vessel interaction risk.
In response to the continuing safety issue around maintaining an effective and proper lookout when navigating in Australian waters, the ATSB has issued a safety advisory notice (SAN) to the masters, owners, operators and skippers of all vessels. Consistent with COLREGS requirements, the SAN reinforces the importance of taking all necessary measures to ensure that a proper lookout is kept at all times, and early avoiding action is taken to prevent collision.
Safety message
Across the past 26 years, investigations into 41 collisions between trading ships and small vessels on the Australian coast have identified that maintaining a proper lookout, using all available means in accordance with the COLREGS, is paramount to preventing collisions. In pilotage waters, pilots have a role in highlighting local traffic areas, patterns and conditions to the ship’s bridge team.
The occurrence
At 1300[1] on 5 July 2014, the 185 m long container ship, Kota Wajar (cover), anchored off the Port of Brisbane, Queensland, after a sea passage from Tauranga, New Zealand. The ship was scheduled to embark a harbour pilot on the following day to berth in Brisbane.
At that time, the 44 foot (13.4 m) yacht, Blazing Keel (Figure 1) was making its way east across Moreton Bay (Figure 2). The yacht, a single-masted cutter equipped with a diesel engine, had left Newport Marina in the Redcliffe area about 2 hours earlier. The yacht’s skipper (and owner) and his wife were on board. They had planned to dive on Curtin Artificial Reef off Moreton Island on the following day (Sunday) as they had many times in the past.
Figure 1: Blazing Keel
Source: Queensland Police Service
Figure 2: Moreton Bay, Port of Brisbane
Source: Port of Brisbane Corporation (annotated by ATSB)
At about 1700, the yacht arrived near the diving destination north of Cowan Cowan Point, where it was then anchored. Weather conditions were good with a light (5 knots)[2] northerly wind, partly cloudy sky and clear visibility. By 1900, the skipper and his wife had turned in for the night.
At about 0030 on 6 July, the skipper awoke and went out on Blazing Keel’s deck. The wind was now from the west-southwest at about 10 knots. Over the next hour, the skipper felt that the sea was becoming rougher in the strengthening wind. By 0130, the wind was gusting to 14 knots.
Meanwhile Kota Wajar’s crew were weighing anchor in preparation to embark its scheduled pilot. The anchor was aweigh at 0200 and, at 0224, the pilot boarded the ship from a pilot boat.
At 0226, the pilot arrived on the ship’s navigation bridge, exchanged information with the master and took over the conduct (con) of the ship. He also provided the master the standard passage plan for the 48 mile[3] pilotage to the ship’s berth at Fisherman Islands, near the entrance to the Brisbane River. The second mate (the officer of the watch) and the duty seaman, who was hand steering the ship, were the other members of the bridge team. The fourth mate, the junior-most deck officer on board, who had been on the bridge since 0130 in preparation for pilot boarding, then left the bridge to rest.
By 0230, Kota Wajar was on a heading[4] of 200° towards the entrance of the shipping channel. The ship’s speed[5] was 11 knots and increasing. At 0250, it passed the NW Fairway beacon and entered the North West Channel (Figure 2).
At 0315, the ship passed NW6 beacon making good 17 knots (as per its passage plan for the Moreton Bay transit). The pilotage was progressing as planned and there were no other ships in the channel nearby. At about this time, the master left the bridge.
Meanwhile, Blazing Keel’s anchor chain started to pay out in the now westerly, 15 knot wind gusts and increasingly rough seas. The skipper decided to weigh anchor and return to Newport Marina under power using the yacht’s engine rather than setting its sails in the windy conditions.
At about 0330, the yacht’s anchor was aweigh and the skipper started its engine. He turned on the yacht’s navigation lights, checked that they were lit and set a southerly course towards Cowan Cowan Point. The yacht made good about 4.5 knots and the skipper and his wife remained in its cabin from where they could look out through the cabin windows.
At 0400, Kota Wajar was transiting the Main Channel (Figure 3) when the routine change of bridge watch took place. The chief mate took over the watch from the second mate. The fourth mate had returned to the bridge to gain watchkeeping experience and assist the chief mate. The helmsman (duty seaman) had also changed.
The pilot was using visual cues, the ship’s radar and his portable pilotage unit (PPU) to conduct the pilotage. He stood on the starboard side of the bridge near the radar and his PPU, and had a clear view out of the bridge front windows. When a course alteration was needed, he moved to a conning position near the centreline gyro compass repeater. The chief mate stood near the radar and, from to time, checked the ship’s position being plotted on the navigational chart by the fourth mate. The fourth mate was also assisting with the keeping of a visual lookout.
The ship was on a heading of 162° after an uneventful passage through the North West and Spitfire Channels. It was a dark night (the moon had set before midnight) and the visibility remained good. The nearest ship, the dredger Charles Darwin, about 8 miles away, was dredging in the East Channel.
By 0400, Kota Wajar’s radar was consistently displaying Blazing Keel’s radar echo. The yacht was about 30 degrees on the ship’s port bow and 4.5 miles away. No one on the bridge had detected the yacht visually or by radar.
By 0410, the distance between Kota Wajar and Blazing Keel had closed to 2.2 miles. The ship’s heading was now 139° with Cowan Cowan Point lighthouse directly ahead, M6 beacon to port and the yacht fine on its port bow. The bridge team remained unaware of the approaching yacht.
At 0413, Blazing Keel crossed 1.6 miles ahead of the ship (that is, from the ship’s port bow to its starboard bow). The skipper and his wife did not see any ships in the channel and he decided to cross it near M7 beacon. By 0415, the yacht was on a south-westerly course at 4.5 knots.
Meanwhile, Kota Wajar arrived off M5 beacon and, at 0415, its course was altered. By 0416, the ship was on a heading of 162° towards M7 beacon. The brightly lit Charles Darwin was conspicuous about 5 miles away, 22 degrees on the ship’s starboard bow. Blazing Keel was once again on the ship’s port bow (12 degrees) and about 0.8 of a mile away. The ship and yacht were on a collision course. No one on board either vessel was aware of the close-quarters situation.
Figure 3: Section of navigational chart Aus 236 showing the tracks of both vessels
Source: Australian Hydrographic Service (annotated by ATSB using electronically recorded data)
The distance between Kota Wajar and Blazing Keel rapidly closed as they approached M7 beacon. At 0418½, when the ship was near the beacon, the pilot began conning to alter course in order to follow the channel on a 185° heading. By 0419, the ship’s heading was 177° with the undetected yacht less than 100 m away on its port bow and closing.
Blazing Keel’s skipper and his wife had not seen the rapidly approaching ship.
At 0419½, as Kota Wajarwas steadied on a heading of 185° in a position immediately east of M7 beacon, it collided with Blazing Keel. The port side of the ship’s bulbous bow first made contact with the starboard side of the yacht, which was on a heading of about 225°.
Blazing Keel’s skipper only realised what had happened when he saw the ship’s dark hull illuminated by the yacht’s aft cabin and galley lights. He quickly put the rudder over to port and the engine throttle to full in an attempt to get clear of the ship. The yacht remained alongside the ship for about 30 seconds, bumping and scraping against its hull, until the curve of the ship’s stern had passed.
Once the yacht was astern of Kota Wajar, the skipper saw bright lights at its stern but could not read the ship’s name. He reduced the yacht’s speed to about 4 knots, checked that its steering was working and confirmed that he and his wife had not been injured. He then asked his wife to check the yacht for damage and leaks.
No one on board Kota Wajar saw or heard the collision or become aware of the yacht nearby. As the ship was steadied on a heading of 185°, the bright lights of Charles Darwin were now fine on the starboard bow (bearing 189°). The dredger was returning to port with an expected entry time earlier than the ship.
The ship continued its passage along the channel as planned.
By 0421, Blazing Keel’s skipper had set a southerly course along the channel while his wife was checking for damage. The skipper attempted to call Redcliffe coastguard using a handheld VHF radio but got no response. He then broadcast an urgency message to all stations on channel 16 and again received no response.
At about 0425, the skipper’s wife reported damage on Blazing Keel’s starboard side, including its mast and rigging, but no water ingress. The skipper shone a torch out on the rigging and noted significant damage. He then checked the yacht’s bilges and found them dry. Satisfied that the hull was watertight, he decided to resume the passage to the marina. By 0427, he had set a south-westerly course.
Shortly after 0500, Kota Wajar’s master returned to the bridge. At about 0518, the ship’s speed was reduced as it approached the port. By 0612, the ship had been secured alongside its berth and the pilot left shortly afterwards.
At 0630, Blazing Keel’s skipper established radio contact with Redcliffe coastguard and reported the collision. By 0730, the yacht had berthed in Newport Marina and the skipper then completed a thorough inspection of the yacht. There was extensive hull damage on its starboard side, both above and below the waterline, and the ship’s red boot-topping paint marks were clearly visible. The handrails, rigging and a number of mast stays and spreaders were damaged.
Shortly thereafter, the skipper and his wife attended the local water police station to provide their statements to the police. The time, location and other details of the collision were then passed on by the police to the port authority and others to follow up with involved parties.
At about 0800, Kota Wajar’s pilot was advised by the pilot office that the ship had collided with a yacht at about 0430 off Cowan Cowan Point. The ship’s master was also advised of the collision. The yacht’s blue and white paint marks were clearly visible near the waterline on the ship’s bulbous bow and along the port side in a number of places.
The fully cellular, 1,550 TEU[6]Kota Wajarwas fitted with navigational equipment required for a ship of its size under SOLAS.[7] The two Kelvin Hughes radars, an x-band MK 5 and an s-band MK 7, had automatic radar plotting aid (ARPA) and other target tracking functions. Both radars also had data input from the ship’s automatic identification system (AIS) transceiver and global positioning system (GPS) receiver unit.
At the time of the collision, Kota Wajar was managed by Pacific International Lines, Singapore (PIL) which operates a large fleet of container ships. The container ship was on a regular service between ports in Asia and Australia and had called in Brisbane about once a month during the last 6 months. Its crew of 22 comprised nationals of China, Ghana, India, Indonesia, Myanmar, Poland and Sri Lanka.
The master was from Poland and held a Polish master’s certificate of competency. He had been at sea for 32 years of which the last 12 had been as master. He had been sailing on PIL container ships for 18 years. He had joined Kota Wajar about 5 months before the incident.
The chief mate was from Myanmar, where his master’s certificate of competency was issued, and had been at sea for 10 years. He had sailed as chief mate for 5 years, the last 1 year of which had been on PIL container ships. He had been on board Kota Wajar for about 2 months.
The Chinese fourth mate held a Class 3 certificate of competency for a watch keeping officer. He started his seagoing career with PIL about 14 months before the incident. He had been on board Kota Wajar for about 2 months and it was his first assignment as fourth mate.
The duty seaman at the time of collision was Indonesian. He had been at sea for 12 years, all of which had been on board PIL container ships. He had been on board Kota Wajar for 9 months.
Blazing Keel
Blazing Keel, a single-masted cutter with a steel hull, was registered in Queensland at the time of the collision. The yacht was equipped with an 85 horsepower diesel engine. Its principal means of navigation was a GME G-Combo G142CFD electronic chart plotter (incorporating a GPS receiver) and a compass. The yacht was fitted with a Koden MD-3000 radar but it had not been operational for about 18 months.[8]
Blazing Keel’s skipper and his wife were residents of Brisbane. Both had held a Queensland recreational marine driver licence (RMDL) for about 10 years. They had also held powerboat licences (to operate a ski boat) for about 25 years. In 2008, the skipper had attended a training course to obtain a skipper’s licence for inshore waters.
The skipper had owned Blazing Keel for about 3 years. His experience of sailing a yacht in Moreton Bay was limited to this period. The experience of his wife, who routinely sailed with him, was similar.
Navigation lights
The International Regulations for the Prevention of Collisions at Sea, 1972, as amended (COLREGS) require all vessels to exhibit specific lights (commonly known as navigation lights) from sunset to sunrise.
The navigation lights of a power-driven vessel underway consist of a masthead light[9] forward, a second masthead light abaft of, and higher than the forward one (mandatory for vessels 50 m or more in length), sidelights[10] and a sternlight.[11]Kota Wajar was required to exhibit all of these lights. At the time of the collision, the working lights along the ship’s cargo hold hatch coamings and flood lights at its stern were also on.
When the collision occurred,Blazing Keel was being powered by its engine and its sails were not set. As a power-driven vessel that was not less than 12 m in length, it was required to exhibit a masthead light, sidelights and a sternlight. The yacht was fitted with a masthead light, sidelights near its bow and a sternlight aft. In addition to these lights, the skipper stated that he had turned on the ‘tricolour’ light on the mast. He was referring to the combined lantern that is permitted for a sailing vessel of less than 20 m in length.[12]
Port of Brisbane
The Port of Brisbane is Queensland’s largest multi-cargo port and one of Australia’s fastest growing container ports. At present, more than 2,600 ships call in Brisbane each year. The port is approached through Moreton Bay and the container terminal is located at Fisherman Islands at the mouth of the Brisbane River.
The shipping channels in Moreton Bay are dredged to maintain depths and are marked by beacons and buoys (fitted with lights). Frequent changes to the shoals, channels and navigation marks (aids) make local knowledge essential for safe navigation. Ships of 50 m or more in length (unless exempted) are required to take a pilot.
Pilotage is provided by Brisbane Marine Pilots (BMP) under the regulatory regime of Maritime Safety Queensland. Ships can transit Moreton Bay at their sea speed (and often do) if the master and pilot agree after considering the prevailing conditions, under-keel clearance, scheduling and traffic. Traffic in the bay regularly includes fishing and recreational craft from a number of marinas and small boat harbours the area. Moreton Island and the waters of its western shores are popular recreational areas.
Kota Wajar’s pilot first went to sea in 1980. His seagoing career as a deck officer included experience as a ship’s master. He began piloting in the late 1990s and, in 2003, joined BMP. At the time of the incident, he had held an unrestricted pilot’s licence for Brisbane for about 9 years.
At 0419½ on 6 July 2014, in clear visibility, the container ship Kota Wajar collided with the yacht, Blazing Keel in Moreton Bay. The ship was southbound in the shipping channel while the yacht, powered by its engine, was crossing the channel in a southwest direction. The yacht suffered extensive damage but maintained its watertight integrity. The two persons on board were not injured and the yacht safely returned to its marina.
No one on board either vessel saw or otherwise detected the other before the collision.
Keeping a lookout
The COLREGS provide internationally agreed rules and measures to prevent collisions at sea. In general, the regulations apply to all vessels and in all waters. Both Kota Wajar and Blazing Keel had to comply with these regulations while navigating Moreton Bay. As the vessels did not sight each other, the matter of applying rules for taking action to avoid collision did not arise. The key requirement to keep a lookout, however, did apply and was a focus of the ATSB investigation.
With respect to keeping a lookout, COLREGS Rule 5 - Look-out, states:
Every vessel shall at all times maintain a proper look-out by sight and hearing as well as by all available means appropriate in the prevailing circumstances and conditions so as to make a full appraisal of the situation and of the risk of collision.
Rule 5 clearly states the purpose of maintaining a lookout and summarises how a lookout should be kept. Effective compliance with the rule relies on a complete and thorough understanding of the COLREGS to ensure that all relevant matters are taken into account. This understanding should be a core competency for those in charge of a navigational watch on ships – something their seagoing qualifications aim to ensure. Similarly, qualifications to operate small recreational craft, including yachts, aim to ensure a sound understanding of the COLREGS to prevent collisions.
An all-round lookout by sight and hearing (inside and outside the bridge) is necessary at all times. Other available means to maintain and enhance keeping a lookout usually include radar, AIS and traffic information from other sources, such as radio broadcasts and ship to ship calls. An effective lookout can ensure the early detection of targets, making possible a full and timely appraisal of the situation and of the risk of collision.
The prevailing circumstances and conditions include the factors that should be considered to keep an effective lookout. Many of these factors are identifiable within the COLREGS; for example Rule 6 - Safe speed, lists several factors that are also relevant to keeping a lookout. Other matters that should be taken into account rely on the practice of good seamanship and an appropriate level of nautical knowledge. Factors relevant to keeping an effective lookout include the:
state of visibility (and using radar to better assess it when restricted by fog, rain or other cause)
time of day (day, night or twilight)
background lights (shore lights or back scatter from own lights)
expected traffic in the area (open sea, coastal passage, port or harbour)
traffic density, including concentrations of fishing and other vessels, including small craft
manoeuvrability of the vessel (including stopping distance and turning ability) and its draught
state of the wind, sea and current, and the proximity of hazards such as shoals and reefs
characteristics, efficiency and limitations of radar (including its range and any interference)
type, capability and limitations of the AIS unit (and features of other vessels’ AIS units)
available local knowledge and information (sailing directions, pilot and other sources)
traffic information via radio (ship to ship calls, all ship broadcasts and schedules).
It is worth noting here that a number of the factors listed above are interrelated. For example, radar significantly enhances keeping a lookout, particularly when visibility is restricted by fog, rain or other conditions, and during darkness. Equally, the lack of radar as an available means to keep a lookout on some small vessels needs to be taken into account.
The COLREGS are supported by a number of other requirements and guidelines for mariners. The STCW Code[13] provides mandatory watchkeeping standards applicable to ‘seagoing ships’, which includes all commercial vessels in domestic or international trade but not recreational craft. The Code requires that a proper lookout is maintained at all times in compliance with Rule 5 of the COLREGS, and comprehensively covers the subject, including the factors discussed above.[14]
The Code requires that the lookout be able to give full attention to lookout duties and not be assigned or undertake any duties which could interfere with that task. It clarifies that the duties of a lookout and helmsperson on a ship are separate. The Code permits the officer of the watch (OOW) to be the sole lookout in daylight (in good conditions) which implies that another person should be posted as a lookout in darkness. It also states that the master and the OOW, when arranging lookout duty for the hours of darkness, shall have due regard to the bridge equipment and navigation aids available, their limitations, procedures and safeguards implemented.
The Bridge Procedures Guide[15] brings together the good practice of seafarers with the aim of improving navigational safety and protecting the environment. The publication is acknowledged as the principal industry guidance on the subject and is widely used internationally to support shipboard safety management systems (SMS). It refers to both the COLREGS and the STCW Code and covers all the relevant subjects, including keeping a lookout. The guide is consistent with the requirements of both in terms of what constitutes a proper lookout and the factors to be considered, including restrictions with respect to a sole lookout.
In essence, keeping a lookout in accordance with the COLREGS is mandatory, and fundamental to preventing collisions. The STCW Code provides watchkeeping standards for seagoing ships, including keeping a proper lookout. In addition to other available means of keeping watch, posting a dedicated visual lookout (that is, by sight) during the hours of darkness, in restricted visibility and when warranted by other circumstances or conditions, is necessary.
Kota Wajar’s lookout
Kota Wajar’s SMS procedures[16] quoted extensively from the COLREGS and the STCW Code with respect to bridge watchkeeping and maintaining a lookout. The procedures were consistent with the Code with regard to the OOW being the sole lookout in daylight. The standard watchkeeping arrangement included a seaman as the dedicated lookout on each navigational watch. It was clearly stated that ‘the duties of the person on lookout and helmsman were separate and the helmsman should not be considered the person on lookout while steering’.[17]
The shipboard procedures required the OOW to comply with the COLREGS at all times, including ensuring that a good lookout was maintained. Detailed guidance on the proper use of radar was included. The OOW was required to ‘give watchkeeping personnel all appropriate instructions and information necessary for maintaining a safe watch, including a proper lookout’.[18] This instruction, when appropriately applied, should result in the dedicated visual lookout being given relevant information, particularly in relation to checking for targets detected by radar or AIS but not yet sighted.
Events and conditions on 6 July 2014
At the time of the collision, Kota Wajar’s bridge team comprised the pilot, chief mate, helmsman and the fourth mate, whose main task was to assist the chief mate. As the OOW, the chief mate was responsible for ensuring that a proper lookout was kept in the prevailing circumstances and conditions. The ship was navigating the approaches to the Port of Brisbane during the hours of darkness under the conduct of a pilot. Those conditions warranted posting a dedicated visual lookout and using other available means to maintain a lookout, including radar and AIS.
In this instance however, no one was assigned the duties of a dedicated visual lookout. The pilot and the chief mate were stationed just aft of the bridge front windows near the x-band radar. The s-band radar inside the chartroom was mainly used for position fixing by the fourth mate. The helmsman was steering the ship as per the pilot’s helm and course (heading) orders.
The x-band radar’s main display was set to its north-up, relative motion mode on a 6 mile range scale (Figure 4). The display was set up to show the planned tracks and track limits (in red). The ‘trail’ function was set to indicate the true motion of targets over the past 10 minutes (so moving targets left trails on the display). Trails make a target more conspicuous and distinguish it from sea clutter. The electronic bearing line (EBL) and variable range marker (VRM) were not switched on. The cursor had been placed near the edge of the display on a 099° bearing.
Figure 4: Kota Wajar’s x-band radar’s main display at 0400 on 6 July 2014
Source: Kota Wajar’s voyage data recorder (VDR) with ATSB annotations
Over a 5 minute period around 0400 on 6 July, the second mate handed over the watch to the chief mate. The duty helmsman had changed some time earlier. Between 0357 and 0358, Kota Wajar’s course was altered from 109° to 162° and its position at 0358 was plotted on the chart. By 0400, about 20 minutes before the collision, Blazing Keel’s radar echo was consistently appearing on the x-band radar’s display, about 30 degrees on the port bow at a range of 4.5 miles. None of the three mates or the pilot saw the yacht’s echo or, if they did, paid any attention to it.
Between 0404 and 0405, after the second mate had left the bridge, the ship’s course was altered from 162° to 139°. Its position at 0405 was plotted on the chart by the fourth mate. On its 139° heading, the flashing white light of Cowan Cowan Point lighthouse was nearly ahead. The chief mate remained near the x-band radar, from where he could monitor, amongst other things, the pilot’s helm orders and the ship’s progress along the planned track.
By 0410, Blazing Keel was fine on the ship’s port bow and 2.2 miles away (Figure 5). At 0413, the yacht was right ahead of Kota Wajar, crossing to its starboard bow. Shortly before 0415, the pilot began conning the ship to its next course of 162°. As the ship’s heading changed to starboard, the yacht was once again on its port bow. At 0415, the yacht was 1.1 miles away, fine on the port bow (Figure 6). Its radar echo and trail remained readily discernible, distinct from sea clutter.
Figure 5: Section of radar display at 0410
Source: Kota Wajar’s VDR (annotated by ATSB)
Figure 6: Section of radar display at 0415
Source: Kota Wajar’s VDR (annotated by ATSB)
Rule 22 of the COLREGS - Visibility of lights, specifies the minimum visibility ranges for a vessel’s navigation lights, depending on its length. Blazing Keel’s masthead light was required to be visible at least 3 miles off, and its sidelights and sternlight at least 2 miles off. Therefore, by 0410, when the yacht was about 2 miles off, its navigation lights should have been visible from Kota Wajar’s bridge. By 0415, when the yacht was about 1 mile off, its lights should have been readily visible.
However, no one on the ship’s bridge said that they saw the yacht’s lights. By 0416, the pilot had ordered the helmsman to steady the ship on a 162° heading. The fourth mate had plotted the position at 0412 and remained occupied with his position fixing tasks. The chief mate remained near the x-band radar. Information recorded by the ship’s voyage data recorder (VDR) indicates that the radar’s EBL, VRM, cursor and its ARPA function were not used in the time leading up to the collision. This suggests that the radar was not actively used to monitor any detected targets.
As its distance closed, Blazing Keel’s echo continued to appear on the x-band radar. At 0418, it was 0.3 of a mile off, fine on the ship’s port bow with its bearing closing. Shortly afterwards, the pilot began conning the ship to its next course of 185°. At 0419½, just as the ship was steadied on a 185° heading, it collided with the yacht. No one on the bridge saw anything to suggest that a collision had occurred. The bridge wing doors were open but nothing was heard.
Why Blazing Keel went undetected
While the chief mate and the pilot had opportunities to sight the yacht out of the bridge windows or see its echo on the x-band radar, they did not. From the ATSB’s analysis, the main reasons and factors why they did not detect the yacht (some applicable to other bridge team members) were:
a dedicated visual lookout was not posted
background shore lights on Moreton Island
distraction from Charles Darwin’s bright lights
focus on navigation aid lights (beacons and others)
relatively low visual and radar detection range of the yacht
yacht was relatively less conspicuous visually and on radar
yacht’s radar echo was not identified and actively monitored
bridge team workload (four course changes in 22 minutes before collision and watch change)
change in relative bearing of the yacht (and other lights) after each course change
bridge team members’ focus on individual tasks during that period of high workload
inattentive lookout for small craft that could reasonably be expected off Moreton Island.
In the time leading up to the collision, the pilot was busy conning the ship. His attention was probably focused on navigation aids, other visual cues, and the ship’s heading and rudder indicator. The helmsman would have been concentrating on executing the pilot’s helm and course orders. The fourth mate was occupied in fixing the ship’s position. The chief mate was probably focused on monitoring the helm orders, their execution, and the ship’s progress in the channel.
While Blazing Keel was not fitted with an AIS unit or a radar reflector to improve detectability (both optional for the yacht), its radar echo and trail were consistently visible after 0400. Therefore, it is reasonable to expect the chief mate (standing beside the radar) to have identified the approaching target. Its lights would also have been visible until less than a minute before the collision (a blind sector existed within a narrow arc of the horizon up to about 150 m ahead of Kota Wajar’s bow).
While a dedicated visual lookout may not have necessarily seen the yacht in those conditions, posting one would have ensured that that person could give their full and undivided attention to the task, including using binoculars. Furthermore, such a dedicated lookout was a requirement of the applicable international rules and standards, and of the ship’s procedures.
Kota Wajar’s bridge team that night for the 3 hour pilotage essentially comprised the pilot, OOW and helmsman. Another seaman to act as a lookout/relief helmsman was not assigned. The fourth mate left the bridge once the pilot boarded and, about 45 minutes later, the master also left.
The evidence indicates that the lack of a dedicated lookout on 6 July was probably usual for that situation. The ship had regularly called at Brisbane and the master had sailed on PIL-managed ships for many years. It is likely that when the duty seaman was the helmsman (day or night) no other person was necessarily assigned lookout duties. The accounts of the bridge team members did not indicate that anyone thought there was no dedicated lookout that night. It is possible that it was considered that the OOW and pilot would sight and detect any traffic.
Conclusion
Key matters with respect to the lookout kept on board Kota Wajar were:
In the time leading up to the collision, a proper lookout by sight, hearing and all available means, including radar, in accordance with the COLREGS, was not maintained.
The lack of a dedicated visual lookout, high bridge team workload and local conditions, such as background lights ashore, were factors in the yacht not being detected by sight or radar.
The ship’s SMS procedures with regard to posting a dedicated visual lookout, consistent with international regulations and standards, were not effectively implemented.
Blazing Keel’s lookout
Blazing Keel’s skipper and his wife both held a Queensland recreational marine driver licence (RMDL). The competency standards[19] for the RMDL include the application of the COLREGS to ensure safe navigation. The standards pay particular attention to key COLREGS, including Rule 5. Therefore, the skipper and his wife should have been aware of the importance of keeping a proper lookout and how to effectively do so.
On 6 July, the yacht’s radar was not operational and it was not fitted with an AIS unit. The means of keeping a lookout were, therefore, limited to sight and hearing. The skipper and his wife kept a lookout from the yacht’s cabin from where it was not possible to keep an all-round lookout. The cabin’s roof restricted vision in an upward direction and its windows limited visibility. While red lights were being used at the helm position to avoid impacting night vision, the lights in the aft cabin and galley were being clearly reflected by the water.
Blazing Keel’s skipper was navigating using only the electronic chart plotter. The plotter provided a perspective of the yacht’s location with respect to beacons and channels in real time. However, it was of little use in keeping a lookout. With no radar and the self-imposed limitations of keeping a visual lookout from the yacht’s cabin, navigating in darkness inherently involved a higher risk of collision. Further, the skipper was not experienced in navigating the yacht at night. Therefore, in the prevailing circumstances and conditions, a proper lookout was not being kept.
In accordance with COLREGS Rule 22, Kota Wajar’s masthead lights were required to be visible at least 6 miles off, and its sidelights and sternlight at least 3 miles off. Therefore, by about 0355, the ship’s masthead lights should have been visible from Blazing Keel’s location. By 0405, its sidelights should also have been visible. As the yacht’s heading was about 220°, the ship’s relative bearing was nearly abeam to starboard.
By 0410, the ship’s navigation and deck lights should have been clearly visible from the yacht. The ship was 2.2 miles off, just abaft the starboard beam. By 0413, when it was 1.6 miles and abeam, the skipper decided to cross the shipping channel near M7 beacon. At interview, he stated that he and his wife looked but saw no ships in the channel. Therefore, either they could not see Kota Wajar’s lights from their positions in the yacht’s cabin or they did not look in its direction.
By 0415, Blazing Keel was crossing the channel on a south-westerly course. Kota Wajar was about 1 mile off near M5 beacon. Had the skipper or his wife focussed their attention, they would have seen the ship’s lights nearly on the starboard beam. The lights would have become more conspicuous as the ship closed.
By about 0418, the ship’s lights were probably above the line of sight from the yacht’s cabin due to its roof and their considerable height in relation to the yacht. Therefore, it was not unexpected that the skipper and his wife heard the impact of the collision but sighted nothing until the skipper saw ‘the lights of the aft cabin illuminate the hull of a ship’. It was only after the yacht was astern of the ship that the skipper saw the lights at its stern.
The possible reasons why Blazing Keel’s skipper and his wife did not detect Kota Wajar were:
inadequate visual lookout
low height of eye (about 2 m)
backscatter from the yacht’s own lights
sea spray on the yacht’s cabin windows
cabin limitations (windows, structures, roof)
traffic in channel not checked from outside cabin
ship’s bearing close to abeam (likely focus ahead)
lack of experience navigating at night (in darkness)
inexperience identifying a ship’s navigation lights
not equipped with AIS receiver unit to detect ships
navigating in darkness without radar (inoperational)
effects of the time of day (night) and/or reduced sleep
focus on chart plotter for navigation (passive monitoring)
focus on crossing channel and course change before the collision
no active monitoring and visual identification of navigation aids (beacons).
Immediately after the collision, the skipper thought that the yacht had collided with a beacon. Had he been actively monitoring (including visually) the passage, he would have known that his yacht was clear of M7 beacon, the only one in its vicinity. The skipper and his wife’s accounts of the incident indicate that most of the above reasons were relevant that night - it is evident that a proper and effective lookout was not kept.
In summary, a proper lookout by sight, hearing and other means, in accordance with the COLREGS, was not maintained on board Blazing Keel. Undertaking the night passage across Moreton Bay without radar increased collision risk, and was inappropriate. The risk increased further due to the ineffective visual lookout - a significant contributing factor to the incident.
Passage planning
Adequate appraisal and planning for a passage can ensure its safe execution and completion. Planning for a passage, including the proper allocation and use of resources, is a part of bridge resource management (BRM). Effective BRM is the product of a sufficient number of bridge team members with appropriate abilities and skills utilising available navigational aids and tools to carry out planned tasks in accordance with their defined roles and responsibilities. Ideally, this should always be the case but it is particularly important during a pilotage due to the higher risks.
Some important matters applicable to the respective passages of Blazing Keel and Kota Wajar through Moreton Bay on 6 July 2014 appear to have not been properly planned or considered.
Blazing Keel
Blazing Keel’s skipper’s planning focused mainly on arriving off Curtin Artificial Reef in daylight on 5 July, resting overnight and diving on the reef on the following day. He intended to follow the usual tracks to and from the reef, which were saved on the yacht’s chart plotter.
The fact that the yacht’s radar had not been operational for more than a year indicates that the skipper had not planned for contingencies, such as navigating in darkness. Nor had the weather and wind conditions that could be expected been properly considered.
The skipper believed that the easterly winds as the yacht sailed to Moreton Island on 5 July (Saturday) would continue over the weekend. However, by sunset, westerly winds had set in across the bay as could be expected in the evening and night. When Blazing Keel’s anchor chain began paying out as the clutch began slipping under load in the early hours of 6 July, the skipper decided to return to the marina. No other options, such as using more anchor chain to reduce the load, re-anchoring in another position, waiting for daylight or seeking a more sheltered place, were considered.
The long passage across Moreton Bay in darkness without radar involved a high risk to the yacht and its crew. Considering other options would have been prudent, primarily in terms of making an informed decision on whether taking the risks associated with the night passage across Moreton Bay was appropriate. As it happened, the weather conditions remained much the same and, by mid-morning, had moderated.
The skipper turned on Blazing Keel’s combined lantern in addition to other navigation lights. The combined lantern indicated a sailing vessel, whereas the yacht was a power-driven vessel at the time. While the skipper might have intended to make the yacht more readily visible, it was not displaying the lights as required by the COLREGS. Had the yacht been sighted by Kota Wajar’s bridge team, there would have been confusion in correctly identifying it as a power-driven vessel.
It is evident that there was no intention to keep a visual lookout from outside the cabin that night, including when approaching and crossing the shipping channel. Had the skipper and his wife properly checked for ships in the channel, they would have seen Kota Wajar about 1 mile off.
After the collision, the skipper used the handheld VHF radio to make an all-ships broadcast. The limited range of the radio probably contributed to the broadcast not being heard.
The evidence generally indicates that Blazing Keel’s trip was not properly planned nor were contingencies considered. Navigating at night without radar involved a particularly high risk. Proper and complete planning would have reduced risk and might have prevented the collision.
Kota Wajar
A berth-to-berth passage plan had been prepared for Kota Wajar’s voyage to Brisbane, where it had called regularly. The plan was documented using the standard forms in the shipboard SMS. The detailed plan covered many subjects and had been signed by the master and all the mates.
The plan did not include any specific reference to the composition of the bridge team. The standard ‘Pre-voyage passage plan checklist’ included two checks that could be considered to indirectly refer to precautions related to this subject. Check item 05 stated ‘Day/night passing of dangerous points considered’ and item 09 stated ‘Traffic – Area of congested water and narrow channel identified’. The checklist for the passage indicated that these checks were completed.
The remarks included in the plan for each leg of the passage were probably intended to adequately address items 05 and 09. The remarks for the legs of the pilotage where the collision occurred were identical and stated:
Narrow channel-Echo sounder on, when passing each buoy posn mark on chart and note down time in bell book or echo sounder log book. Keep clear reef & rock & Nogo area as marked on the charts. ISM checklist B08, & (B07, B09 as req.) (Vsl. under pilotage, D.off to assist pilot and master)
While the passage plan did not refer to the bridge team’s composition or a dedicated lookout, the ship’s procedures for watchkeeping arrangements (discussed earlier) were clear on this subject. However, a dedicated lookout was not posted. Specific remarks in the passage plan about traffic and keeping a lookout may have prompted greater vigilance during the pilotage. Similarly, taking into account the guidance for masters and mates of ships operating in Australian waters as per Marine Notice 17/2014, titled ‘Sound navigational practices’,[20] may have helped. The notice also lists their responsibilities when a pilot is on board, the first of which is to maintain a good lookout and situational awareness.
Brisbane Marine Pilots
The pilot used the standard BMP passage plan for Kota Wajar. The standard plan listed a number of OOW responsibilities. The first of these stated ‘Keep a good look out visually and on radar. Use ARPA and report targets to pilot including small fishing boats and yachts’. Excluding this general statement, the plan did not refer to traffic or areas where vessels, including small craft, were likely to be encountered. Neither was the subject discussed in the master-pilot information exchange.
While there are a number of reasons why the yacht went undetected, the pilot’s passage plan and local knowledge input may have increased the bridge team’s awareness of traffic in certain areas. The passage off Moreton Island is one such area where a greater number of small craft can be encountered. The island is a popular recreational area and activities include camping, fishing, parasailing, snorkelling and diving. The waters to the north of Cowan Cowan Point include Curtin Artificial Reef and those south of it include the Tangalooma wrecks. A number of suggested routes for small craft lie adjacent to, or cross, the shipping channel off the island. The area is also one where background lights can affect the visibility of targets in the foreground. Furthermore, the course changes required in the shipping channel increase the bridge team workload.
Although the master is responsible for ensuring a proper lookout is kept, the pilot jointly manages risk during pilotage. Given the pilot’s primary role is providing local knowledge, it then follows that information with respect to local traffic to better manage associated risks should be a priority.
In submission to the draft of this investigation report, BMP advised that interaction with other vessels, particularly small craft, was discussed amongst its pilots and reviewed by its risk management team. The team concluded that such interactions occur throughout the pilotage and, therefore, highlighting any particular area in its passage plan would not effectively address the risk. However, BMP stated that it would consider a range of other measures to address the risk.
In this occurrence, BMP’s standard passage plan and the master-pilot information exchange did not draw attention to any areas of higher risk of collision or prompt Kota Wajar’s bridge team to keep a proper lookout. The passage plan and the information exchange did not ensure that the ship’s bridge team was provided with adequate information on local traffic and areas where attention must be paid to other vessels,including small craft.
Collisions between ships and small vessels
In the past 26 years, 63 collisions between trading ships and small vessels have been reported to the ATSB or its predecessor. Of these, 41 have been investigated,[21] and the failure to keep a proper and effective lookout has been identified as one of the recurrent contributing factors.
While there is no substitute for a proper lookout, small vessels can improve their detectability with aids such as AIS transceivers and radar reflectors. An AIS transceiver can also assist small vessel crews in the early detection of ships and provide important dynamic and static ship information.
Collisions can also be prevented if navigators on ships and small vessels exercise greater caution in areas where they are likely to encounter each other. In addition to ports, harbours and coastal waters in general, it is important to be particularly vigilant in specific areas. For example, ships should be expected in charted shipping channels, recommended routes, two-way routes, deep water routes, preferred tracks, traffic separation schemes and other similar fairways. On the other hand, small vessels are more likely to be encountered near the shore and in recreational areas, such as reefs, diving areas and fishing grounds.
Navigators today have comparatively easy access to information. For example, electronic chart plotters are common even on small craft and provide accurate information such as the locations of shipping channels. A small vessel that avoids a shipping channel significantly reduces the risk of collision with a ship.
While measures to prevent collisions might appear straightforward, the recurrent contributing factors in collisions between ships and small vessels indicate that implementing such measures is not. The contributing factors invariably include a failure to keep a proper lookout on board one or both vessels and the absence of early and appropriate action to avoid collision.
The past 26 years of safety investigations into collisions between trading ships and small vessels on the Australian coast have consistently shown that keeping a proper lookout and taking early avoiding action in accordance with the COLREGS could have effectively prevented those collisions in almost every instance.
The safety lessons from those investigations have been published in ATSB investigation reports. A number of ATSB safety bulletins also highlight these risks to educate seafarers and mariners. These documents and other safety information about marine safety issues are available on the ATSB website.
At about 0419 on 6 July 2014, in clear visibility at night, the container ship Kota Wajarcollided with the yacht Blazing Keel in Moreton Bay. The ship was southbound in the shipping channel while the yacht was crossing it. The yacht suffered damage but its watertight integrity was maintained and the two persons on board were not injured.
From the evidence available, the following findings are made. These findings should not be read as apportioning blame or liability to any particular organisation or individual.
Safety issues, or system problems, are highlighted in bold to emphasise their importance. A safety issue is an event or condition that increases safety risk and (a) can reasonably be regarded as having the potential to adversely affect the safety of future operations, and (b) is a characteristic of an organisation or a system, rather than a characteristic of a specific individual, or characteristic of an operating environment at a specific point in time.
Contributing factors
A proper lookout, in accordance with the international regulations for preventing collisions at sea (COLREGS), was not maintained on board Kota Wajar. A dedicated visual lookout was not posted and radar was not appropriately used.
Kota Wajar’s safety management system procedures with regard to posting a dedicated lookout were not effectively implemented.[Safety issue]
The high workload of Kota Wajar’s bridge team and local conditions, such as background lights ashore, were factors in Blazing Keel not being detected by sight or radar.
A proper lookout, in accordance with the COLREGS, was not maintained on board Blazing Keel. The yacht was navigating at night without radar and the lookout kept by sight was ineffective.
Blazing Keel’s diving trip was not properly planned, contingencies were not considered and the night passage was undertaken without radar since the equipment had been inoperational for more than a year.
Other factors that increased risk
All of Blazing Keel’s available navigation lights, including the combined lantern permitted by the COLREGS for sailing vessels, were turned on. As the 13.4 m yacht was a power-driven vessel at the time, the lights displayed were not in accordance with the rules and confusing.
The inclusion of specific remarks in Kota Wajar’s passage plan with regard to traffic and keeping a proper lookout may have prompted greater vigilance during the pilotage.
Brisbane Marine Pilots’ standard passage plan and master-pilot exchange did not ensure that a ship’s bridge team is provided adequate information with respect to local traffic and areas where attention must be paid to other vessels, including small craft. [Safety issue]
Over the past 26 years, investigations into 41 collisions between trading ships and small vessels on the Australian coast have identified that not maintaining a proper lookout and taking early avoiding action, in accordance with the collision regulations, has been a consistent and continuing contributor to such collisions. [Safety issue]
Other findings
Fitting Blazing Keel with an automatic identification system (AIS) transceiver would have improved its detectability and detection range while allowing those on board the yacht to detect and identify ships at long ranges.
Safety issues and actions
The safety issues identified during this investigation are listed in the Findings and Safety issues and actions sections of this report. The Australian Transport Safety Bureau (ATSB) expects that all safety issues identified by the investigation should be addressed by the relevant organisation(s). In addressing those issues, the ATSB prefers to encourage relevant organisation(s) to proactively initiate safety action, rather than to issue formal safety recommendations or safety advisory notices.
Depending on the level of risk of the safety issue, the extent of corrective action taken by the relevant organisation, or the desirability of directing a broad safety message to the marine industry, the ATSB may issue safety recommendations or safety advisory notices as part of the final report.
Where relevant, these safety issues and actions will be updated on the ATSB website as information comes to hand. The initial public version of these safety issues and actions are in PDF on the ATSB website.
Proper lookout
Kota Wajar’s safety management system procedures with regard to posting a dedicated lookout were not effectively implemented.
Brisbane Marine Pilots’ standard passage plan and master-pilot exchange did not ensure that a ship’s bridge team is provided adequate information with respect to local traffic and areas where attention must be paid to other vessels, including small craft.
Over the past 26 years, investigations into 41 collisions between trading ships and small vessels on the Australian coast have identified that not maintaining a proper lookout and taking early avoiding action, in accordance with the collision regulations, has been a consistent and continuing contributor to such collisions.
On 6 July 2014, ATSB investigators attended Kota Wajar while the ship was berthed in Brisbane. The master and directly involved crew members each provided their accounts of the time of the collision. Photographs of the ship and copies of relevant documents, including log books, reports, records, manuals and procedures were obtained. The voyage data recorder was downloaded.
The pilot provided his account of the time of the incident at the offices of Brisbane Marine Pilots (BMP). The investigators also attended Blazing Keel, where the skipper and his wife provided their accounts of the collision. Photographs and relevant information was obtained. Further evidence was provided by the Queensland Police Service (QPS) and Maritime Safety Queensland (MSQ).
References
Australian Maritime Safety Authority (AMSA), Marine Notice 17/2014, Sound navigational practices, AMSA, Dec 2014.
Under Part 4, Division 2 (Investigation Reports), Section 26 of the Transport Safety Investigation Act 2003, the ATSB may provide a draft report, on a confidential basis, to any person whom the ATSB considers appropriate. Section 26 (1) (a) of the Act allows a person receiving a draft report to make submissions to the ATSB about the draft report.
A draft of this report was provided to Kota Wajar’s master, chief mate, fourth mate, helmsman, its managers, Pacific International Line (PIL), the pilot, BMP, Blazing Keel’s skipper, the Australian Maritime Safety Authority (AMSA), QPS, MSQ and the Maritime and Port Authority of Singapore (MPA).
Submissions were received from Kota Wajar’s master, PIL, the pilot, BMP, Blazing Keel’s skipper, AMSA, MSQ and MPA. The submissions were reviewed and where considered appropriate, the text of the report was amended accordingly.
Purpose of safety investigations
The objective of a safety investigation is to enhance transport safety. This is done through:
identifying safety issues and facilitating safety action to address those issues
providing information about occurrences and their associated safety factors to facilitate learning within the transport industry.
It is not a function of the ATSB to apportion blame or provide a means for determining liability. At the same time, an investigation report must include factual material of sufficient weight to support the analysis and findings. At all times the ATSB endeavours to balance the use of material that could imply adverse comment with the need to properly explain what happened, and why, in a fair and unbiased manner. The ATSB does not investigate for the purpose of taking administrative, regulatory or criminal action.
Terminology
An explanation of terminology used in ATSB investigation reports is available here. This includes terms such as occurrence, contributing factor, other factor that increased risk, and safety issue.
Publishing information
Released in accordance with section 25 of the Transport Safety Investigation Act 2003
Ownership of intellectual property rights in this publication
Unless otherwise noted, copyright (and any other intellectual property rights, if any) in this report publication is owned by the Commonwealth of Australia.
Creative Commons licence
With the exception of the Coat of Arms, ATSB logo, and photos and graphics in which a third party holds copyright, this publication is licensed under a Creative Commons Attribution 3.0 Australia licence.
Creative Commons Attribution 3.0 Australia Licence is a standard form licence agreement that allows you to copy, distribute, transmit and adapt this publication provided that you attribute the work.
The ATSB’s preference is that you attribute this publication (and any material sourced from it) using the following wording: Source: Australian Transport Safety Bureau
Copyright in material obtained from other agencies, private individuals or organisations, belongs to those agencies, individuals or organisations. Where you wish to use their material, you will need to contact them directly.
On 11 July 2014, train ST24, a scheduled XPT passenger service, returning to Sydney Central Station from Melbourne Southern Cross Station, derailed at turnout MYD887 near North Melbourne station in Victoria. Turnout MYD887 was installed as part of the Regional Rail Link project. While certified for standard gauge revenue operations earlier that week, it had not been used by XPT services until the day of the derailment.
As a result of the derailment, there were minor injuries to some passengers and the train’s crew, as well as damage to track and rolling stock.
What the ATSB found
The ATSB found that the derailment of ST24 occurred at a type 37 mixed gauge turnout (MYD887), as the wheelset of a carriage (probably XAM2176) transitioned from the standard gauge short stock rail onto the broad gauge switch blade through the transfer area. It was determined that there were design deficiencies of the type 37 turnout with respect to transfer area width, guard rail protection, and capacity of the tie bar to resist elongation, that contributed to the derailment.
Earlier that morning the same train, travelling from Sydney as ST21, derailed at a similar type 37 mixed gauge turnout (MYD882) but re-railed a short distance later. The train crew felt the train bounce but were unaware that it had derailed, so continued into Southern Cross Station. The incident was reported to operational staff and the track was being inspected at the time ST24 derailed at turnout MYD887.
Post-derailment, an examination of the type-approved design of the type 37 turnout determined that it was lacking, in that it had been assumed that the type 37 turnouts would perform safely in service based solely on the performance of a similar (type 29) dual gauge turnout, although there were significant differences between the two turnout types.
The ATSB determined that there were no maintenance deficiencies with train ST24 that contributed to the derailment.
What's been done as a result
V/Line has actively managed the redesign, alteration and validation of the type 37 turnout, to support the safe operation of standard gauge rolling stock having wheel rim widths of 127 mm, including a comprehensive review of contractual arrangements, testing and commissioning processes.
Safety message
Proposed infrastructure changes, including those put forward by contractors, need to be thoroughly assessed at the design stage to ensure that they meet all operational and safety requirements.
Once constructed, infrastructure needs to be rigorously tested as part of the commissioning process to ensure that the changes are safe and perform to the original design intent.
Preliminary report
Report release date: 25/09/2014
This preliminary report details factual information established in the investigation’s early evidence collection phase and has been prepared to provide timely information to the industry and public. Preliminary reports contain no analysis or findings, which will be detailed in the investigation’s final report. The information contained in this preliminary report is released in accordance with section 25 of the Transport Safety Investigation Act 2003.
The Occurrence
The information contained in this Preliminary report is released in accordance with section 25 of the Transport Safety Investigation Act 2003 and is derived from the initial investigation of the occurrence. Readers are cautioned that new evidence will become available as the investigation progresses that will enhance the ATSB's understanding of the accident as outlined in this Preliminary report.
On 11 July 2014, train ST21, a scheduled XPT passenger service, was travelling from Sydney to Melbourne. At Broadmeadows station (about 18 km north of the Melbourne CBD), a pilot boarded the train for the final part of the journey into Southern Cross station. The pilot was required to provide route familiarisation training for XPT drivers who were operating over the newly commissioned section of dual gauge track leading into and out of the Southern Cross station.
At about 0738, train ST21 entered the dual gauge ‘up’ fly over track and passed over MYD882 (dual gauge ‘up’ turnout), which was part of the newly commissioned track. As the train traversed the turnout, it bounced heavily. The pilot described it as ‘a short sharp dip in the track, similar to a short deep bog hole (mud hole)’ and explained that if the train hadn’t kept rolling, he would have thought they had derailed. The pilot immediately rang Southern Cross number 1 signal box and reported the occurrence. Number 1 signal box advised that they would arrange for a track inspection. The train continued into Southern Cross, where it was fuelled and joined by passengers and new crew, in readiness for the return journey to Sydney as train ST24.
At about 0830, train ST24 departed Southern Cross and travelled along the dual gauge ‘down’ fly over track on its journey towards Sydney. As the train approached signal MYD987, the driver observed a clear medium speed with ‘S’ indication. To the driver, this meant that the route was correctly set and that the train could traverse MYD887 (dual gauge ‘down’ turnout) at up to 25 km/h. As the train traversed the turnout at about 20 km/h, the driver and pilot felt several large jolts, followed by a series of fault indications on the driver’s display screen as the train came to a standstill. The pilot then rang the train controller and advised that train ST24 had derailed on the fly over. When the site was secured, the driver walked back to inspect the extent of the damage. Recovery personnel arrived shortly thereafter and commenced disembarking passengers.
Investigators from the ATSB and the Chief Investigator Transport Safety (CITS) Victoria attended the site and began gathering/protecting perishable evidence, including site data, photographs, measurements, CTC data logs and train data logs.
The investigation is continuing and will include an examination of the following:
Design, quality control, commissioning and acceptance testing processes for dual gauge turnouts.
The process for identification and examination of potential infrastructure or rolling stock defects that may result in derailment, following reports of suspected infrastructure irregularities.